
Apple scrap vinegar is an easy substitute to the real apple cider vinegar. You can make apple scrap vinegar at home in just a few steps and have a great ingredient that you can use a million different ways. I’ll show you how.
When you live this homesteading lifestyle, you develop an allergy to throwing food away.
You see… It takes so much energy to grow food that when success finds you, you’re going to make darn sure that not a single bit of it is wasted.
And if you didn’t eat it, your kids didn’t eat it, your husband didn’t eat it, your mother or his mother didn’t eat it, you didn’t manage to do whatever else with it… Well, the animals will enjoy it and you’ll most likely make sure to use their poop to fertilize the garden!
Nothing really goes to waste on the homestead. And we like it that way.
Homemade Apple Scrap Vinegar…

As a homesteader, you also develop the ability to maximize the useof everything.
You use whey to make just one more cheese before you use it to make bread.
A useless barrel might turn into a dog house, and toilet paper rolls become little tiny pots that you can start seeds in.
Combine the no-waste with the let’s-turn-this-into-something-useful attitude and you can be sure that a homesteader is not going to let a pile of apple scraps go to the compost pile or the chickens before he or she squeezes the life out of it.
And so, what shall a homesteader do with a pile of perfectly beautiful apple scraps?
Well, apple scrap vinegar, of course!
What is Apple Scrap Vinegar…
Apple scrap vinegar is a simple way to turn apple scraps into apple vinegar.
Is it the same as apple cider vinegar?
No, it’s not.
Apple cider vinegar is made with real, raw apple cider that has enough natural sugar in it that you don’t have to add additional sugar when you’re making vinegar.
Apple scraps, still have a lot of great apple taste in them (and natural yeast which is required for the fermentation process) but they don’t have enough sugar to carry the fermentation process so to help them we add a bit of sugar into the mix.
Apple cider vinegar is healthier and maybe more rich and flavorful. If you want to learn more about making real apple cider vinegar, check out this great post.
I like keeping things simple… and to tell you the truth, I don’t care much for vinegar, any kind. I simply don’t like the taste.
Yet, it’s an ingredient that has to take some space in any home because there are simply way too many things you can do with it aside from drinking it or using it to prepare food.
So… Apple scraps vinegar is good enough for me.
It might not be as “real” as apple cider vinegar but it’s still very close to it.
What are the Ingredients in Apple Scrap Vinegar?
We really only need a few things to make apple scrap vinegar at home…
Apple scraps – since we are using apple scraps; peels and cores, it’s best to use organic apples.
If you don’t use organic apples that’s fine too just make sure to wash your apples well before you peel them.
Water – use non-chlorinated water.
Sugar – we are going to use one tablespoon of sugar per one cup of water to cover the apple scraps with. This sugar will feed the bacteria that is responsible for the fermentation process and at the end of the process it will all be gone.
Tools For Making Apple Scrap Vinegar…
Aside from the ingredients above, we are going to need a few things…
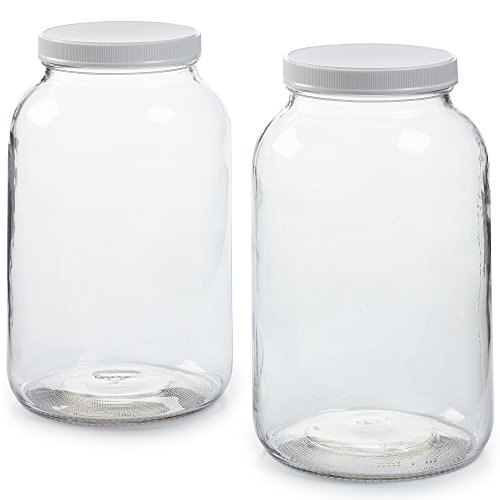
A jar – I used a gallon jar and another quart jar to fit my apple scraps. You can use whatever size jar that you want.
Large measuring cup – to mix the sugar and water in.
Fermentation weight – to keep the apple scraps under the sugar water.
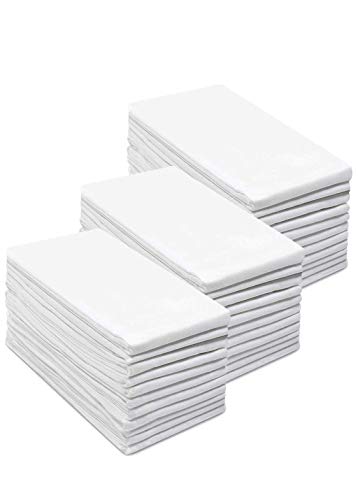
Thin towel – I use these flour sack towels a lot in my kitchen. They are perfect to allow air in while keeping flies and such out.
Rubber band – we’ll need a band to secure the flour sack towel to the rim of the jar.
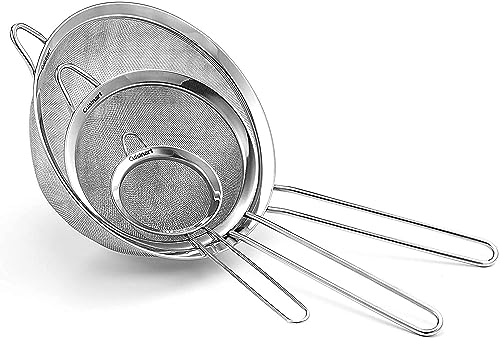
Strainer – to strain the vinegar.
Bowl – I strained my vinegar into a bowl and then transferred in into a clean jar.
All right, we are ready to make apple scrap vinegar!
How to Make Apple Scrap Vinegar…

I start by adding apple scraps (can be peels and cores) to a jar so they fill about 3/4 of it…

Then I use a measuring cup or pitcher and add one tablespoon of sugar to every one cup of water. I stir this until the sugar dissolves…

And add the sugar water to the jar…

I make sure to leave a couple of inches of headspace.
Now, it’s important to keep the apple scraps submerged. The easiest way to do this is by using a fermentation weight. Any apple pieces that float on the top and get in contact with the air will mold.

I cover the top of the jar with a thin flour sack towel and secure it with a rubber band to allow air but keep the flies away.
Now I place the jar on a shelf somewhere or on my kitchen counter… Somewhere at room temperature out of the way kinda spot, where I can leave the jar for two weeks.
Note that some people leave their apple scrap vinegar to ferment up to six weeks. The longer you go the stronger the vinegar is.
I find that two weeks with the scraps is enough for me. I’ll leave it for a couple more weeks without the scraps after I strain (you’ll see below).

**You can see that I didn’t do a good job keeping the apple scraps submerged… Still, my apple scrap vinegar turned out just fine, but do make sure to use the proper fermentation weight when you do this so your chances for success are as close to 100% as possible.
After a few days, you’ll notice the fermentation bubbles. Apple peels have natural yeast in them, and the good bacteria that is developing in the process is busy breaking down the sugar we added to the water.
You’ll also notice that the apple scraps stat to change their color. That’s normal too.

Just let it sit there… If you notice a brown jelly-like thingy at the top, that a mother. And it means that your vinegar is doing great!
A mother is basically a colony of bacteria and it floats. Leave it there for now, but later you can fish it out and save it in another jar covered with vinegar.
You can add it later when you make more apple scrap vinegar to jump-start the fermentation process.
Straining Homemade Apple Cider Vinegar…

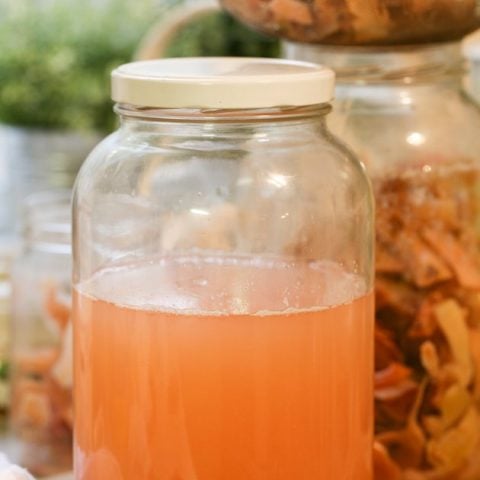
After two weeks (or more if you choose to leave your apple scrap vinegar longer), it’s time to strain the vinegar and remove the scraps.
I place my strainer over a large bowl and pour the jar onto the strainer. The strainer catches the apple scraps and the bowl catches the apple scrap vinegar.

Then, I place the strainer over a clean jar and run the vinegar through it again and into the jar.
I cover the jar with the thin towel again and secure it with the rubber band.
At this point, I let the vinegar sit at room temperature for another two weeks or so to get the final vinegary taste and smell.

That’s it! After a couple of weeks, you can close the jar and store it.
Some like keeping it in the fridge, I just leave it in one of my kitchen cupboards and it seems to be happy there at room temperature.
Vinegar can keep indefinitely. It will get stronger at the beginning and then if you don’t use it, it will gradually weaken.
I’m sure that you won’t have a problem using it within a year though. I’ll make another batch after that (or long before that).
This was simple, right?
You can use this vinegar as you would use any other vinegar however, we do not want to use homemade vinegar when canning.
We need to make sure that we use vinegar with a 5% acidity for canning safety, and since we don’t really have a way to check the percentage of acidity, it’s better to not use this vinegar when canning.
But other than that, go ahead and use your vinegar however else you’ll use vinegar!
I hope that you liked this post! Here are a couple of recipes that will produce a whole lot of apple scraps for you to use…
Apple Butter Recipe For Canning
How to Dry Apples in the Oven (Apple Chips)
And if you are interested in more fermenting recipes, check these out…
Apple Scrap Vinegar
Make apple scrap vinegar at home with this easy recipe.
Ingredients
- Apple scraps (from organic apples preferably) to fill 3/4 of a gallon jar
- 5 tablespoons Sugar
- Non- chlorinated water
Instructions
- Place the apple scraps in a jar so they fill 3/4 of it.
- Add one tablespoon of sugar to every one cup of water and dissolve. Add the water to the jar of apple scraps. Keep adding sugar water to the jar until it covers the apple scraps.
- Place a fermentation weight on the scraps to make sure that they are all submerged under the water.
- Cover the jar with a thin towel and secure it with a rubber band. Place on the shelf or kitchen counter (at room temperature) for two weeks.
- After two weeks, place a strainer over a large bowl and strain the vinegar. The scraps can go to the chickens or to the compost pile. Place the strainer over a clean jar and strain the vinegar again into the new jar.
- Cover the jar with the thin kitchen towel, secure with a rubber band, and place away for another two weeks.
- That's it! Cap the jar and store in your pantry.
Notes
If you want, you can leave your apple scrap vinegar to ferment for more than two weeks. Up to six weeks. It will get stronger with time. I find that two weeks with the scraps in there and two weeks without the scraps is the right strength for me.
If you find that a jelly-like brown stuff is forming at the top of your vinegar, that's a sign of success! This jelly thing is called a vinegar mother and it's basically a mass of bacteria.
You can remove it at the end and either toss it or keep it in a jar in the fridge covered with vinegar. You can use it to "jump-start" another batch of vinegar in the future.
You can use apple scrap vinegar the same way that you would use any other vinegar, however, you can't use it for canning since we have no way of checking it's acidity level.
Recommended Products
As an Amazon Associate and member of other affiliate programs, I earn from qualifying purchases (there is no change in product cost or charge to you! Thank you for helping me support the blog).
-
 2 Pack - 1 Gallon Glass Jar w/Plastic Airtight Lid, Muslin Cloth, Rubber Band - Wide Mouth Easy to Clean - BPA Free & Dishwasher Safe - Kombucha, Kefir, Canning, Sun Tea, Fermentation, Food Storage
 -
6-Pack Easy Fermentation Glass Weights with Handles for Keeping Vegetables Submerged During Fermenting and Pickling, Fits for Any Wide Mouth Mason Jars, FDA-Apporved Food Grade Materials
-
Simpli-Magic 79146 Flour Sack Towels, 28''x28'', White, 12 Pack
-
Cuisinart Set of 3 Fine Mesh Stainless Steel Strainers


Hi! I’m Lady Lee. I help homesteaders simplify their homesteading journey while still producing a ton of food! I am a single mother of four, I was born in Israel and raised in an agricultural commune called a Kibbutz. Now I homestead in central NC.
Hii, i made this recipe. I am in the 3rd week where my vinegar to be is been strained and covered again by a kitchen towel and kept in a dark place. But i noticed a white covering on the top, is it ok? Thank u
Yes, that is probably the formation of what we call a “mother”. It might get rubbery and thicken. I can’t know for sure but that’s what it sounds like. Your vinegar should be ok.
Hello! I’m trying your apple scrap vinegar! Thank you for the detailed instructions on it.
So, if there’s mold just on the top, I can just discard that (saving the mother) and filter and use, right?
Thanks so much!
Beth Johnson
Pine Country Farm
California
Yes. After filtering try to keep it in a dark location,I feel like it’s discouraging the mold from growing back again.
Hi there when making acv do I need to add a “starter fluid”/mother ?
Thank you
In this method, you don’t. Just the water and the apple scraps.
I was only able to fill a giant jar about 1/2 way ….does it need to be 3/4 full? Or is 3/4 full the maximum that you should have ?
You want the right ratio of sugar water to apple scraps to make good and strong vinegar. So if you filled the jar half way with apple scraps, fill it about 3/4 full of sugar water. That should be fine.
I tried this and got what seemed like a good ferment—the jar overflowed a little, but it’s been about a month and it doesn’t smell or taste quite like vinegar, more like a weak beer. Any idea what I’ve done wrong?
Hi Kate, did you use organic apples?
Quick question – can you do this recipe for any fruit, i.e. pears?
Honestly, I’ve never tried. But I’ve never seen it done with any other fruit…
Hi, thank you for sharing.
I was told that I can use the whole apple. Would that be a correct option, or not?
I have never tried with whole apples so I am really not sure.
How long will it keep for?
Mine is in the cabinet for almost two years now and looks, smells, and tastes great! I keep it at room temperature in the cabinet under my sink (so a dark place).
Do you have to use sugar ? I am sugar free could you use Pyure or honey ?
Yes, you have to use sugar. It is the food for the bacteria but all of it is fermented in the process.
Here’s a recipe that uses honey.
https://www.thehealthyhomeeconomist.com/make-raw-apple-cider-vinegar/
I make this one all the time. I also save the scoby from the top at the end of each batch and add it to the vinegar after removing the apples scraps for the remaining 2–3 weeks. It makes sure to really get those good bacteria that will turn the alcohol (the bubbles from the fungus on the apples eating the sugar/honey) into vinegar.
I’ll check it out. Thanks!
CAN YOU PLEASE SING ME UP FOR YOUR NEWSLETTERS
Sure!