Grafting Fruit Trees – A Step by Step Picture Tutorial
This post may contain affiliate links, view our disclosure policy for details.
This is a step-by-step picture tutorial on grafting fruit trees. Every time I visit my home country Israel, I spend some time with a friend that grows olive trees for a living. He always teaches me something new and this time I was lucky enough to be there during the grafting season. Let’s join him in the field and learn how to graft fruit trees!
A couple of years ago, on our yearly trip to Israel to visit family, we met a local farmer who came to do some maintenance work on my ex-mother-in-law’s fruit trees.
I started following the guy like a lost puppy, and what do you know? He took me in.
After that day a couple of years ago, I wrote the post 4 Techniques of Grafting Fruit Trees which is one of the most successful posts on the blog (I’ll refer to it a lot in this post).
And I get why… Grafting is a tricky business. There are so many benefits to grafting, and people have been grafting fruit trees for years, but there are so few people who know how to do it and so many things that can go wrong. It’s like making cheese, you have to practice and practice and practice until you get it right.
This is why it’s so valuable to learn it first hand from someone that has a ton of experience.
Grafting Fruit Trees…
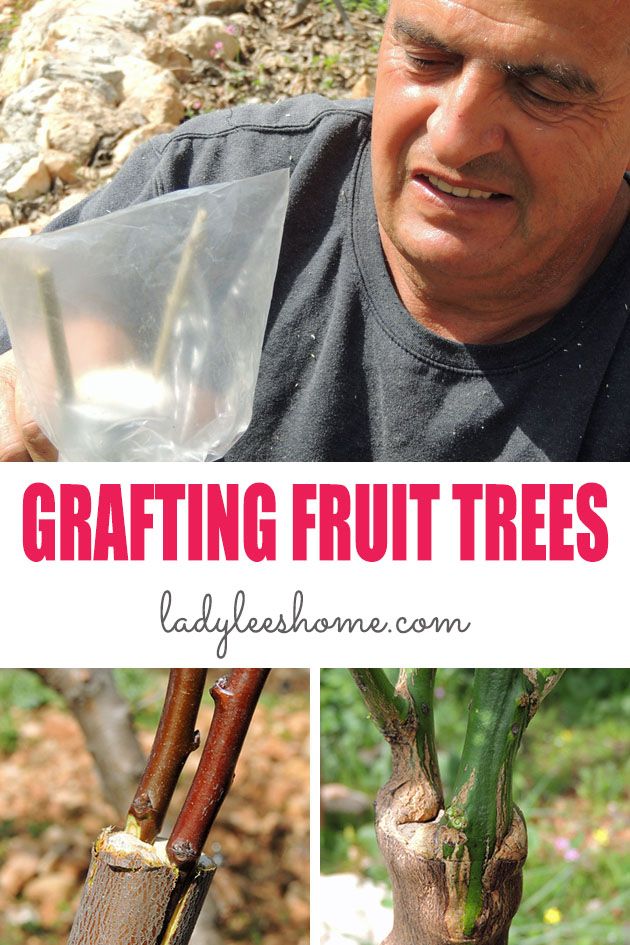
So today is your lucky day! Our last visit to Israel was during grafting season and we got to tag along on a day of grafting and fruit trees maintenance. I am sharing it all here with you!
Table of Content…
- What is Grafting?
- Benefits of Grafting Fruit Trees.
- Which Tree to Graft on Which Tree.
- When is The Best Time to Graft Fruit Trees?
- Tools for Grafting Fruit Trees.
- How to Graft Fruit Trees.
- Preparing the Tree for Grafting.
- Finding the Right Shoot to Graft.
- Grafting the Shoot on the Tree.
- How to Bandage a Grafted Tree.
- Creating a Greenhouse Effect to Protect the Grafted Tree.
- One More Example of Grafting a Fruit Tree.
- How Does a Successful Grafted Tree Look?
- Grafting Recap.
What is Grafting?
To graft means to join two living trees from the same family into one by uniting a shoot or a bud with a standing tree.
Benefits of Grafting Fruit Trees…
In my post 4 Techniques of Grafting Fruit Trees, I give a couple of examples of situations where you would graft another tree on your existing tree. Those might help you understand the benefits below much better so make sure you check them out. There are so many benefits to grafting…
Variety – the main benefit that comes to mind is having two (or more) different kinds of fruits on one tree, like, an orange and a lemon. Or two (or more) different varieties of fruit on the same tree, like, green apple and red apple.
Low maintenance -since you still have just one tree it means you still have to take care of just one tree. You don’t need additional space, you don’t need to water more, you don’t need to fertilize another tree or thin another tree or prune another tree, yet at the end of the day, you’ll get two different kinds of fruits.
Quick production – grafting also saves you waiting time. When you plant a new tree, it will take it a few years to start producing a nice amount of fruit for you. When you graft onto an existing tree you’ll have fruit ready for picking in just a couple short seasons.
Saving the tree – grafting can also save a sick or broken tree. You will see this in the tutorial below. What we did is used the trunk and roots of a tree that was not producing anymore to support a new tree.
Pest management – another benefit of grafting is fighting insects and diseases. If your tree is suffering but you know of another variety that is doing much better in your area, you can graft the new variety on your tree to help it produce better.
Pollination – some trees have a female and a male tree and you have to plant both in order for them to pollinate each other and produce fruit – this is called cross-pollination (in my post about choosing the right fruit trees I go over this in more details). Pears, plums, and pecans are among the trees in this group. So in this case, you can graft a female on a male or a male on a female and you will have one tree that can pollinate itself. Magic, huh?
Which Tree to Graft on Which Tree?
This is where experience comes in… Basically, you have to remember that the trees you join have to be from the same family for them to successfully “communicate”.
For example, trees within the prune family such as peaches, nectarines, and plums can be grafted together. Those can also be joined with an almond tree since it is from the same family.
Varieties of olives can be grafted onto one another. Different varieties of apples (such as Honeycrisp and Gala) or apples and crabapples can be grafted together.
You will have to make sure you check each combination before you graft. The best way, though, is to ask someone with experience. If you have grafted before and you know of a successful combination, please list it in the comments below. Hopefully, it will save someone a whole lot of work.
When is the Best Time to Graft Fruit Trees?
You can’t just graft any time of the year. It has to be done at the end of winter just before spring; before the tree starts to bud when the branches are still completely bare.
You want to do this on a sunny day but not a hot day. We want plenty of light but not a lot of heat.
Here in the South, it is best to graft somewhere at the end of February or the beginning of March. Pay attention to when your fruit trees usually start to bud and pay close attention to the weather.
Tools for Grafting Fruit Trees…
You’ll see in this post that we don’t use many tools for grafting. But the ones we do use can determine if the grafting is successful or not so they are super important. I found all of the tools that we used in Israel on Amazon. Here is what you’ll see us using in this grafting tutorial…
Chainsaw – we will use a chainsaw in order to prepare the tree for grafting.
Grafting knife – it’s so important that you use the right kind of knife! We need a straight edge, sharp knife.
Grafting tape – we’ll use the grafting tape (which is not a sticky tape) to hold the grafting together. This is very important because we must make sure that there is good contact between the shoots that we graft to the tree we graft on for them to be able to communicate.
Sticky tape – just so we can hold the grafting tape closed.
Produce bag – we are going to make a greenhouse effect with a produce bag in order to keep moisture around the grafted area. You’ll see below how it’s done with a simple produce bag.
Paper bag – if you live in a hot, sunny climate, you might need a paper bag to cover the grafted area in order to shade it a bit from the harsh sun. I explain more about this below.
Ok, now that we’ve covered the basics and gathered our tools, let’s get out to the field and see how it’s done…
How to Graft Fruit Trees…
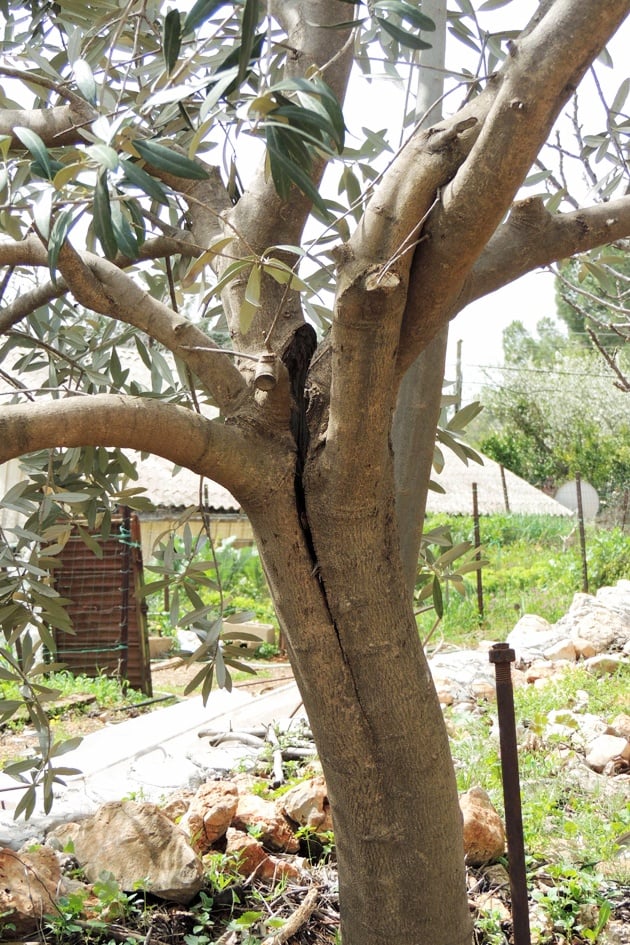
The first tree we grafted was my ex-mother-in-law’s olive tree. A couple of years ago, it was split in the center because of a load of snow and since then it stopped producing.
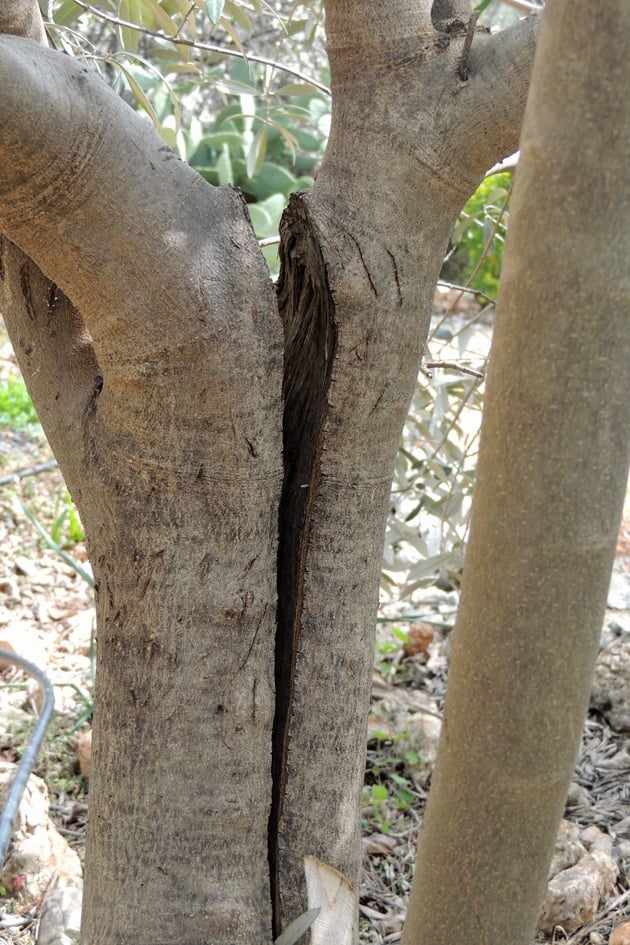
Here is another look at the trunk. It was split almost all the way to the bottom.
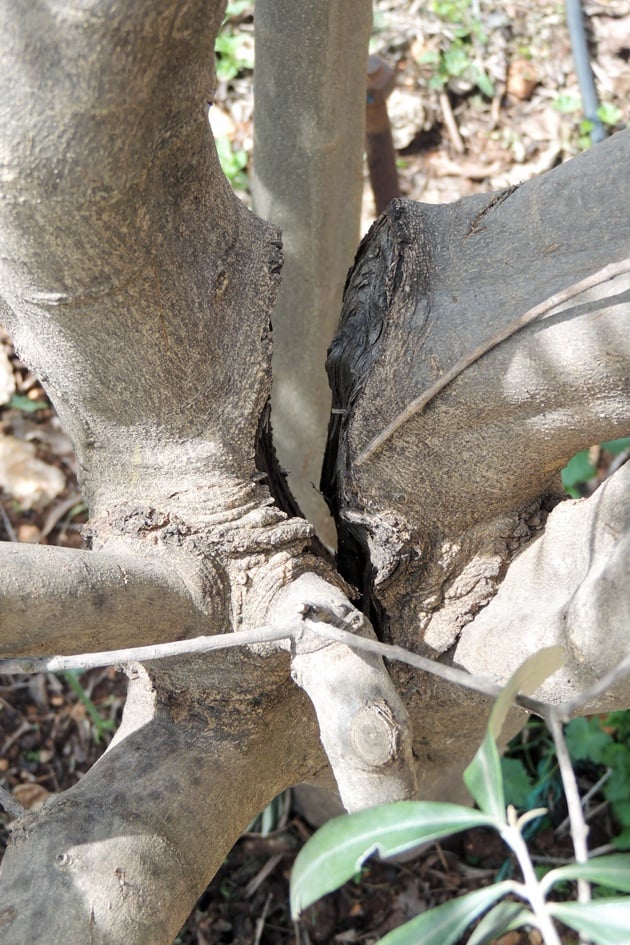
In this case, grafting was done in order to save the tree. Instead of pulling the tree out or just cutting it down and wasting the space, we took advantage of the already established root system and grafted a new olive variety on this existing tree.
Preparing the Tree for Grafting…
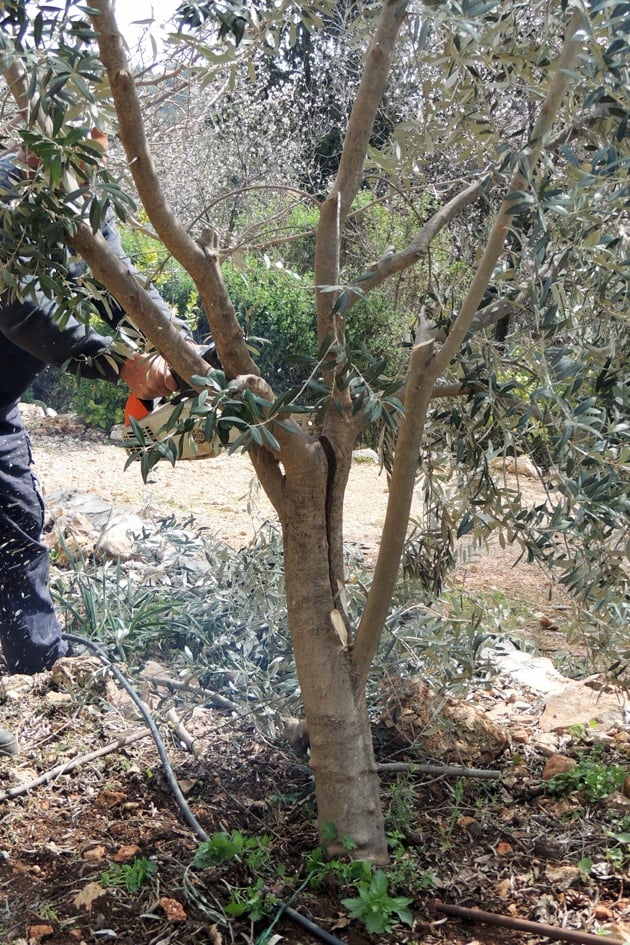
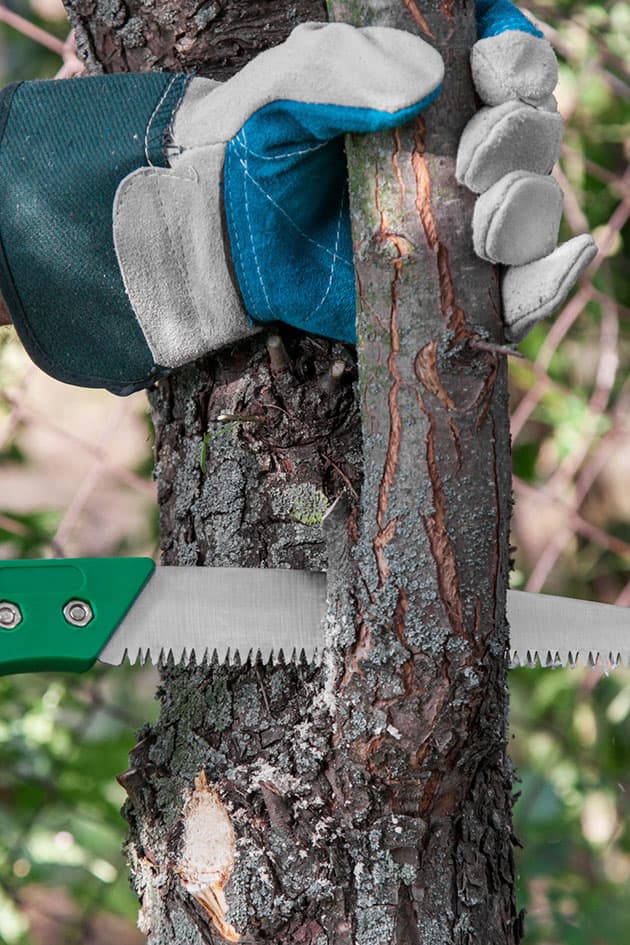
The first step was clean-up. We needed to cut the tree below the point where it split and prepare it for grafting.
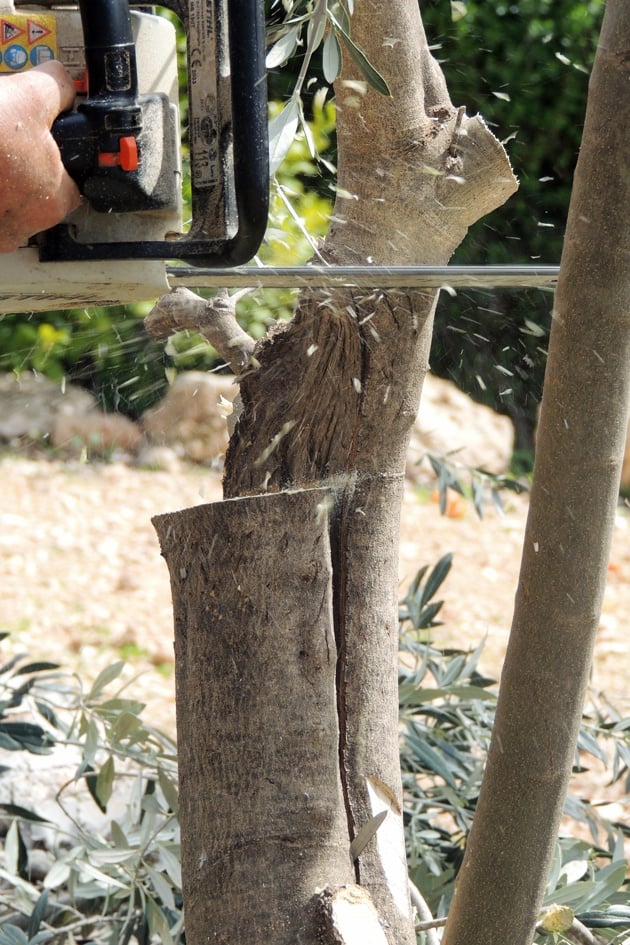
Raik (the local farmer I was talking about before) worked with a small chainsaw to cut off a little bit at a time…
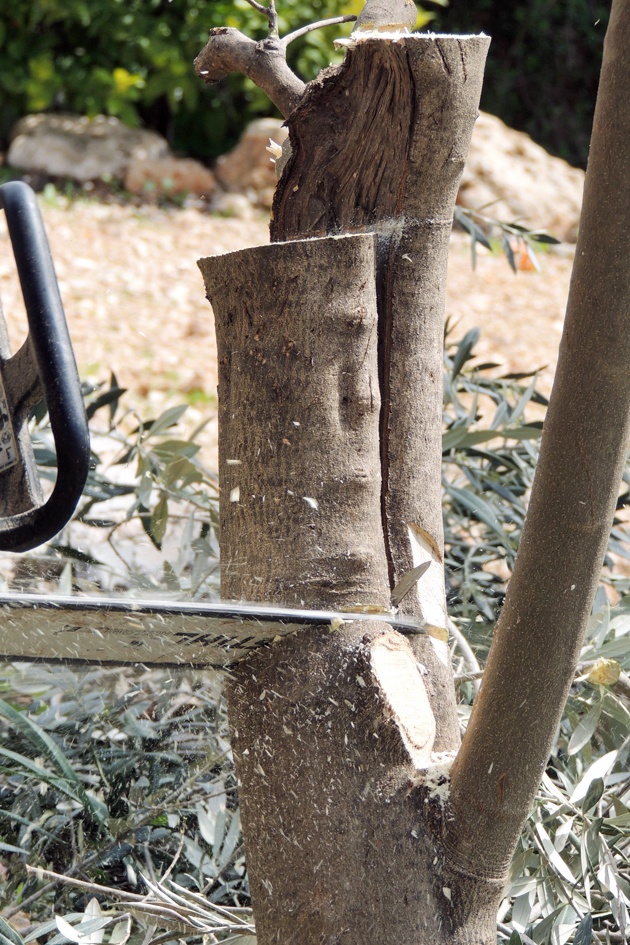
All the way down past the split…
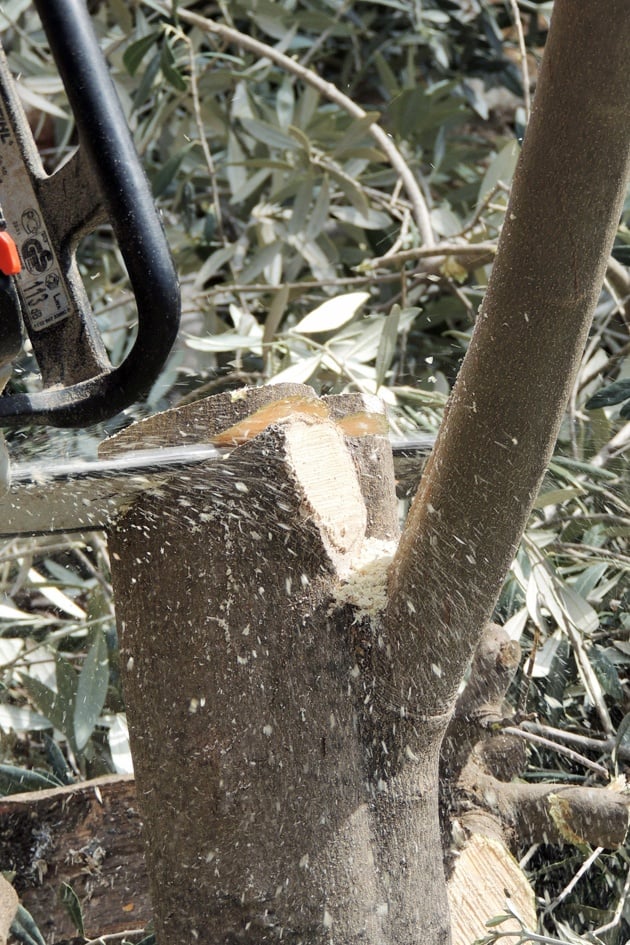
We didn’t want to cut more than necessary.
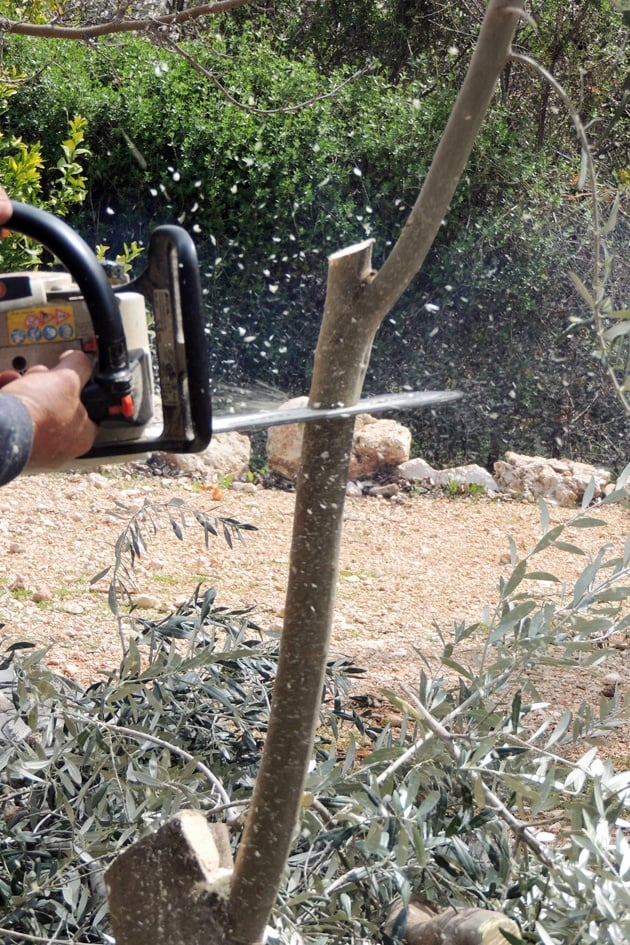
This tree had another big branch that came from the trunk. We could have left it and have the tree producing two kinds of olives, but since my ex-mother-in-law didn’t like the olives this tree produced, we shortened this branch as well and prepared it for grafting.
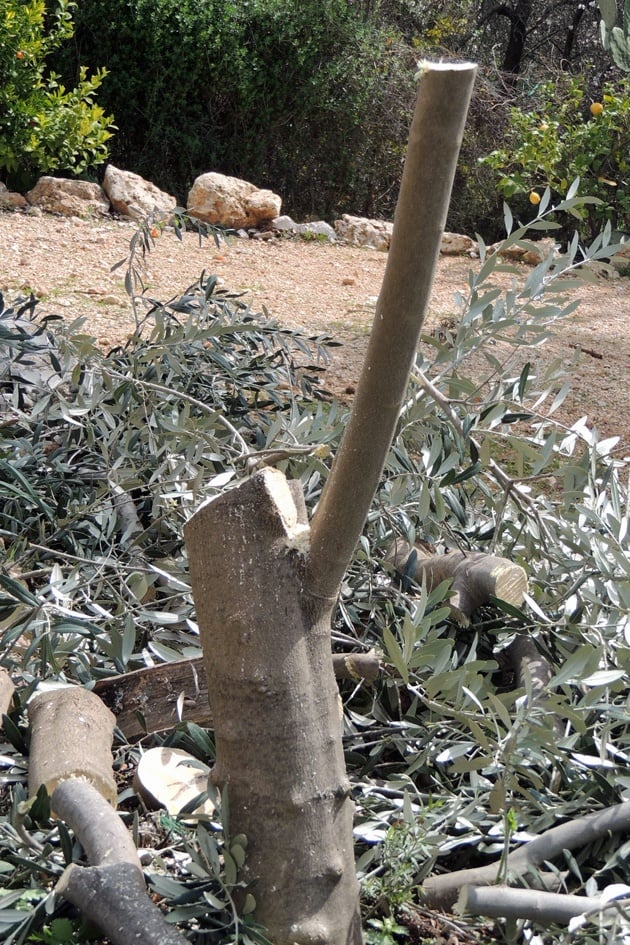
Ok, that’s it. Now we were ready to start.
Finding the Right Shoot to Graft…
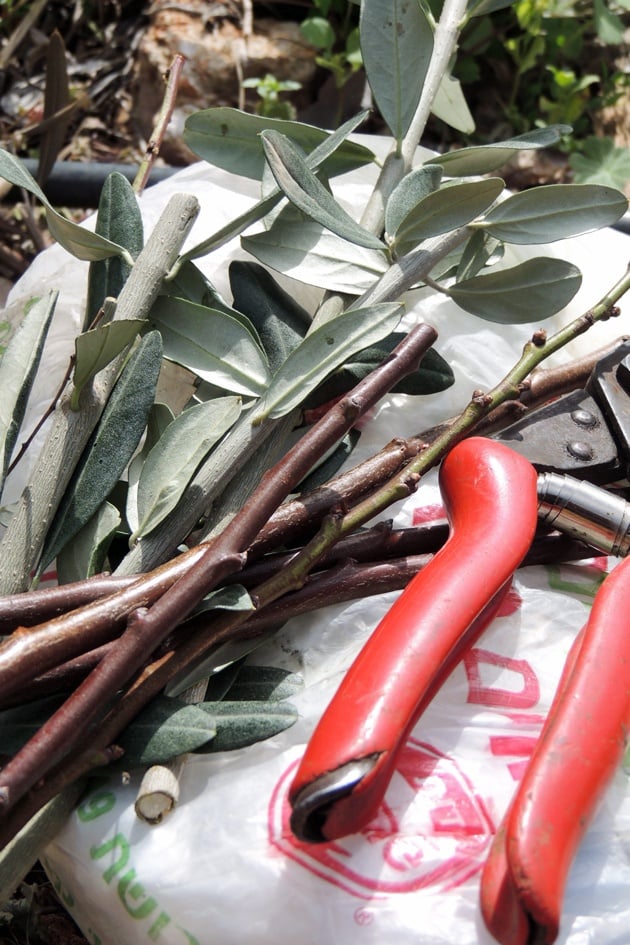
Raik had his own olive grove that he has been caring for for years, so he brought with him a few young branches from one of his trees.
It is VERY important that you graft branches from a tree that you know or from someone that you absolutely trust. You want to make sure you graft a healthy tree so you don’t damage your own tree and that you graft from a tree that you know has a great production of healthy and delicious fruit.
It would be a shame to do all this work and find out in a couple of seasons that you grafted from a tree that does not produce well.
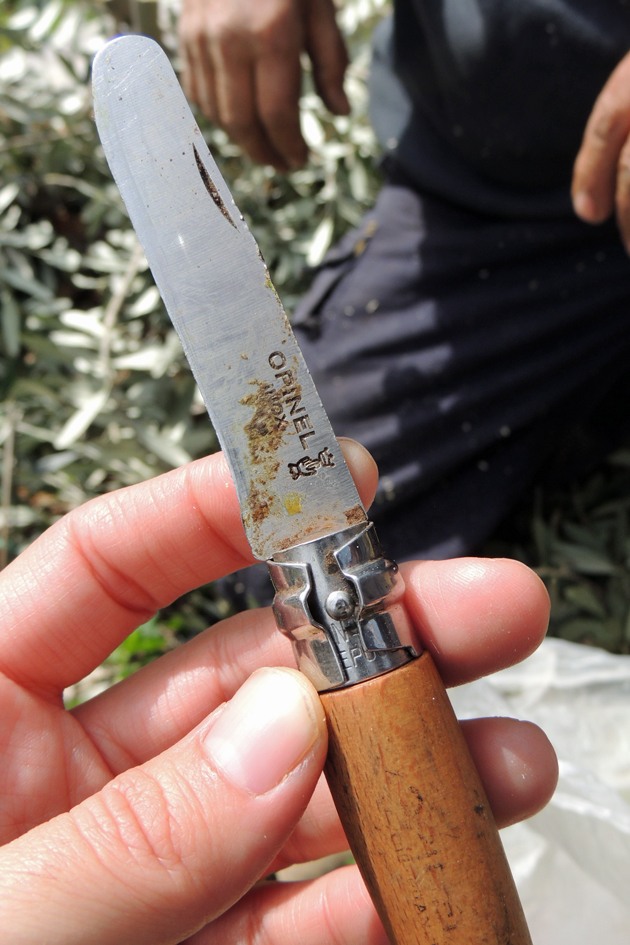
Next, use a very sharp knife with a straight edge to prepare your shoot…
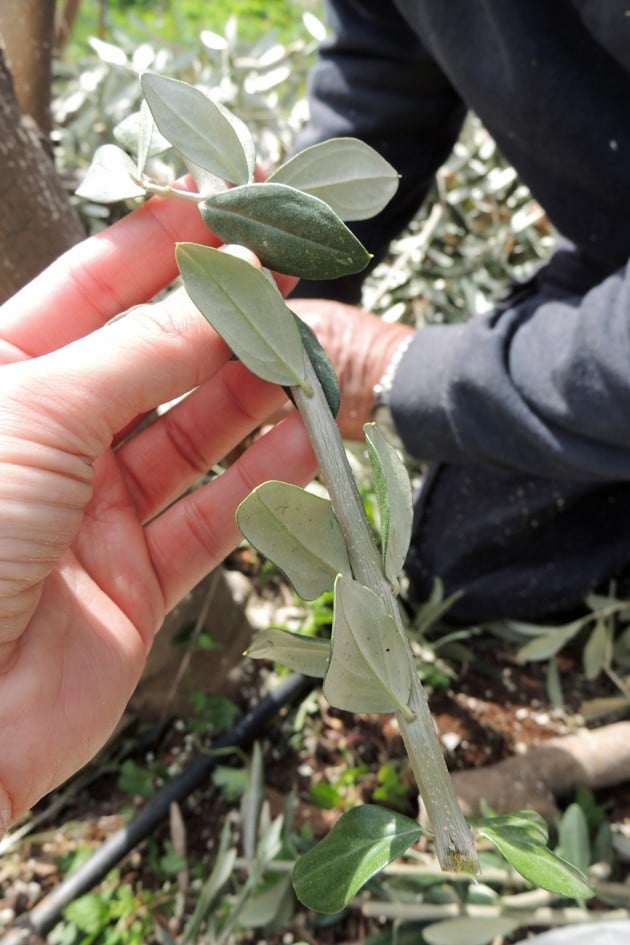
This is the one we will work on first…
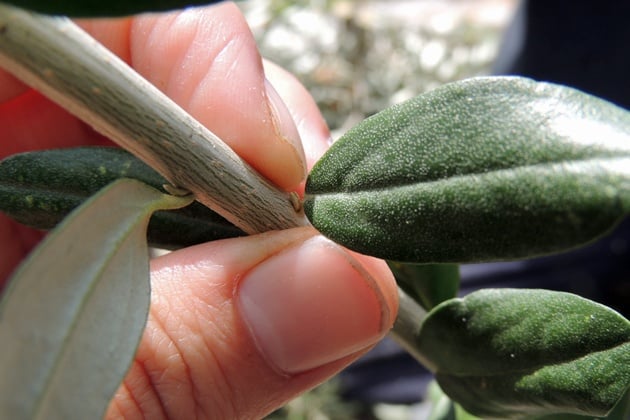
See the tiny bud between the branch and the leaf? We want to make sure we don’t damage it because this is where the new tree is going to grow from.
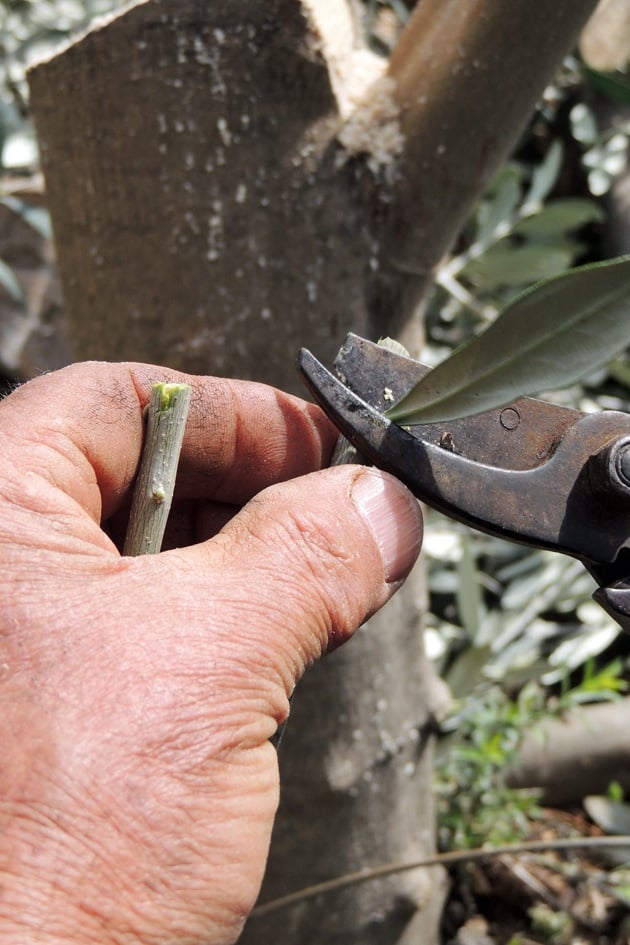
So we start by carefully, CAREFULLY, removing the leaves…
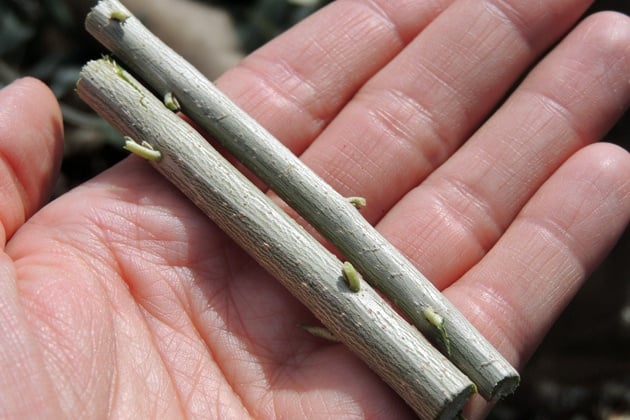
And shorten the shoots to about four inches or so. Ok, now see in the picture above the difference between the two shoots?
The left one has its buds pointing up and the right one has its buds pointing down. When you graft, make sure that the buds of your shoot are pointing up! Makes sense, yes? But it’s very easy to forget this.
You want your tree growing right, so, again, make sure the buds on the shoot you are grafting pointing up towards the beautiful sky.
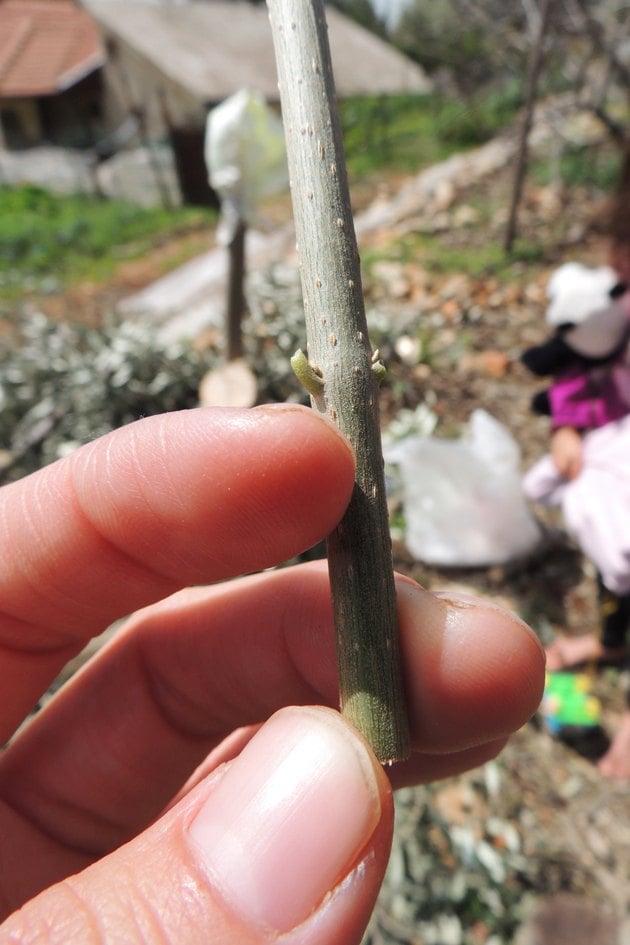
Now, cut half of the width of the lower one inch of the shoot… (This is method #1 in the 4 Techniques of Grafting Fruit Trees post).
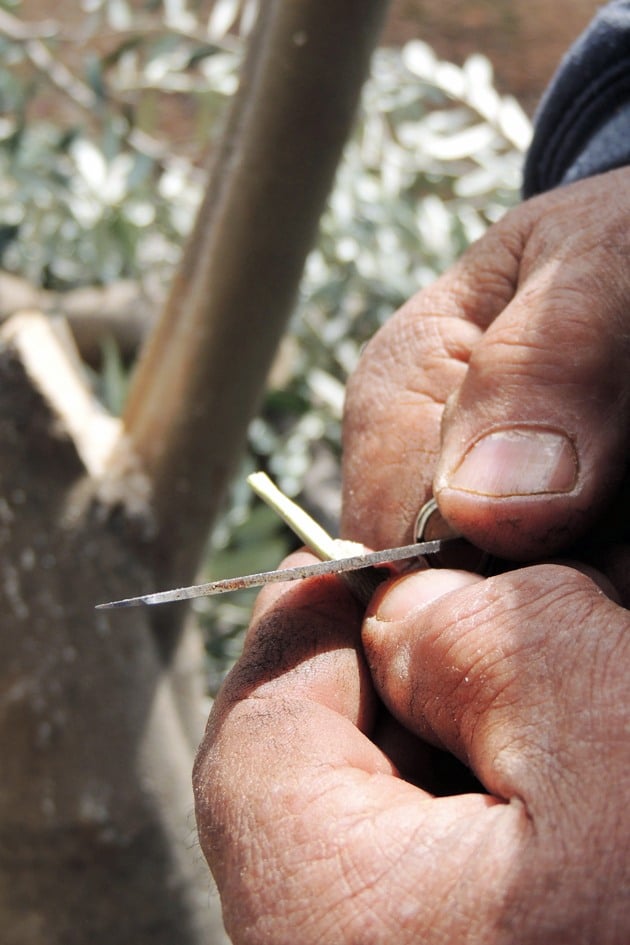
Remember to use a sharp knife with a straight edge and remember to always work away from your body and not towards it.
Grafting the Shoot on the Tree…
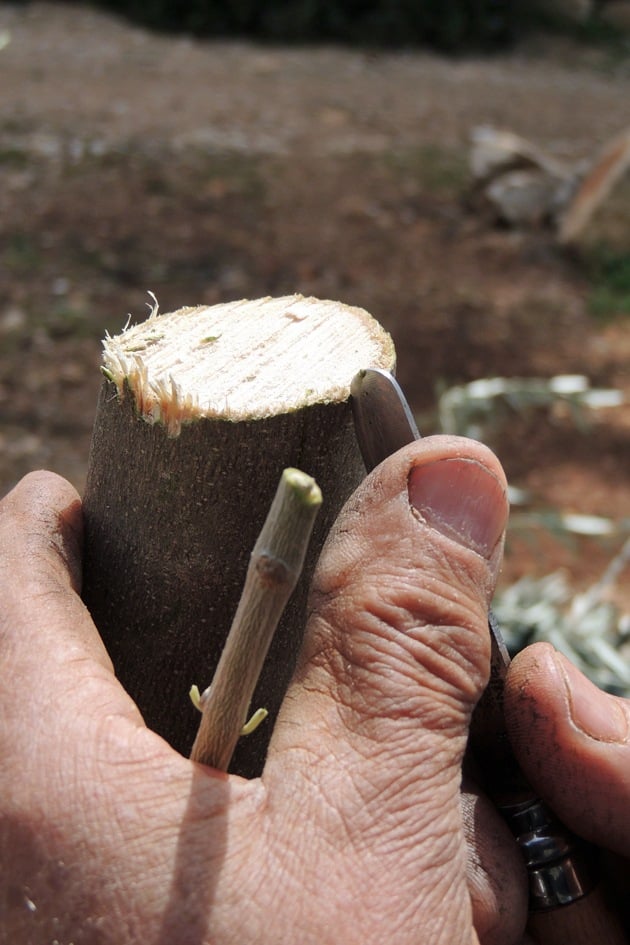
Next, use your knife to cut a small opening in the bark of your tree…
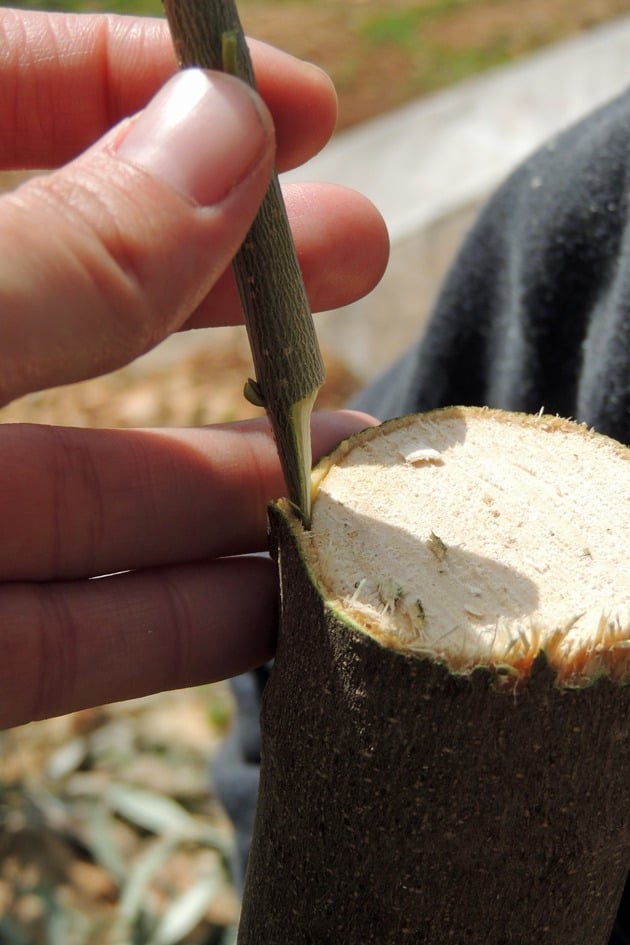
And insert your shoot down this opening.
A couple of notes here… If the time of the year is right, the bark will separate from the woody center easily. If it doesn’t, you might have to keep trying since you are already set up for grafting, but note the time somewhere and if your grafting is not successful make sure to try at a different time next year (this might be just one week before or after).
Remember, all the nutrients, the food, the water, it’s all passing in the bark so it is super important for the bark of your shoot to touch the bark of the tree.
What will happen if there is good communication here and the grafting is successful is that the old bark will communicate with the new bark and they will join and “exchange information” or in other words, grow (this is why we are grafting trees from the same family, so they can ‘talk’).
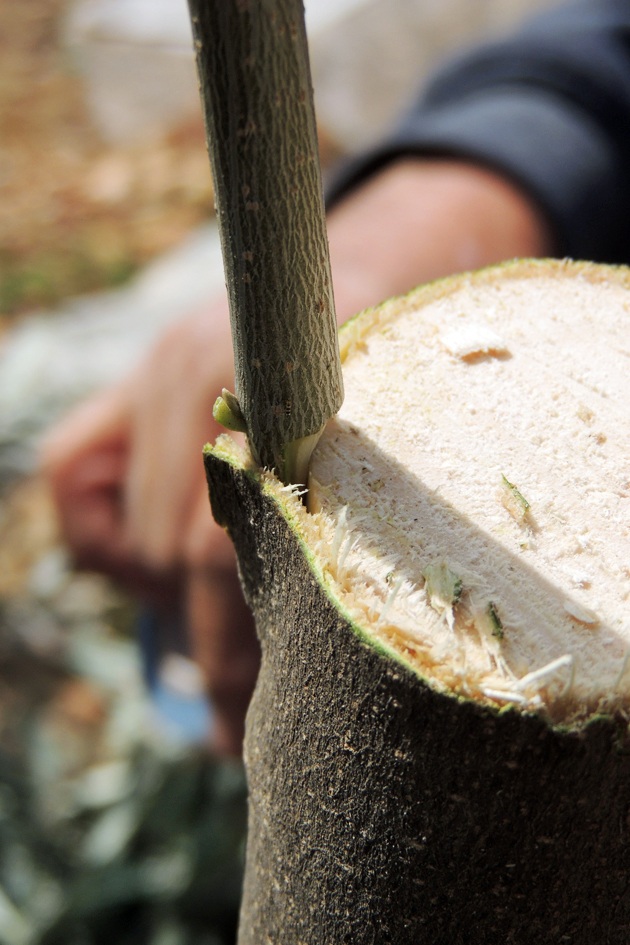
So we pushed it all the way in…
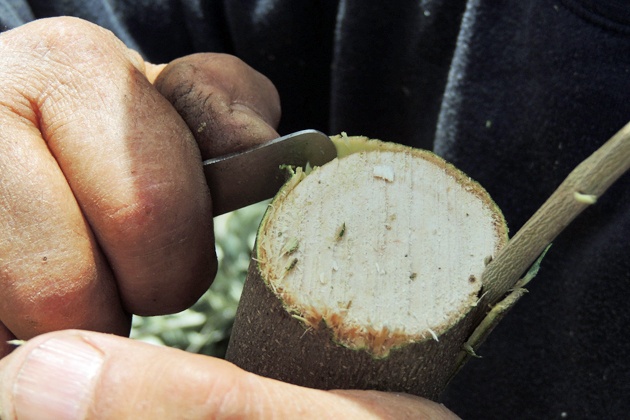
Then did the same thing on the other side…
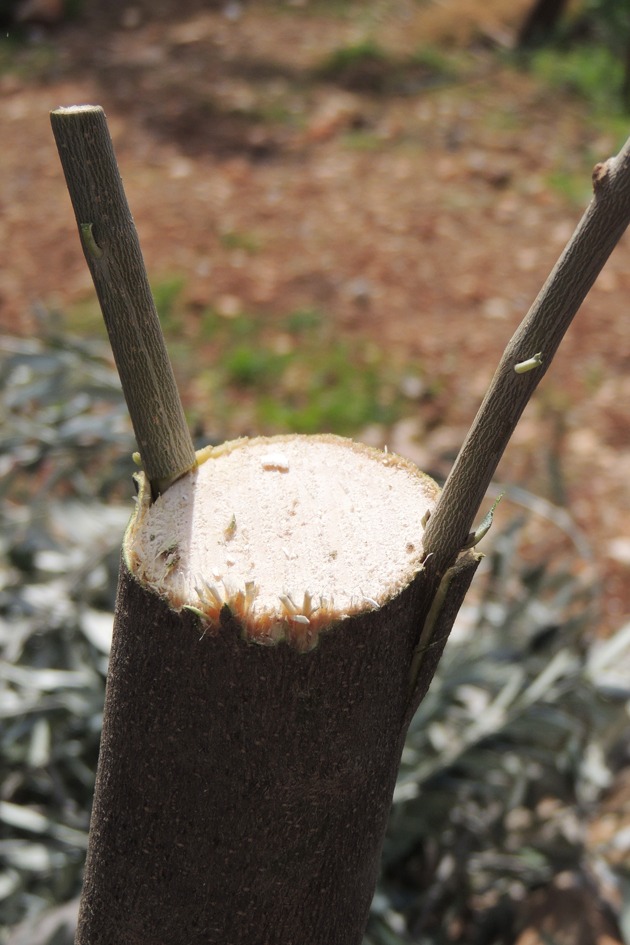
And now we have the two shoots in place…
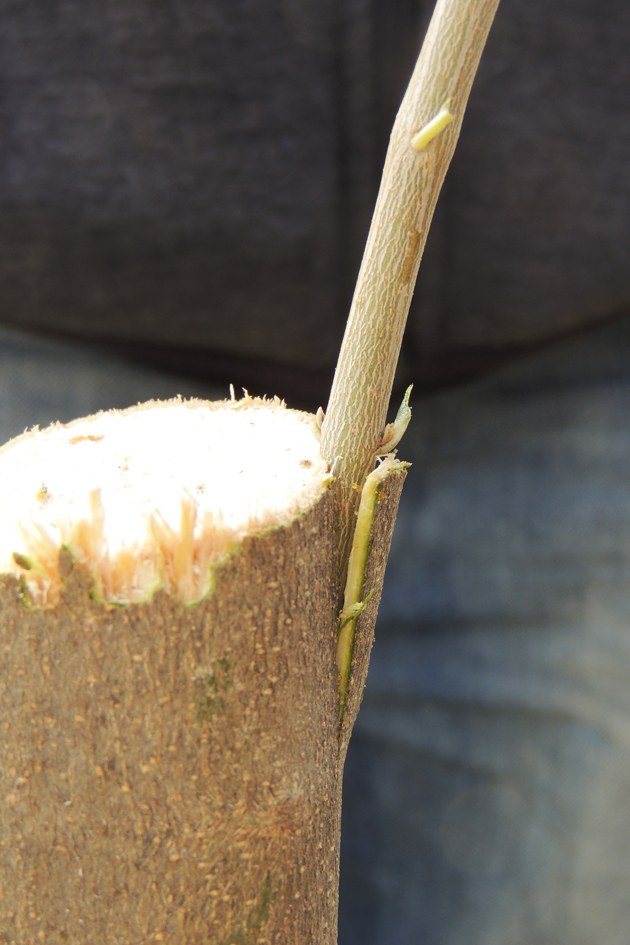
Here is another look. See how the buds on the shoot are pointing up?
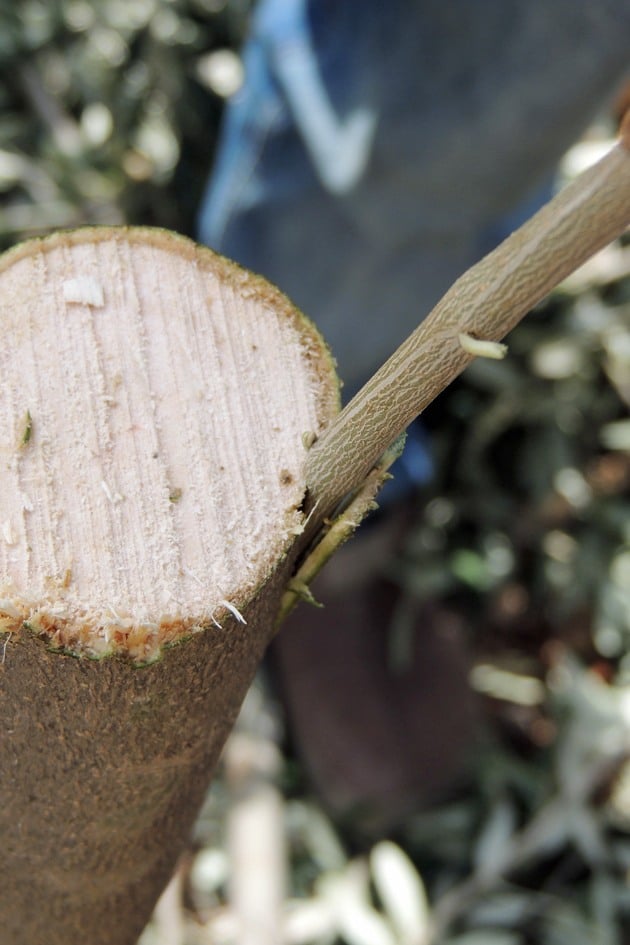
This is how it looks from the top.
How to Bandage a Grafted Tree…
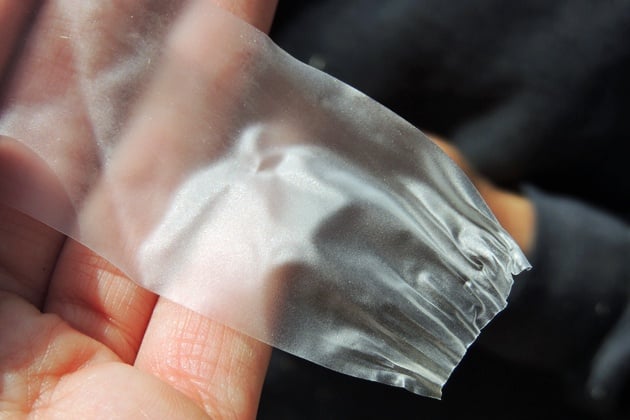
Now that we have the shoots in place, it’s time to bandage the tree to hold the whole thing together. This is a special grafting tape. It is not sticky on any side, just plastic.
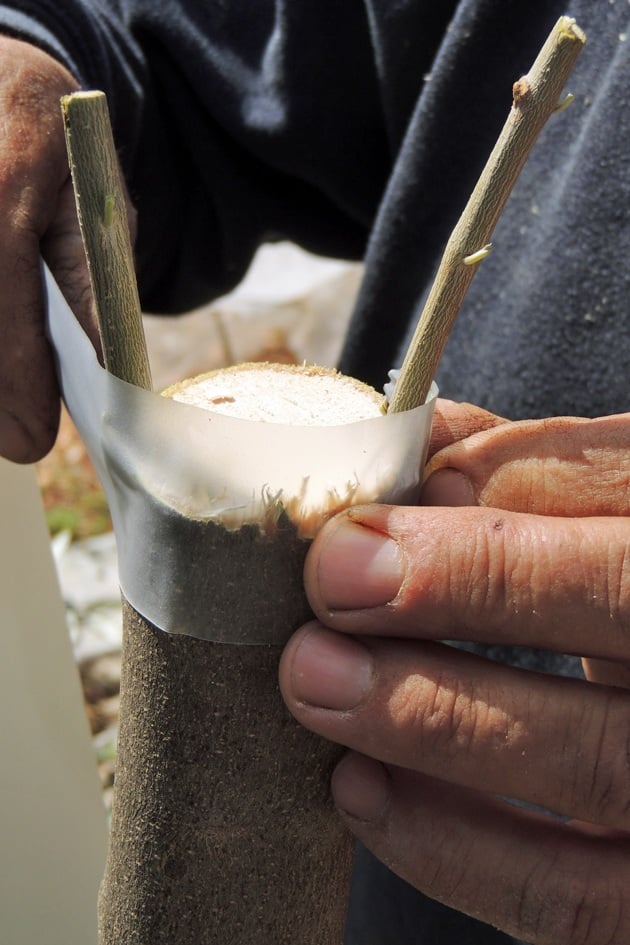
We started wrapping the tree firmly. You want it to hold the shoots to the branch tight. Also, we wrapped it in a way that some of the tape is higher than the top of the branch to protect the top from water in case it’s raining.
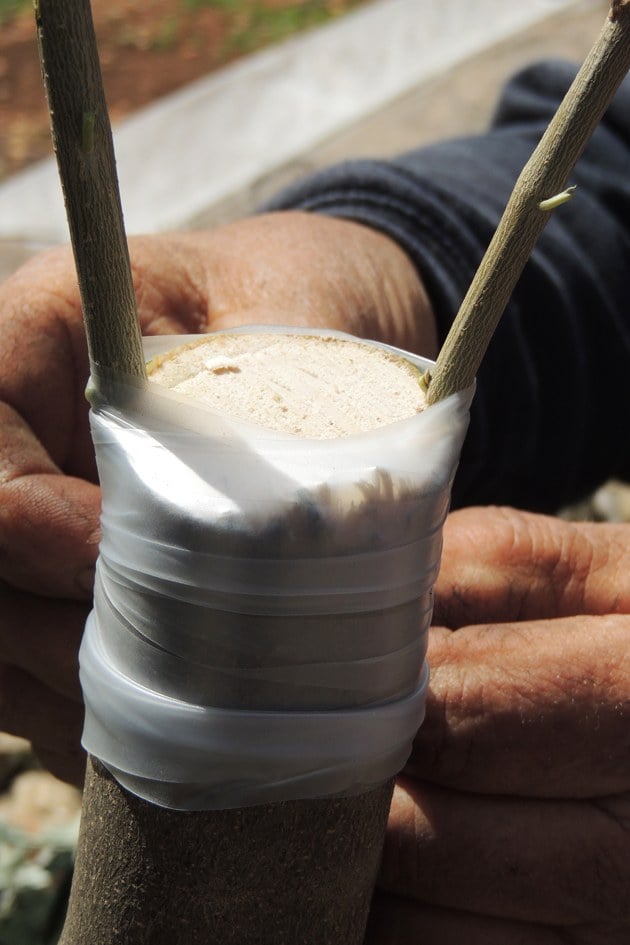
Keep wrapping it a few times. You can tape the end with a piece of sticky tape.
Creating a Greenhouse Effect to Protect the Grafted Tree…
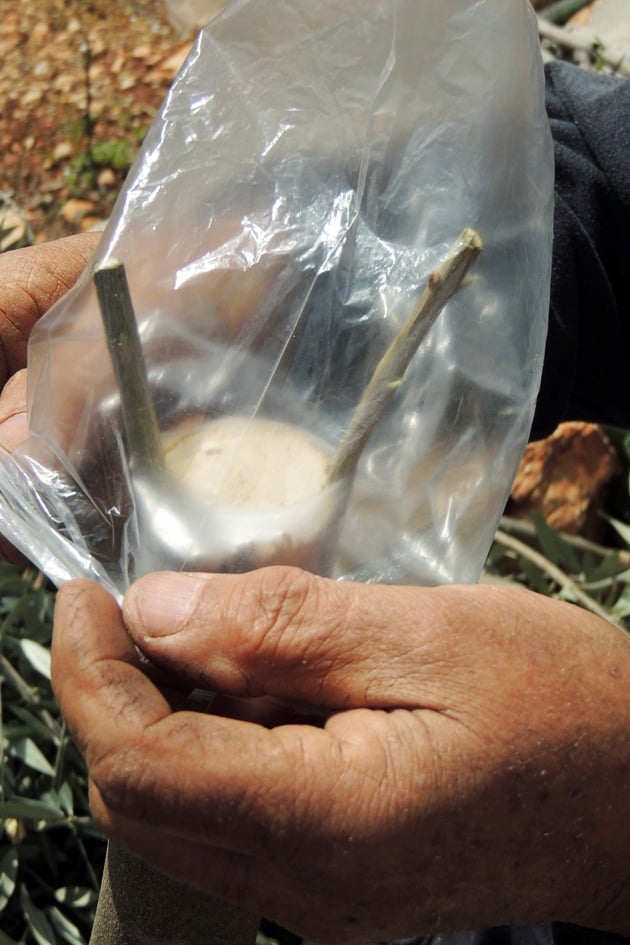
Next, create a greenhouse effect by placing a plastic bag over the grafted branch to keep the area warm and moist.
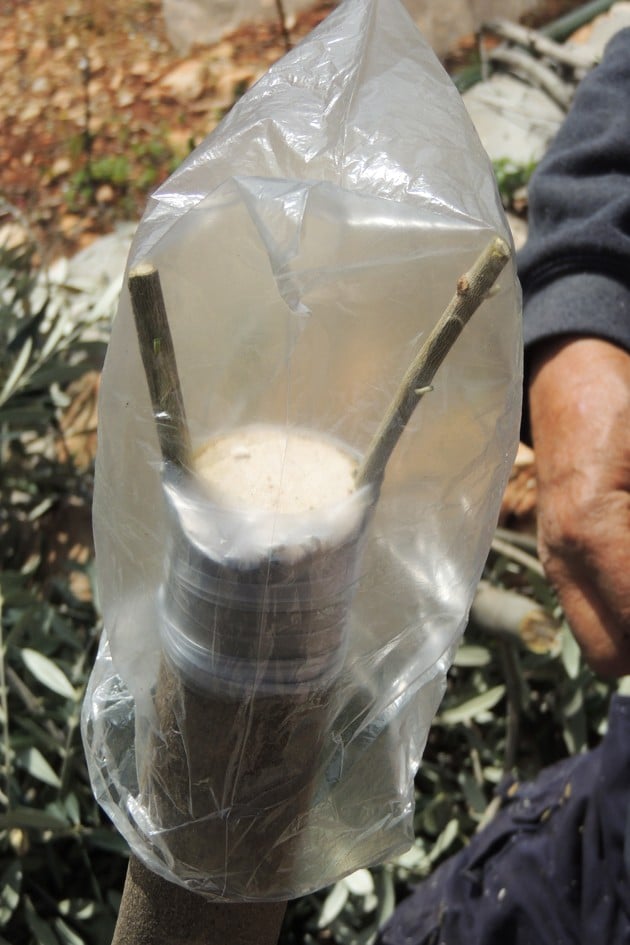
Like so…
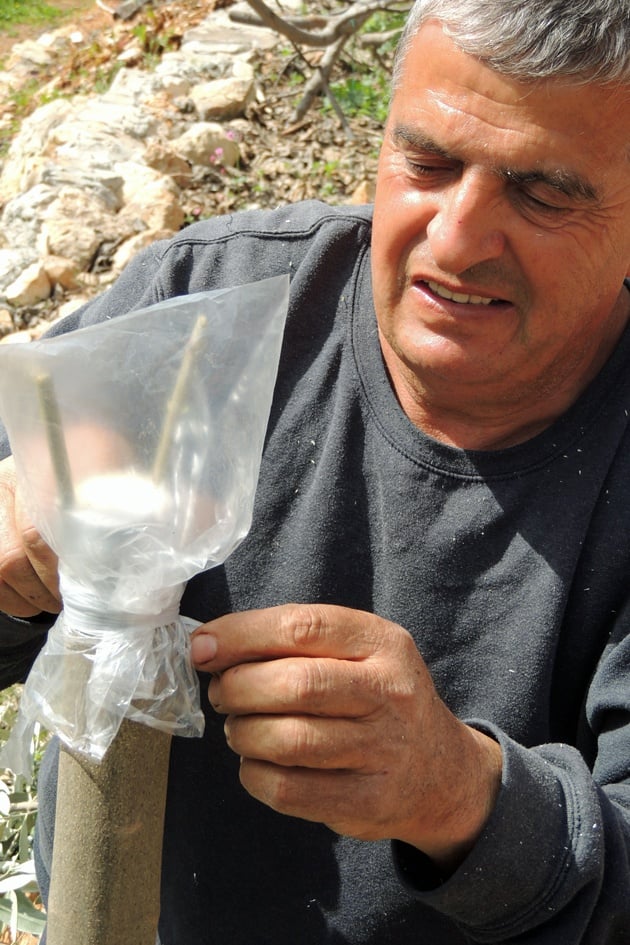
And tie it at the bottom.
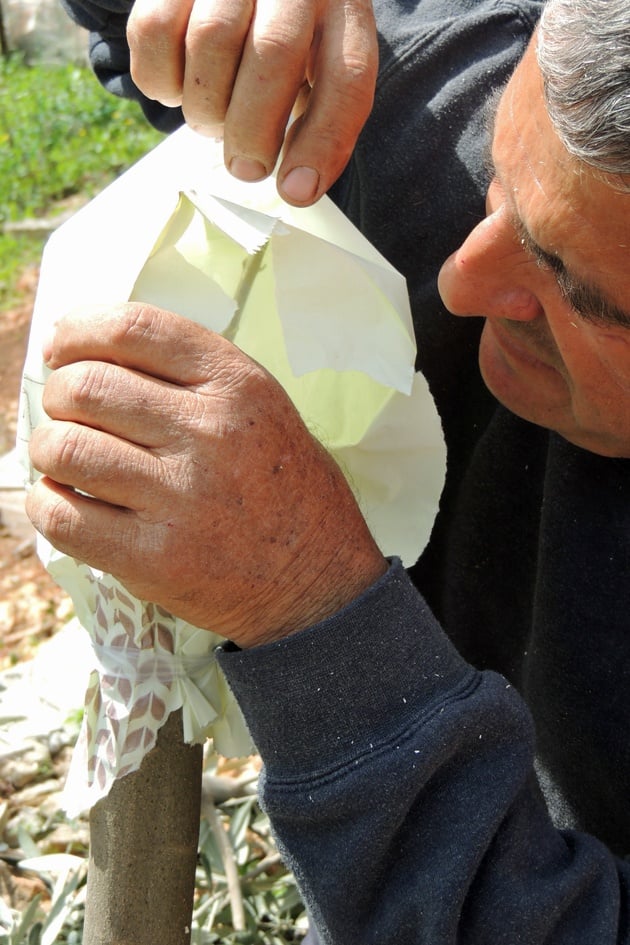
Lastly, because the sun in Israel is very strong even in early spring, we placed a paper bag over the plastic bag. It’s very dry in Israel, so the chances that it will rain and the paper bag will get wet are small, but you might decide to skip this step.
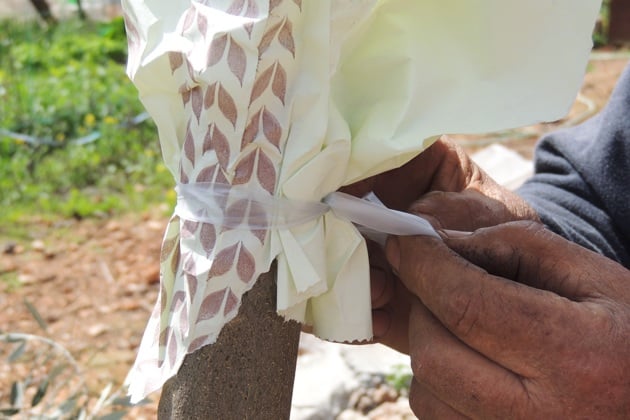
We tied the paper bag at the bottom as well so it stays in place.
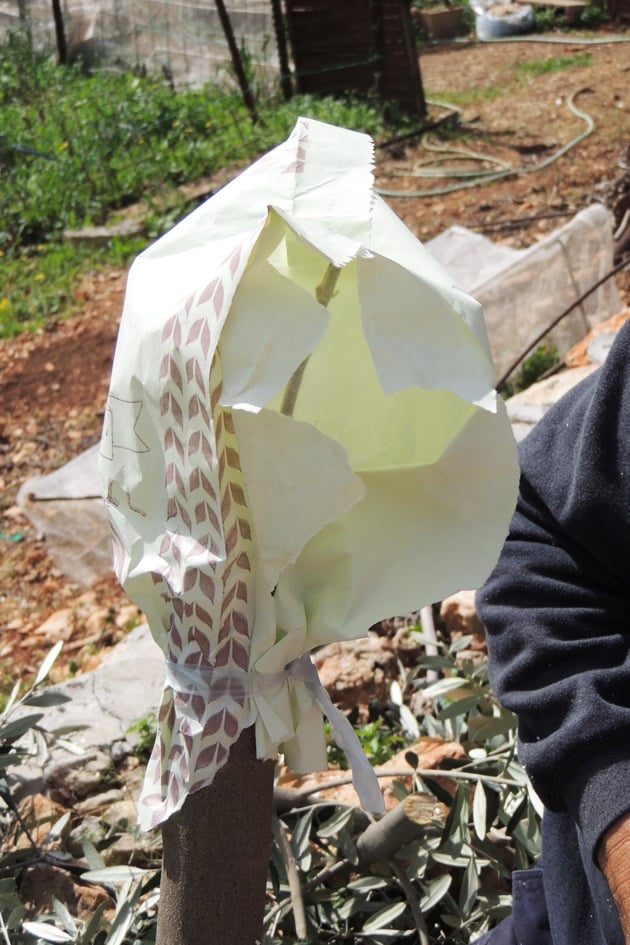
And opened one side of it so there is plenty of light coming in just not direct sun. That is it for this branch. Make sure to check on it regularly. Once some green leaves starting to grow, remove the paper bag and make a hole in the plastic bag.
Once there are more than a few inches of growth and the grafting looks successful, remove the paper bag completely. Then give the tree a few more months to grow before removing the tape.
One More Example of Grafting a Fruit Tree…
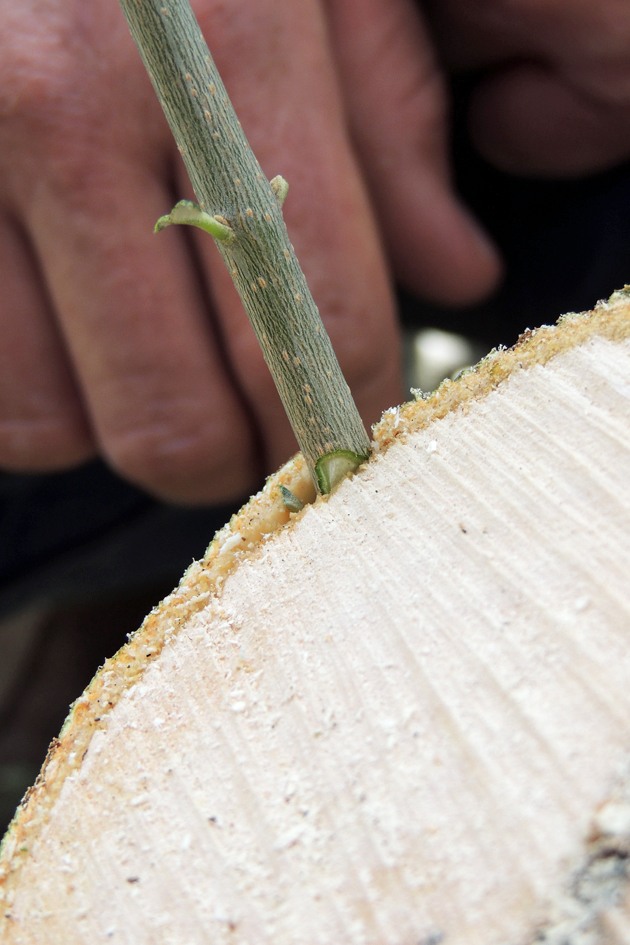
We used the same method of grafting on the trunk of this same tree… We prepared the shoot, made an opening in the bark of the trunk, and inserted the shoot.
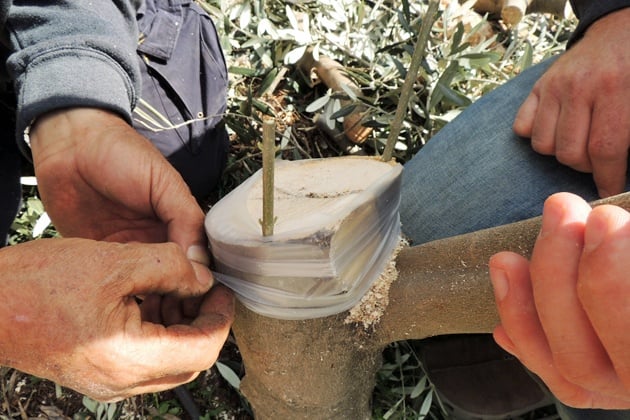
Then we wrapped it with the grafting tape…
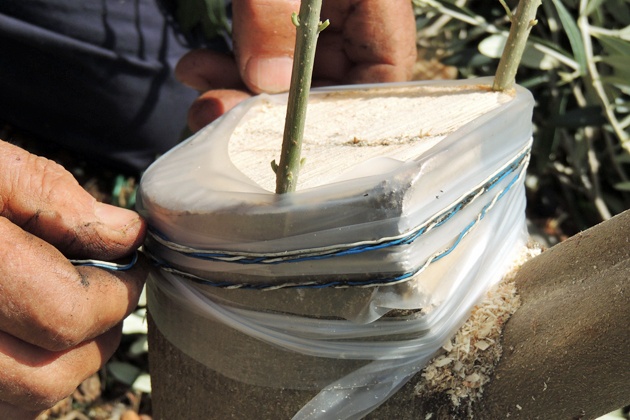
And since this is a wider trunk we added a twine around the tape to make sure things stay in place. We covered it in the same way, with a plastic bag and a paper bag.
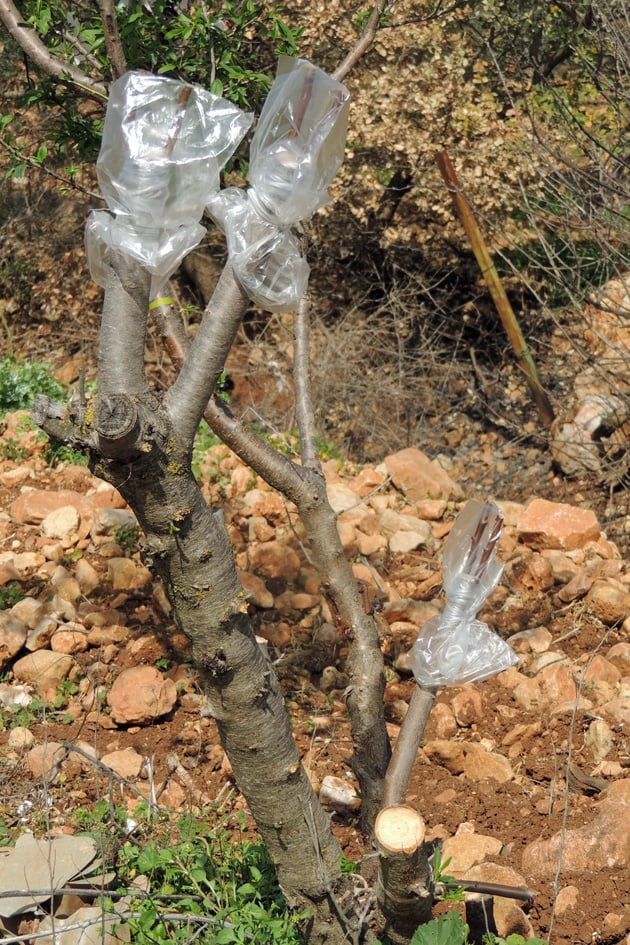
After we were done with the olive tree at my ex-mother-in-law’s we took a ride to Raik’s olive grove. Amongst the olive trees is this tree – an almond tree. It didn’t have a great track record in producing great almonds so Raik decided to graft peach onto it.
Since this combination of almond and peach is a fast-growing combination (where it might take months for the olive tree to accept the grafting it only takes a few short weeks for the almond/peach combination), we had to use a different method of grafting.
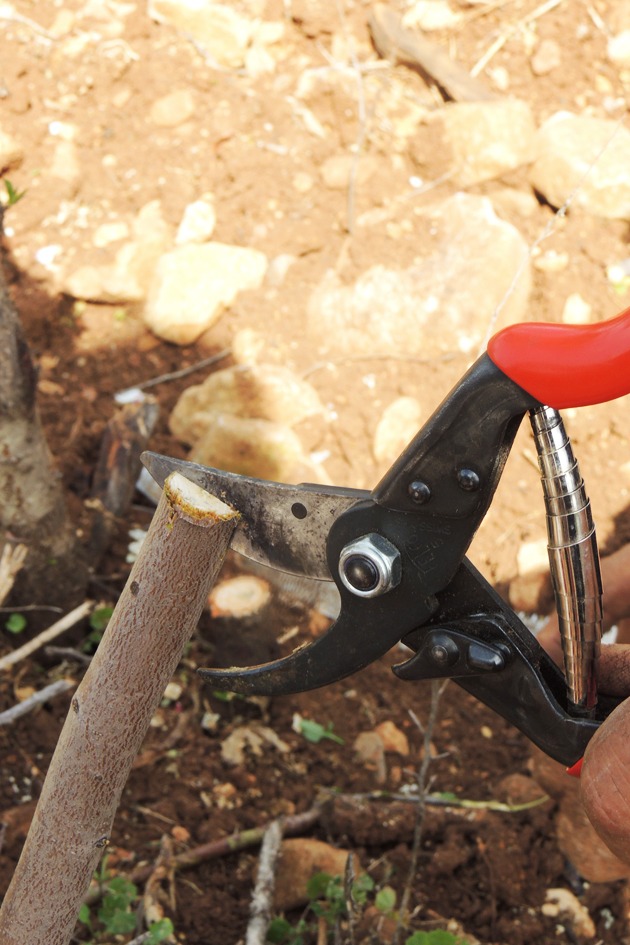
So, since there is going to be some fast growth here and since the branches we are grafting on are narrow, we split the branch apart at its center.
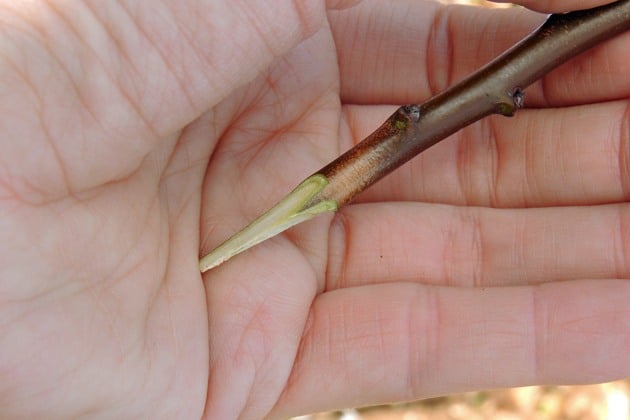
To prepare the shoot of the peach tree we removed the bark from both sides of the lower inch of the shoot…
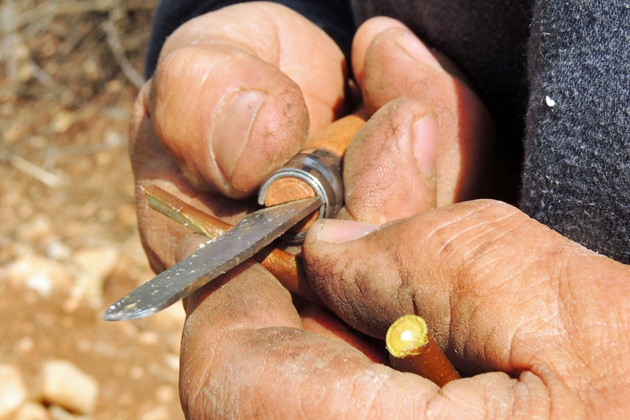
Like so…
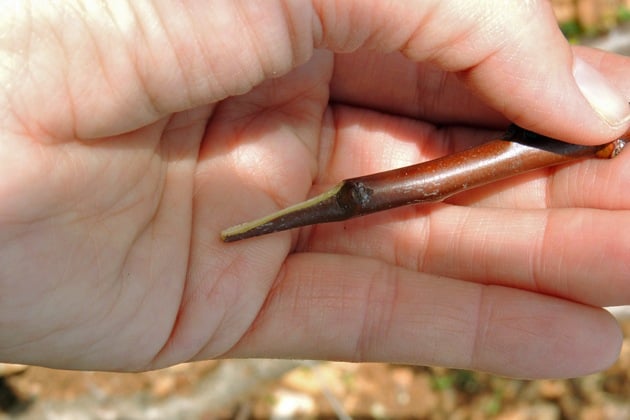
Leaving the bark at the back of it.
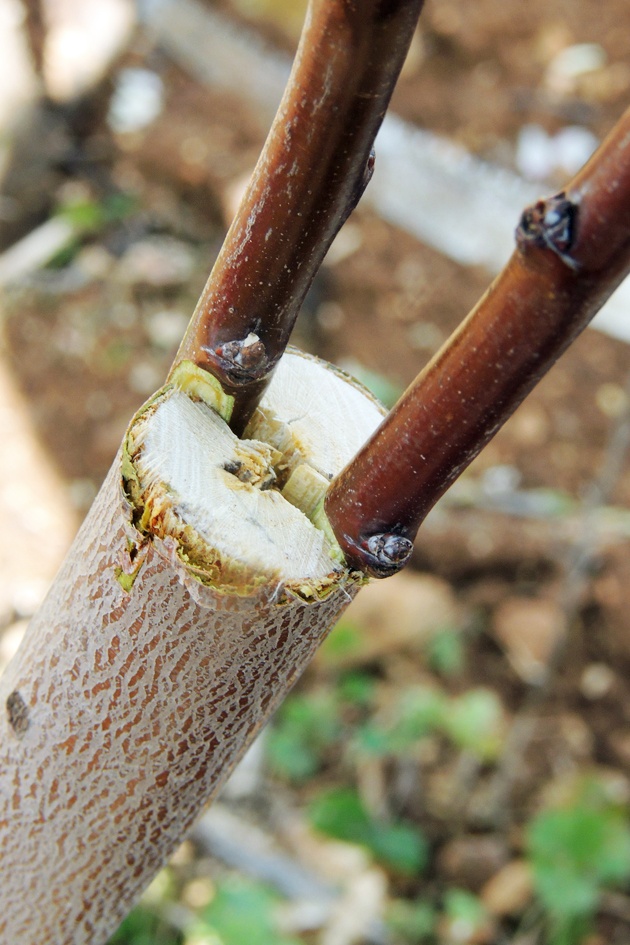
Then we grafted the two shoots in a way that the narrow edge is towards the center of the branch and the bark at the back is lining with the bark of the branch.
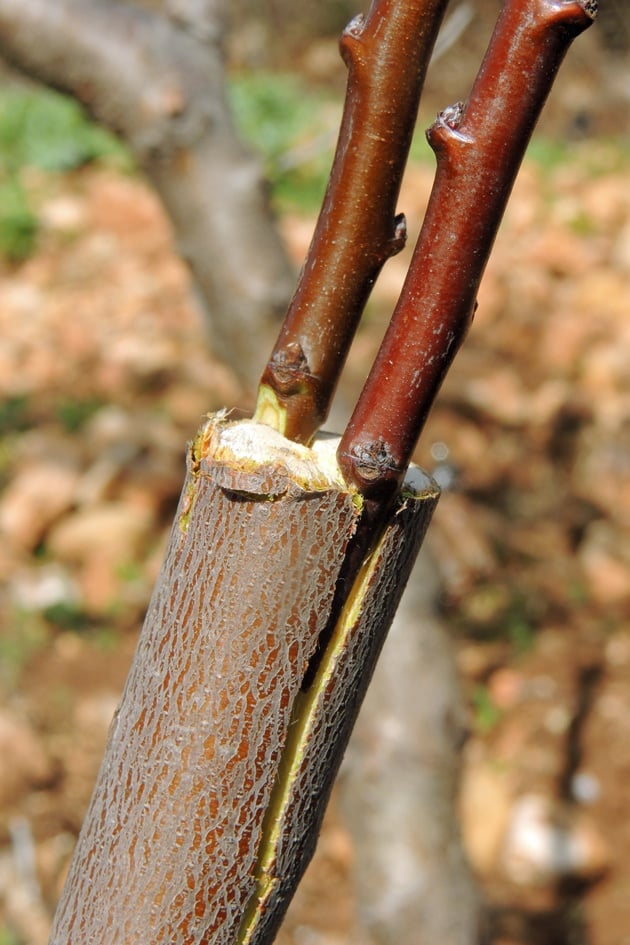
Another look. This is method # 3 in the 4 Techniques of Grafting Fruit Trees Post. If we did the same thing that we did for the olive tree on this tree, because it’s a fast-growing combination, the grafted branch would have most likely broken from the weight of the growth.
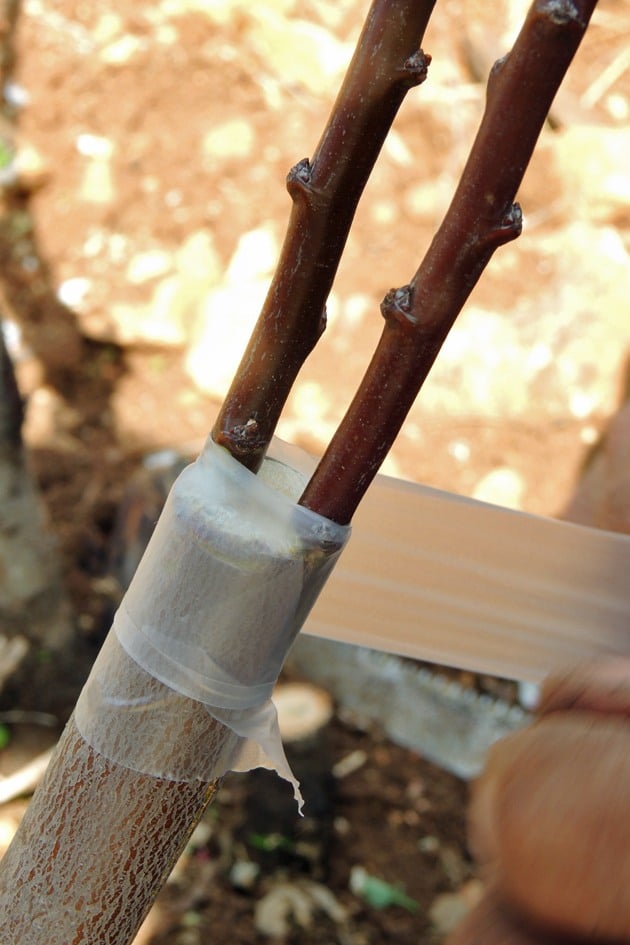
Next, we wrapped it tight…
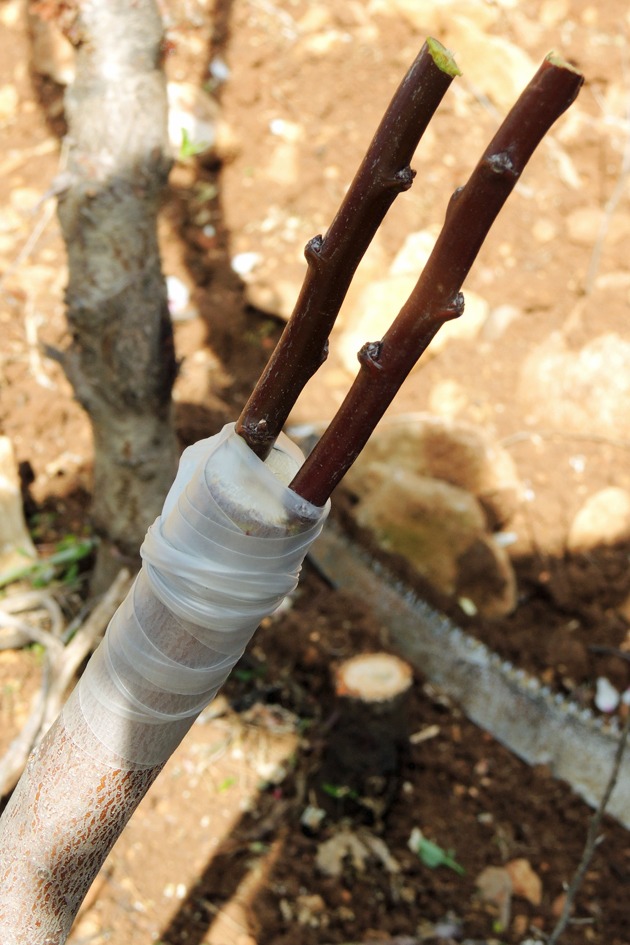
To make sure that everything stayed in place…
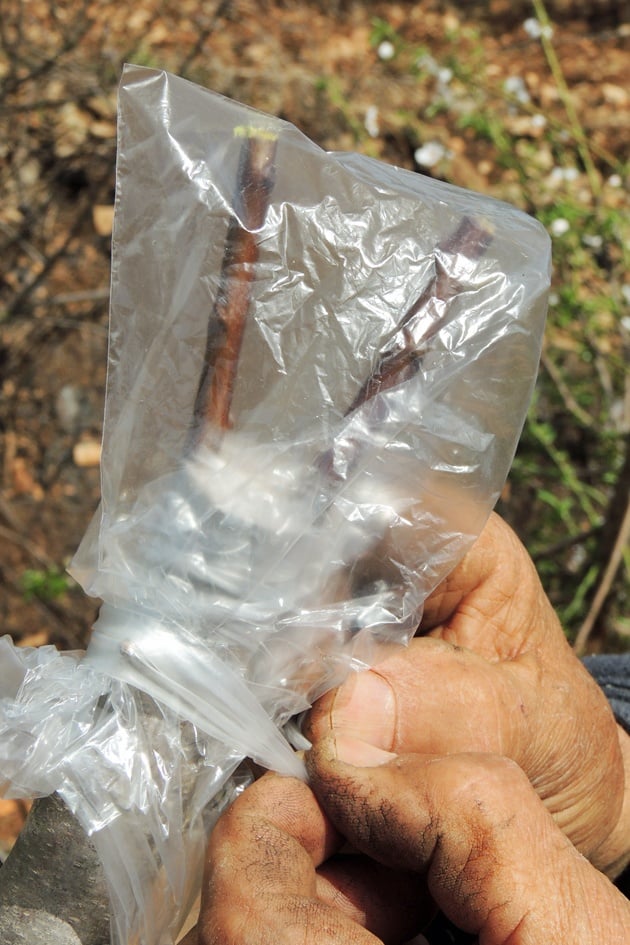
And covered it with a plastic bag. We didn’t add the paper bag on this one.

We grafted three of the branches of this tree and left a couple to produce almonds.
The same process applies here… The shoots will start to grow green leaves, make a hole in the plastic bag, then the shoot will start growing into a branch and once it is established remove the bag completely and then give it a few more months before removing the tape too.
How Does a Successfully Grafted Tree Look?
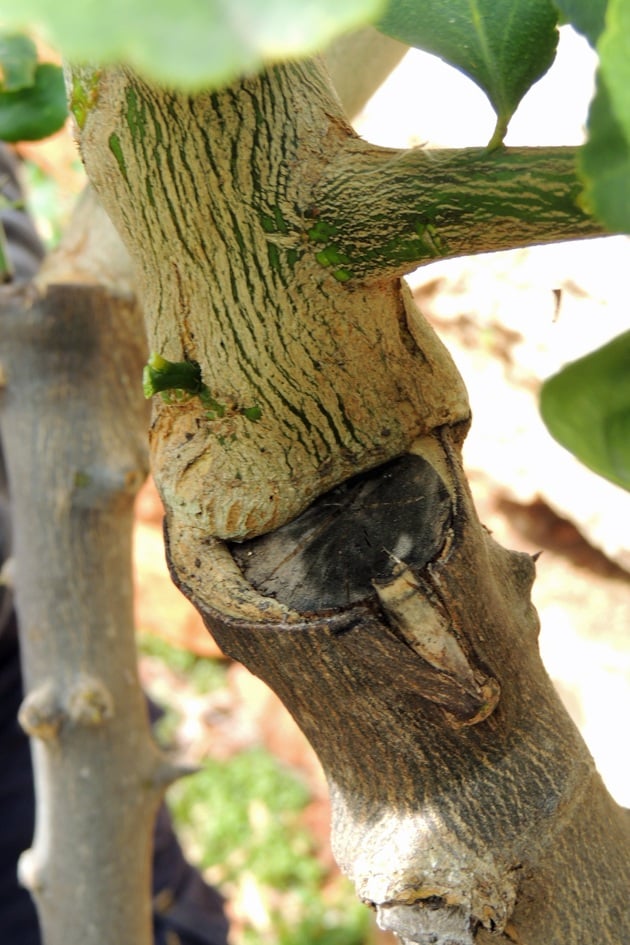
Here is an example of a year old grafting. In this case, it’s a lemon tree that was joined with another kind of lemon. You can see that he did the same thing here as he did with the olive tree but only one shoot was successful.
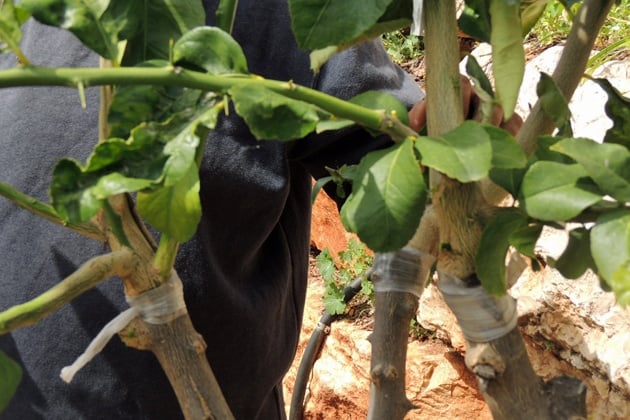
See how we take off the bag first but leave the tape for support until the new branches are completely established? We went ahead and removed the tape from this tree (one year after it was grafted).
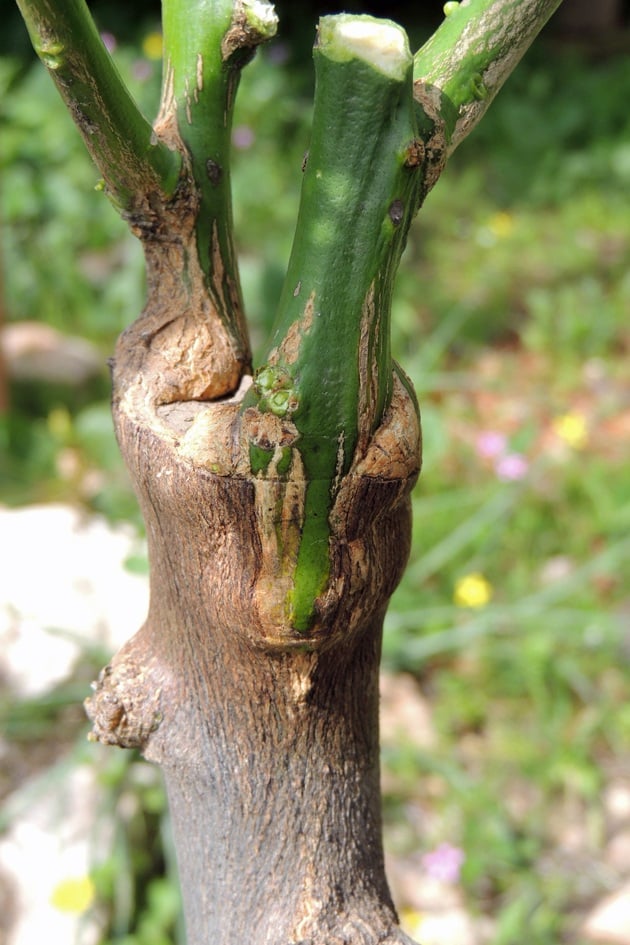
Another example. Here, both of the shoots from either side of the branch were a success.
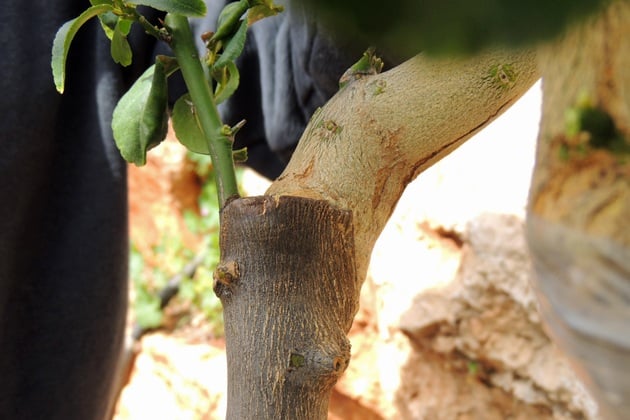
This is the same lemon tree just another branch.
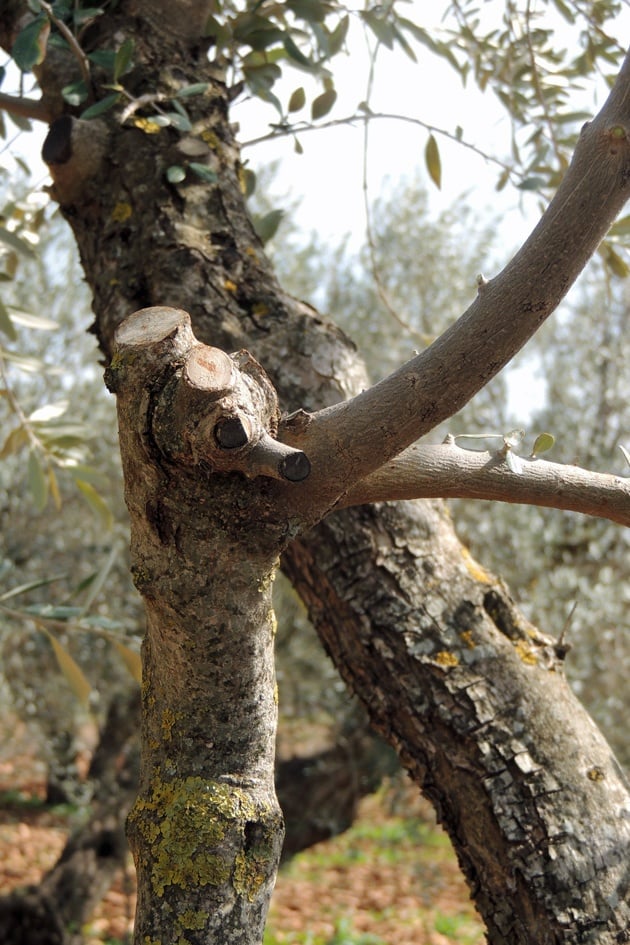
And lastly, this grafting is a few years old on an olive tree. This tree is producing two kinds of olives (you can see the difference in the texture of the branches).
So Let’s Recap…
- Graft at the end of winter, before the tree starts budding.
- Check your grafting combination before you graft. Make sure both trees are from the same family.
- Know the tree you are grafting. Make sure to take young branches from a healthy tree that is known to produce good fruit.
- Choose the right method to maximize your chances of success.
- Use a sharp knife with a straight edge.
- Make sure the buds of the shoot you are grafting are pointing up.
- Make sure the bark of the shoot and the branch you are grafting on touch.
- Use grafting tape to support the joined area and a plastic bag to create a greenhouse effect.
- Check your tree regularly.
I don’t know about you guys, but this stuff fascinates me! I guess if you read so far it’s probably fascinating for you too. I can’t wait to have my own orchard so I can experiment on my own trees. I think it will be cool to have one tree producing three or four kinds of fruits.
Later in our trip, I also met with another farmer that is working in the second-biggest field crop operation in Israel. They grow everything from watermelons to garlic to wheat and everything in between.
They don’t start their own plants in greenhouses, they buy them from a gigantic plant nursery. He mentioned to me that at the nursery they use grafting as well.
For example, they graft watermelon plants on pumpkin stems (or something like that, I can’t remember the exact combination). Many plants can produce great fruit but have a very weak root system, grafting allows them to take advantage of the strength of each plant. I hope that on my next visit I’ll be able to visit that nursery.
Anyway, grafting is an amazing art! I don’t know if I am going to like the manipulations they perform on field crops. I need to look into that and learn about it more, but for fruit trees, it works great.
Both the tree and the owner benefit. It’s a skill that not many know how to perform. I feel lucky to have been able to learn it from someone with so much experience and I hope this post will help you if you ever decide to give it a try!
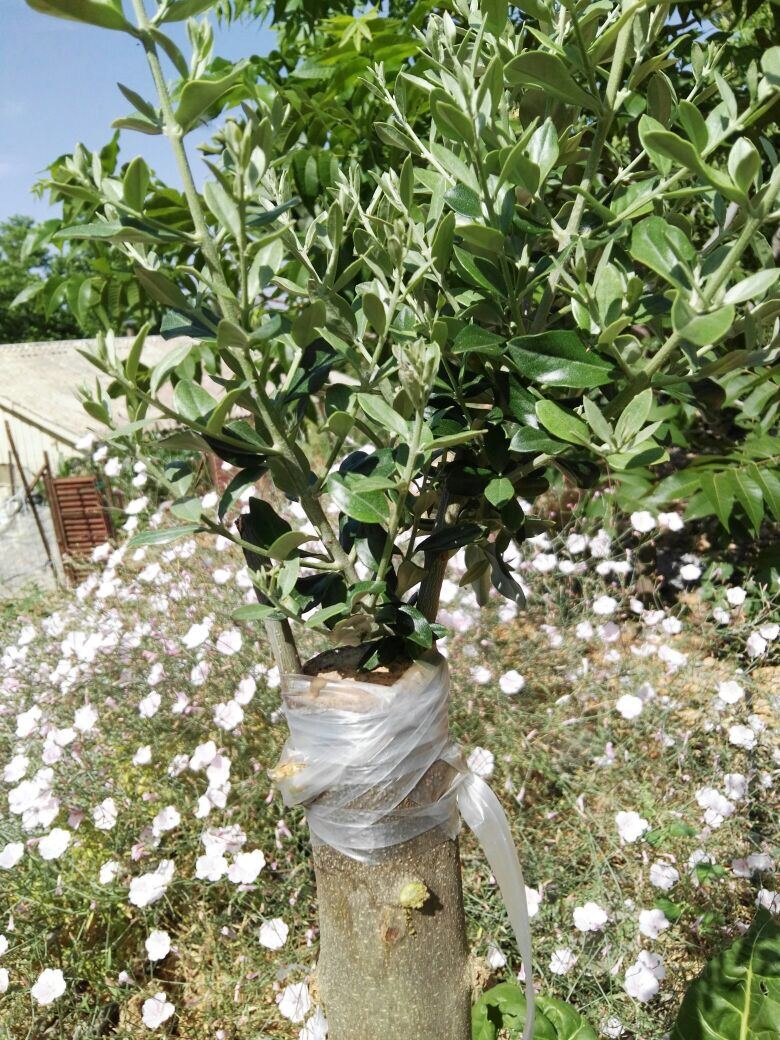
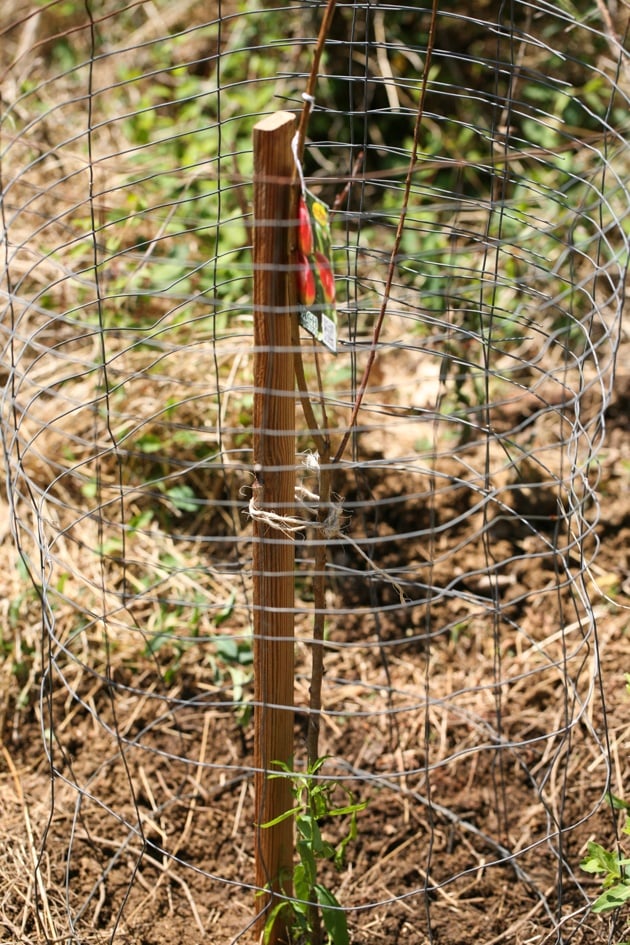
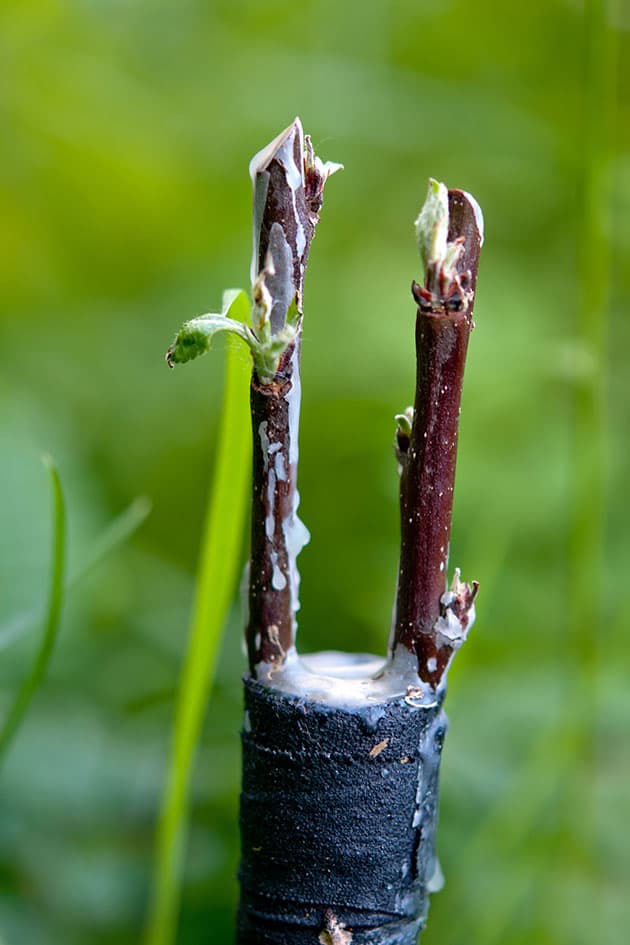
**Update: I am adding a couple of pictures of the grafted olive tree you saw at the beginning of this post. Those pictures were taken on June 9th, 2017, less than six months after we grafted it.Not every graft is successful, but this one was and it is just beautiful to see the two trees join!
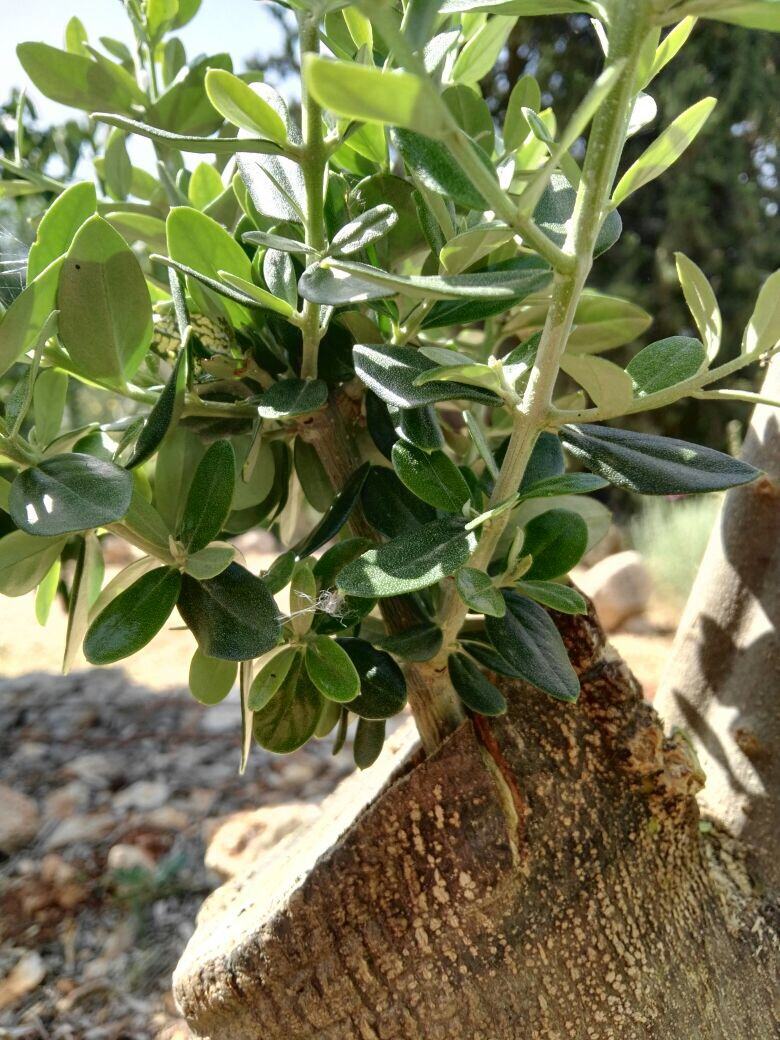
Here is another look…

Gostei bastante desse assunto
Thanks for “grafting” I am compiling data for the family’s survival. Information is harder to come by now as everyone wants to sign you up for a course in underwater basket weaving. they are stretched out so you forget what was on the last video. information in book forms are what is needed so we can reference them if needed. Many use computers to store the info but I am old school and use paper. I get folders from the dollar store that holds my info and provides faster access to the computer. I use the old Dewey decimal system to catalog them and can add them without problems. The best part even the youngest has access without the need of a computer ( or power) so thanks for all the well-written info. ———I, Grampa
You are welcome!
Thank you very much ,it is very beneficial article I learned a lot of things from you
So glad to hear that! Thanks for stopping by.
Awesome! I love that its an olive tree as the example and the passion that went into the detail of this article. Thank you for sharing. Its obvious there is a “love” for gardening. <3
There sure is! Thanks for stopping by!
hello, so very interesting!
I am wanting to try and graft a fig onto a olive ….are they the same or similar genus….can it be done?
No, I am afraid that they won’t work! They are not from the same family so they won’t be able to communicate.
HI, MY YOUNG CHERRY AND CITRIC TREES , DIE VERY SLOWLY- DIE DOWN- FROM TOP DOWN. AFTER I TRY TO GRAFT THEM. CAN YOU TELL WHY? THANKS TED.
It will be really hard for me to say why without looking at the tree… Sorry.
Awesome thanks, truly amazing would love to learn more. Elle
Thanks for stopping by! Grafting is an amazing art!
Lee, I am new at grafting but have had some successes in the past. I visited my Cousin in Be’er Sheva last March (not a good time because of COVID ) and it was cool and rainy. Our growing season is much shorter here in Ohio so grafting my apple trees will have a much shorter time to complete. Your explanations and photos are very well done.
Israel’s weather is kinda like South California. Here in Nc, we still have. a long growing season but OH is a whole different story. You guys are probably still months away from doing anything outside. I had an old apple tree in my backyard that I planned on grafting but I lost it last week in a snow storm. I’ll have to plant a new one instead of it. I just came back from Israel a couple of weeks ago. COVID restrictions are crazy but I had to go see the family anyway. Mine lives in the North Praying that this COVID time will end soon so we can travel again! Thanks for stopping by!
Pleased with the Gear information..very nice.how Grafting fruit trees..
thank u 4 ur knowledge
hopefully i’ll be successful 2
aloha
I thoroughly enjoyed working my way through this grafting tutorial. The photo examples were really a great help.
Thankyou for sharing such valuable lessons with us, and for your generosity in passing on all youve learned from experience.
So happy it was helpful!
Thanks. I really appreciated the minute step by step approach to explain the grafting techniques.
I have mango orchard comprising of a mango variety that is not so productive and fruits are not so much in demand. I want to have alphonso mango variety grafted into the bark of these trees. I do not have the grafting techniques.
I am from Mauritius. How do you think you can help me achieve my dream?
Thanks and regards.
S.Gunessee
You’ll just have to try or find someone to show you. No other way to do it.