This post may contain affiliate links, view our disclosure policy for details.
In this post, I’ll show you step by step how we built a PVC greenhouse for the farm. This was a fun project but unfortunately, I didn’t get to use the PVC greenhouse much (you’ll see why in a minute). This is a great project that can really serve your farm well IF you live in a certain climate. Regardless, I hope this step by step tutorial will help you understand how you can build this greenhouse quickly if you feel that it’s the right thing for your farm.
What part of gardening do you like most?
Most people will probably say harvesting is their favorite part of gardening, but my favorite part of growing plants is seeing the seeds sprout. I plant the seeds in the ground and come back every 20 minutes to check if they sprouted. I know they are not going to sprout 20 minutes after I planted them, but I just have to check.
Note – read on, but beware, this is what happened to this greenhouse a few short weeks later. If you live in an area that gets snow in the winter, I will not recommend you use PVC. Also, this is an old post on the blog so excuse me for the quality of the images.
DIY PVC Greenhouse…
So last year, after I made the decision to start farming our land, I had to come up with a plan of how to get to the Farmer’s Market as early as possible with a nice variety of vegetables to sell.
I met with my county cooperative extension agent on our land, which was just a cleared field back then, and as we were talking he suggested that I will purchase seedlings from a farm in VA. This didn’t appeal to me so much. I didn’t want someone else to start the plants for me. I want to see the seedlings sprout.
But I don’t have $4000 for a commercial greenhouse. So I started looking around and watched many YouTube videos of people who built their greenhouses.
We were looking for something that we can do ourselves in a couple of days, something that will be big enough for a small farm, and that will cost us the least amount of money. We decided to go with a PVC greenhouse. We know this is not a greenhouse that will stay standing for many years, but if it lasts three years until the farm takes off we’ll be grateful.
This 12’x30′ greenhouse cost us a little over $300 because we had some lumber and a door laying around that we could use. If you have absolutely nothing to recycle, it should cost you about $360.66 + your local sales tax.
Here is the list of materials (prices accurate as of 1/27/2015):
- 23 Charlotte Pipe 3/4-in x 10-ft 480-PSI Schedule 40 PVC Pipe @ $2.54 = $54.42
- 15 LASCO 3/4-in Dia 90-Degree PVC Sch 40 Cross Tee @ 2.37 = $35.55
- 6 LASCO 3/4-in Dia PVC Sch 40 Tee @ $0.47 = $2.82
- 4 Gampak 4-Pack 3/4-in Rigid Strap @ $0.87 = $3.47
- Oatey 8-fl oz PVC Cement @ $5.18
- 2 doors – better to buy storm doors. If you get an indoor kind of door, make sure you either paint it or cover it with plastic. We used leftovers from out greenhouse film to do that. Don’t buy new doors! There are a gazillion doors on Craigslist, and you can easily find a very cheap door or even a free one. I calculated them at $20 each = $40.
- 4 2x6x16 treated lumber (for the long sides of the frame) @ $10.97 = $43.88
- 2 2x6x12 treated lumber (for the 2 shorter sides of the frame) @ $8.57 = $17.14
- 12 2x4x8 treated lumber (for door frames and frames to support the plywood at the ends) @ 2.97 = $35.64
- 14 2 feet rebars @ $1.84 = $25.76
- 4 sheets of plywood @ $7.45 = $29.80
- 6 mil Greenhouse film – $67. Everywhere that I looked online, greenhouse film cost about $113 for a clear 6 mil 20’x50′. I was about to order when I decided to check my local farm store (Southern States). They didn’t have it in the store but were able to order a 6 mil 20’x100′ clear greenhouse film for me for $67! I might go ahead and add another layer of film in the near future, but so far we covered the greenhouse just once. Call around before you order online. The film must be at least 6 mil (better to go with thicker if you are in areas with heavy snow), and 20 feet wide. Buy at least 60′ of the film.
Materials total = $360.66
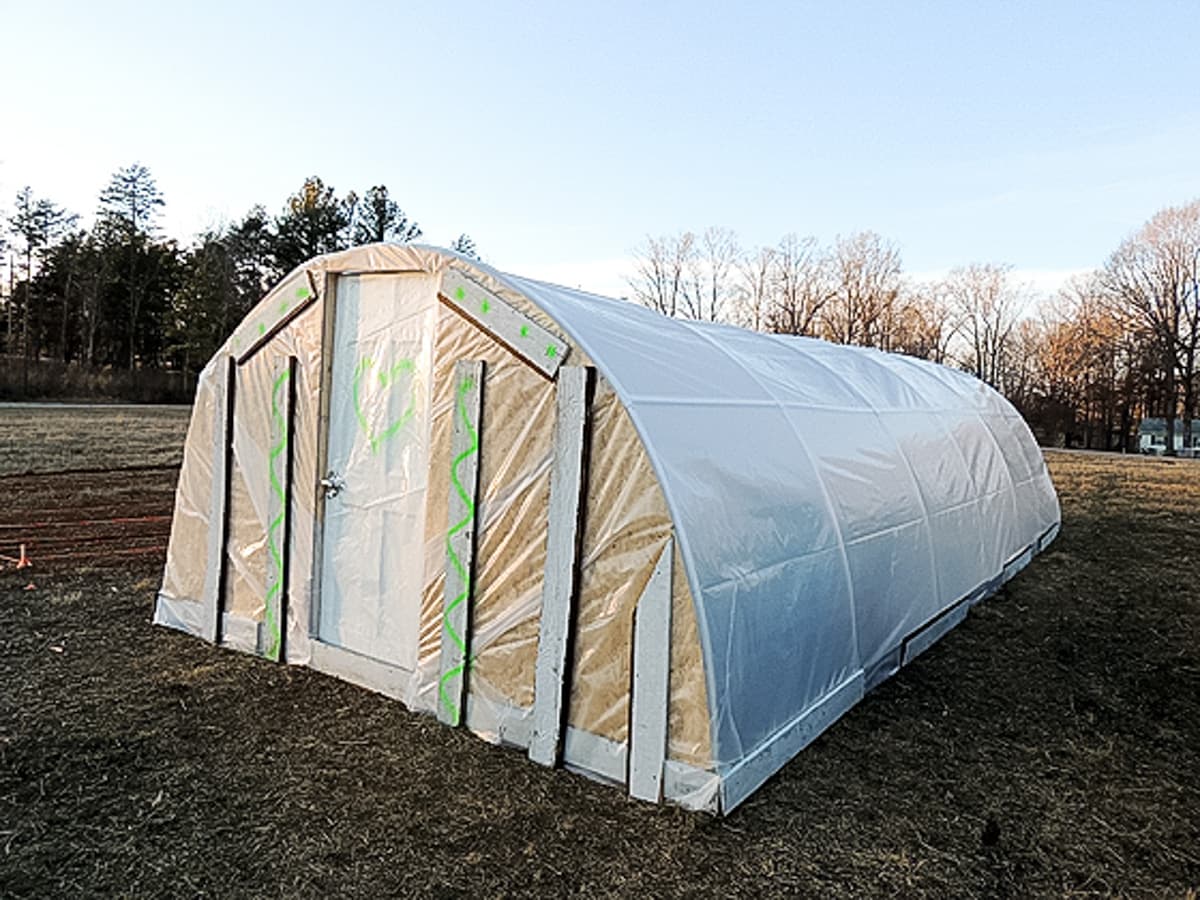
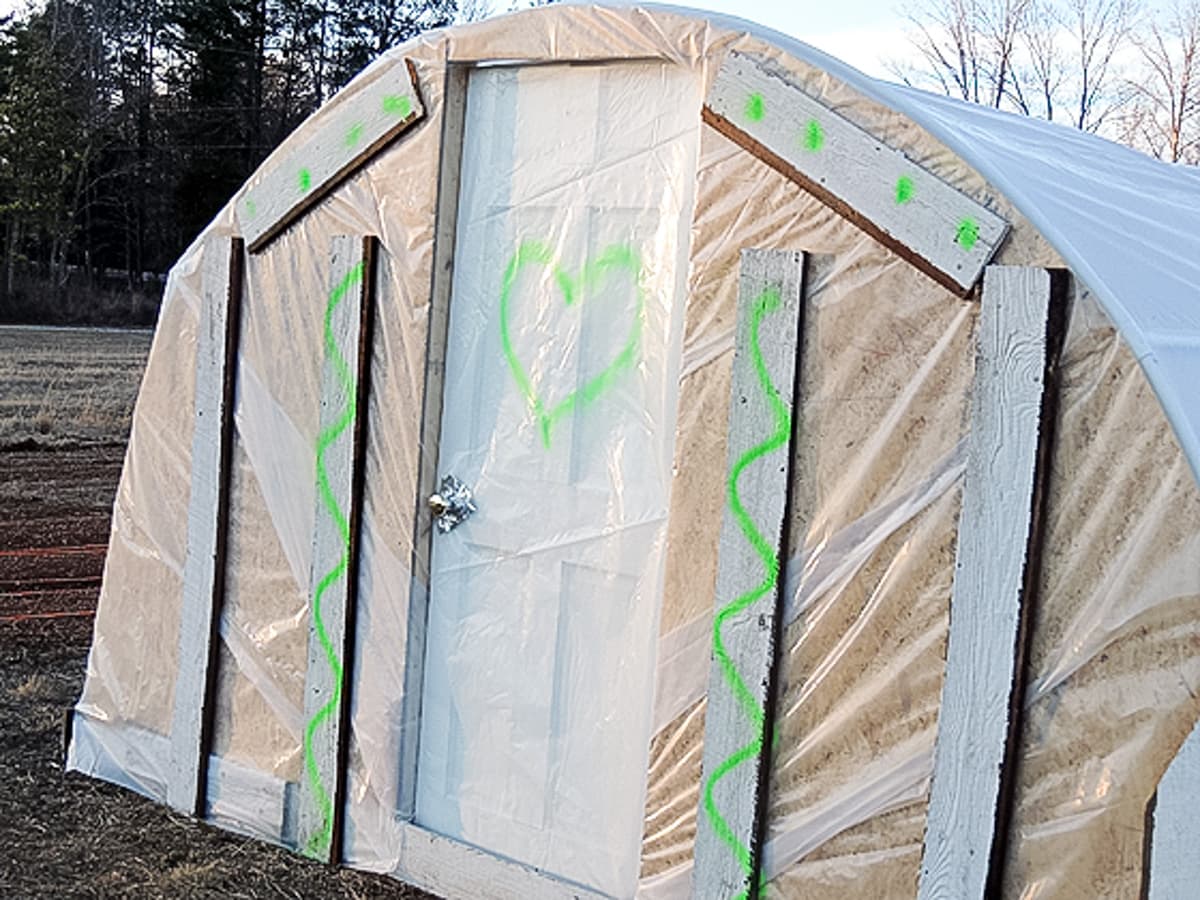
Please note, we love building things ourselves, but truth be told, we are not very good at making them pretty. They will always be a 100% functional, but pretty? Not so much. As we were nearing the end of the project, I asked my ex-husband how come we don’t try to make things pretty. He gave me the look, the one that says “I’ve been working on this thing for two days and you dare to complain?”.
I dropped the subject and went to the other side of the greenhouse to work on the plastic cover. When I came back, I found neon green graffiti on the end of the greenhouse… I guess it was his way to make this thing “prettier”. Oh well. I just wanted you to know in case you were wondering about the artwork.
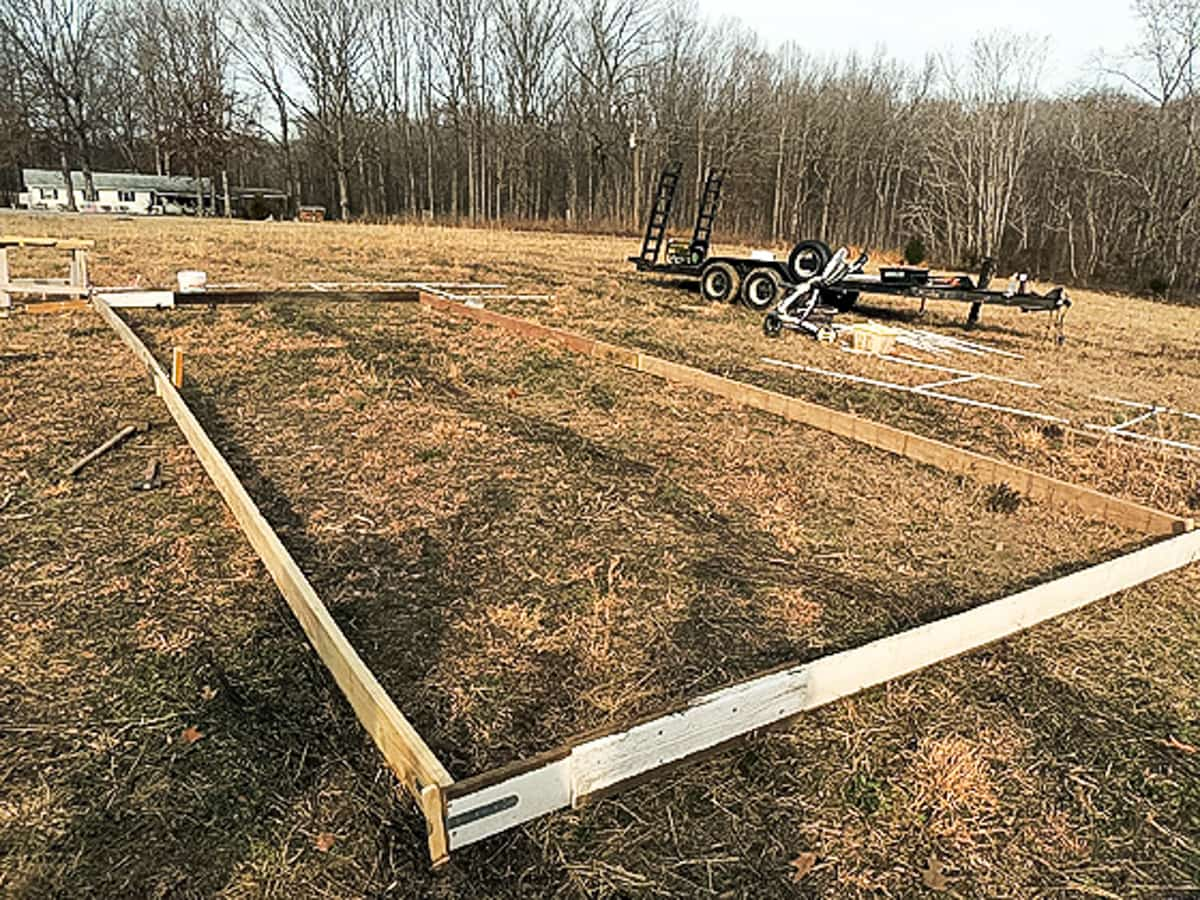
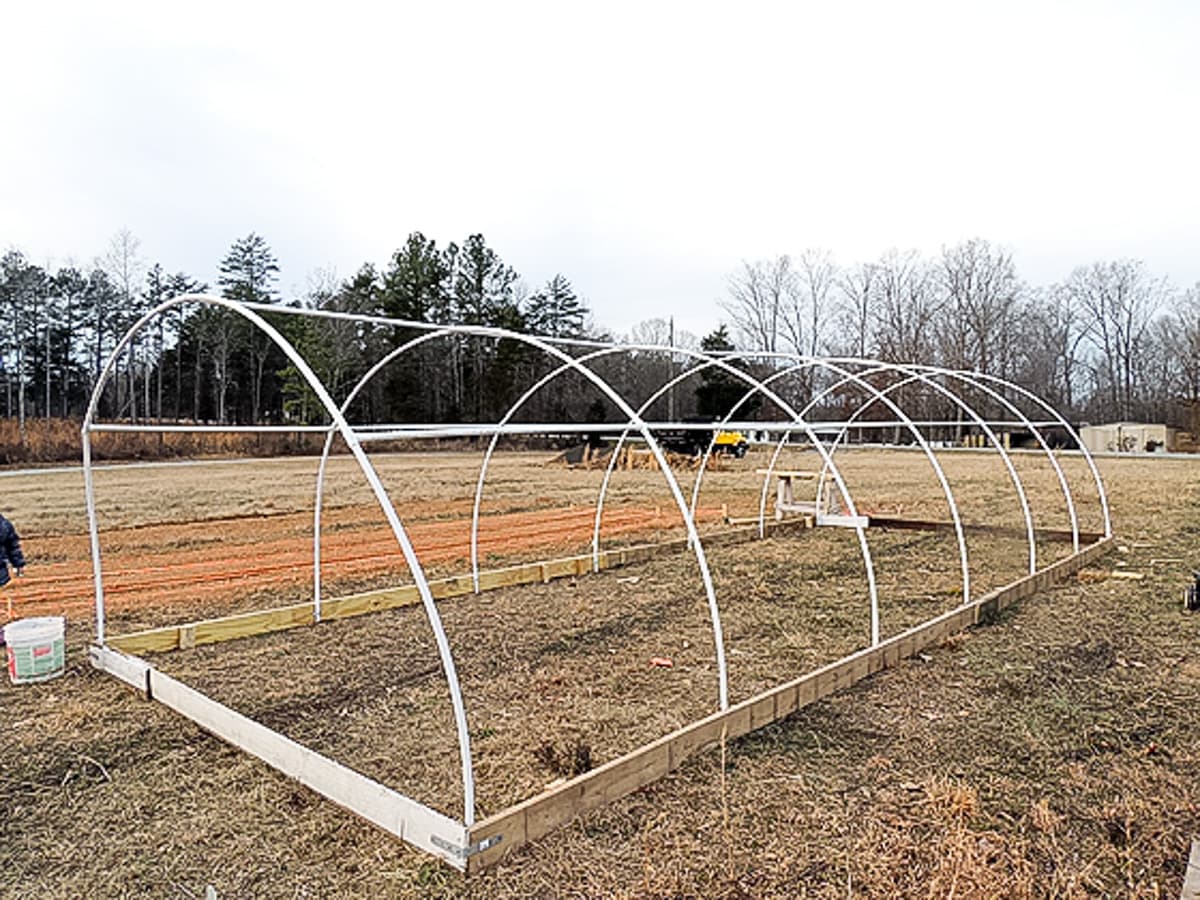
We started by measuring the lengths and diagonals of the rectangle. The shorter lengths are 12′ each, and the longer ones are 30′ each. The diagonals must be equal. Then we built the frame from 2x6x16s and some reclaimed wood we had laying around. If you have to purchase everything, you’ll use the 2x6x16 lumber for the long sides (2 for each side, shorten each one by 1 foot), and 2x6x12 lumber for the short sides.
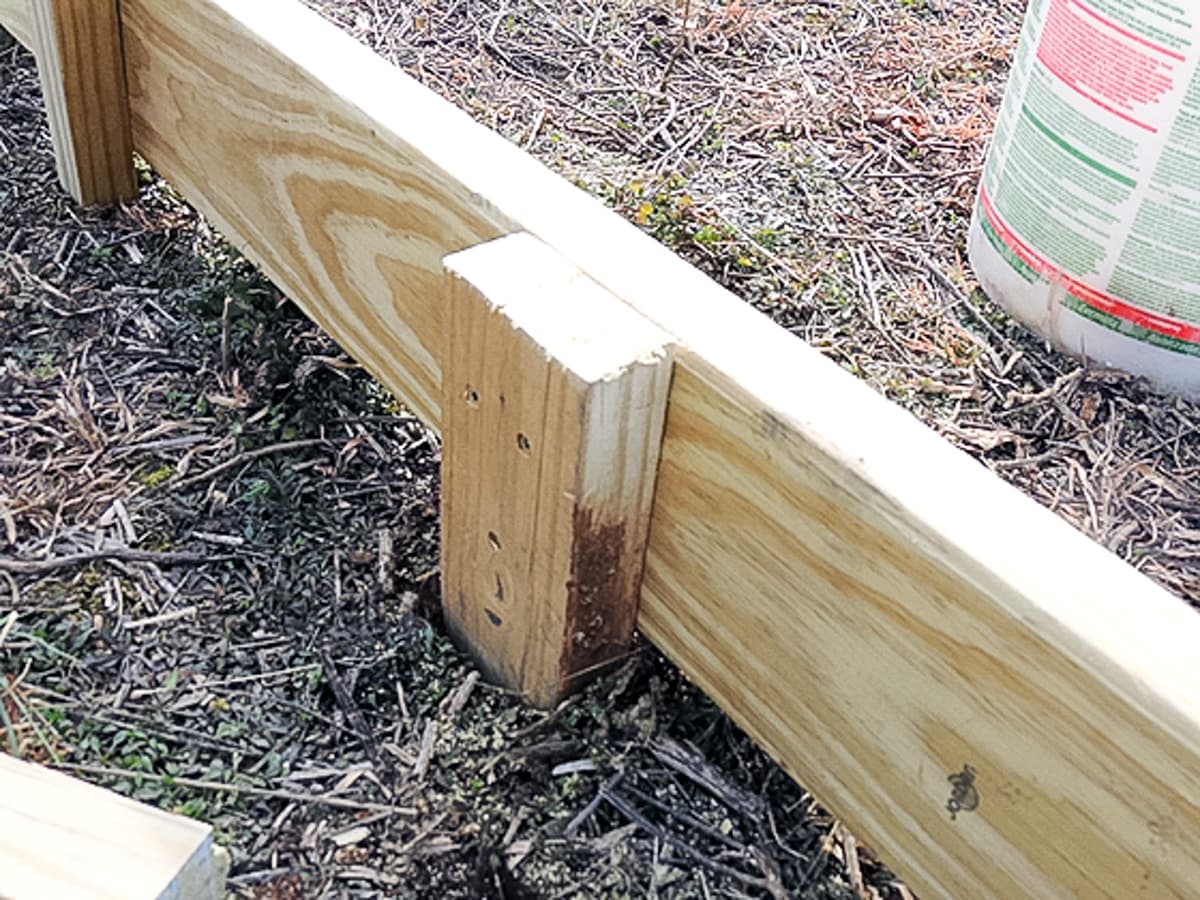
Next, we secured the frame by hammering a few pieces of leftover lumber into the ground and screwing the frame to them.
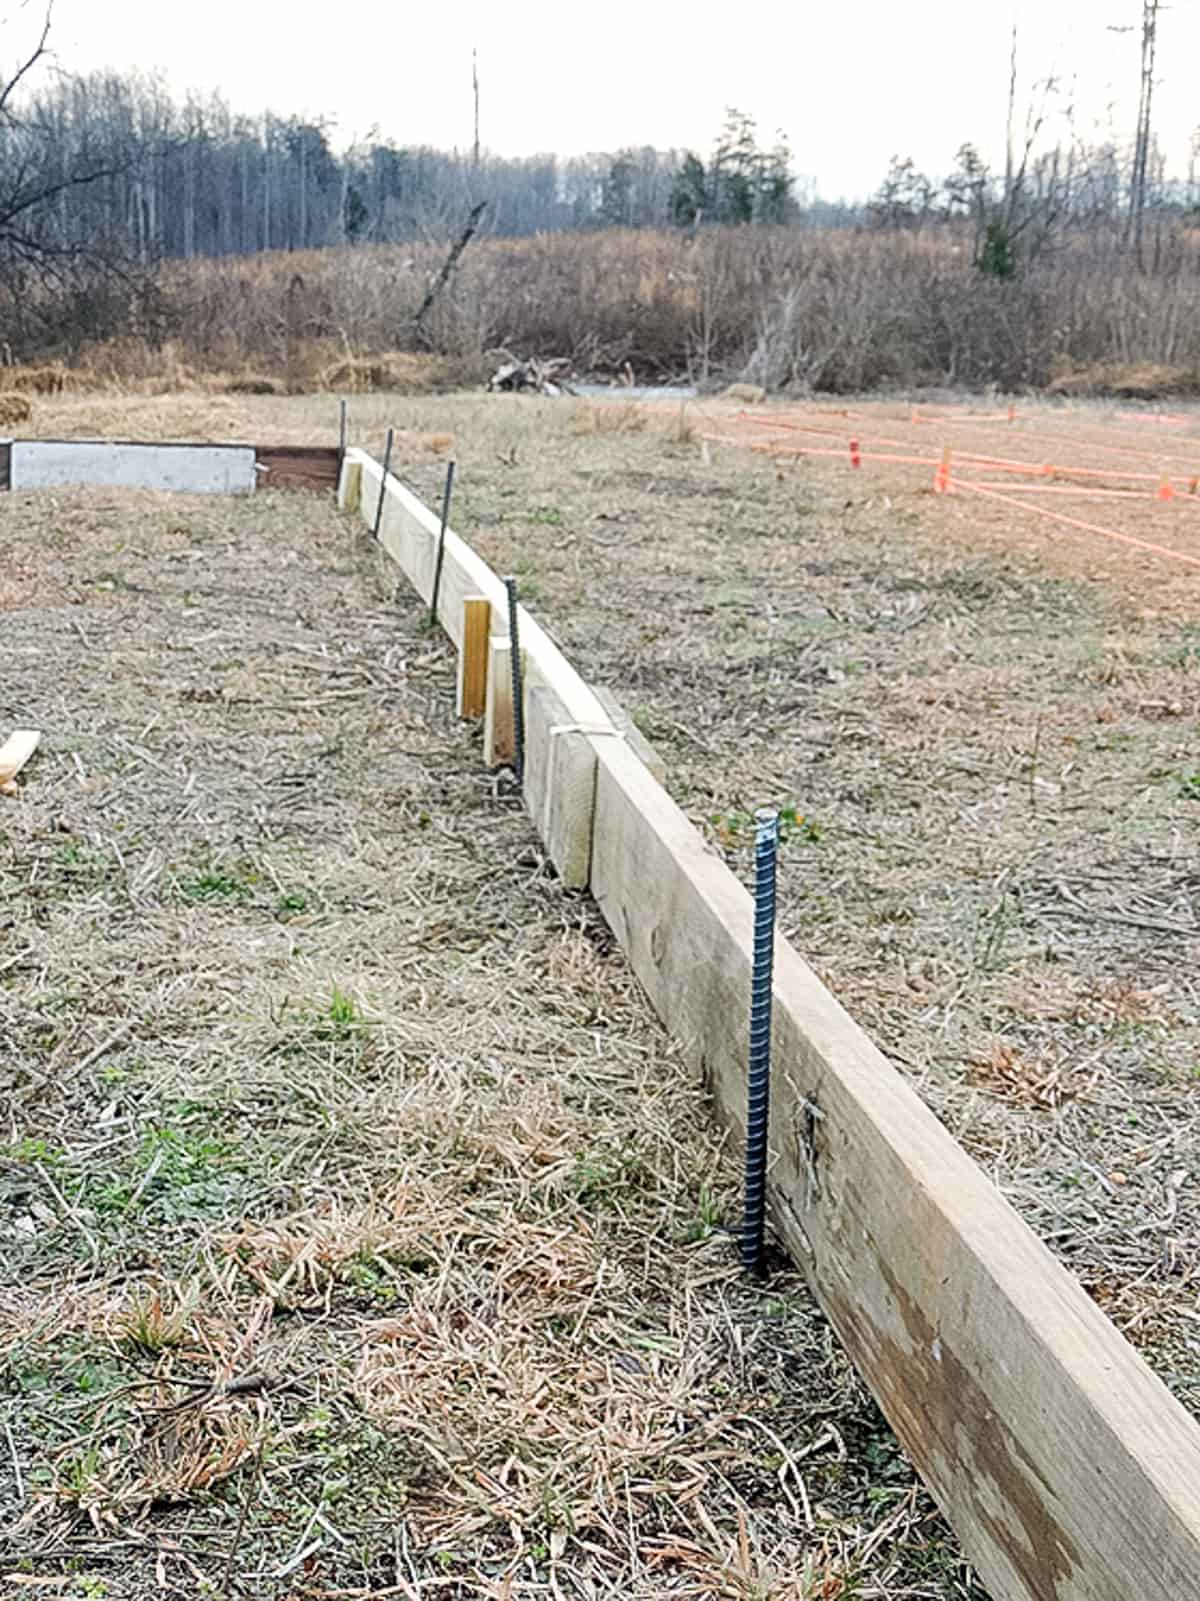
We positioned the rebars every 5′ down the two long sides of the frame. Now the frame is ready for the PVC.
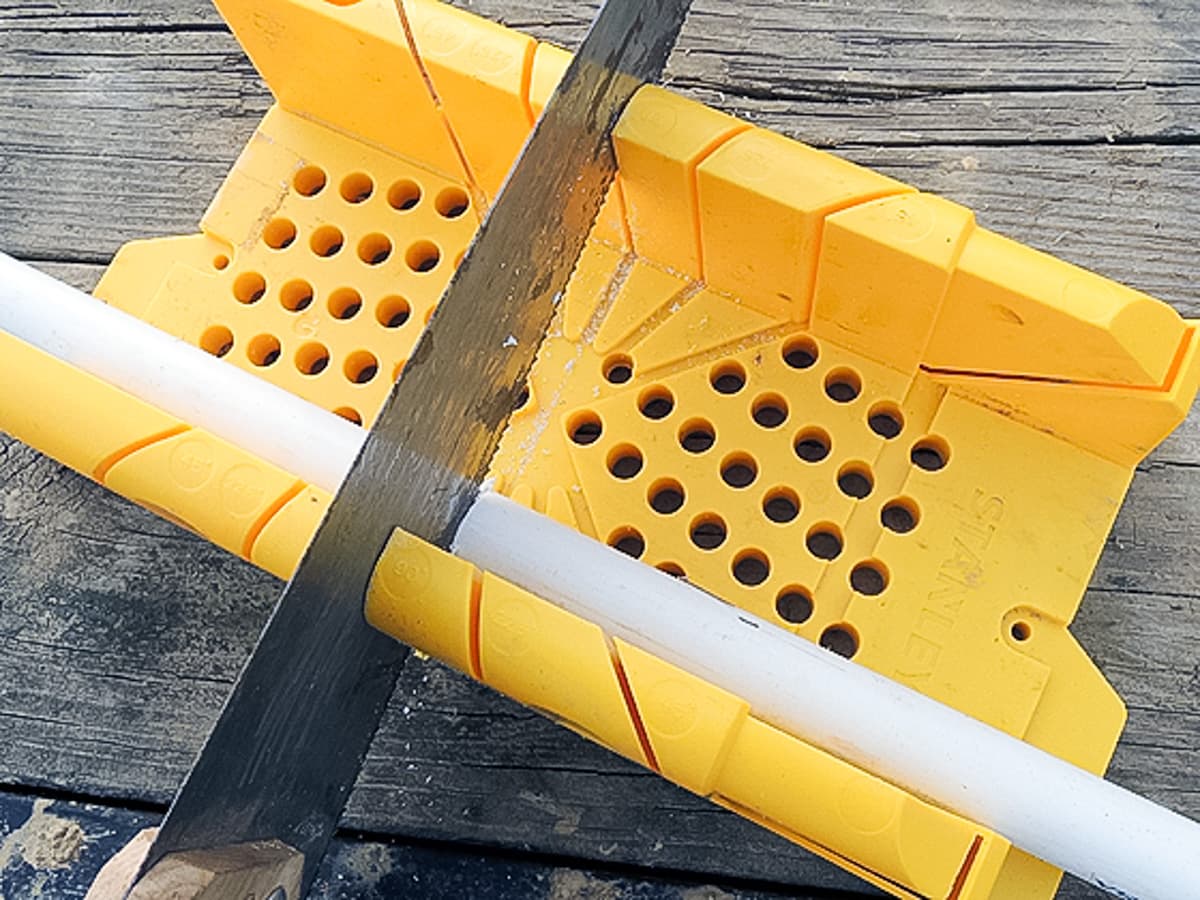
To prepare the PVC, we cut all the 10′ sections in half…
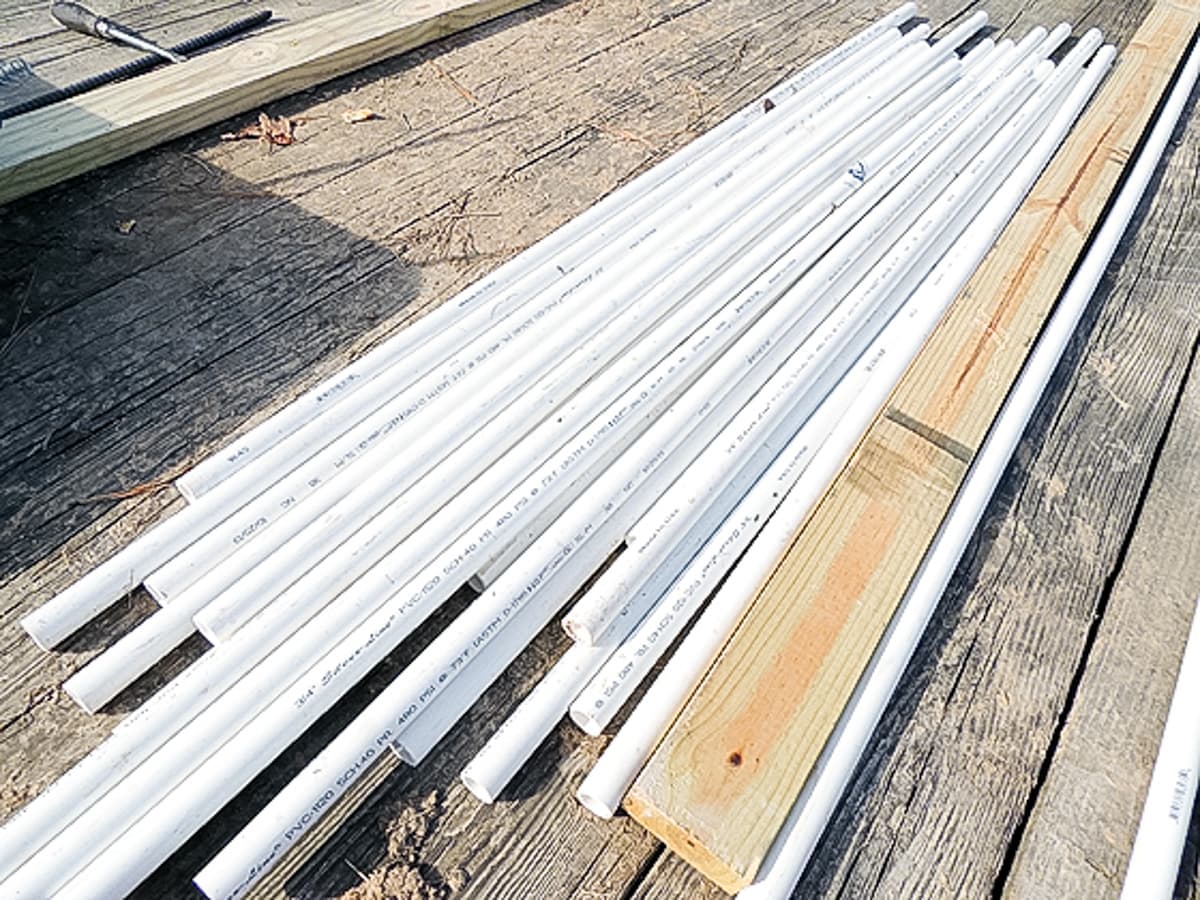
So we were left with 46 5′ PVC pieces.
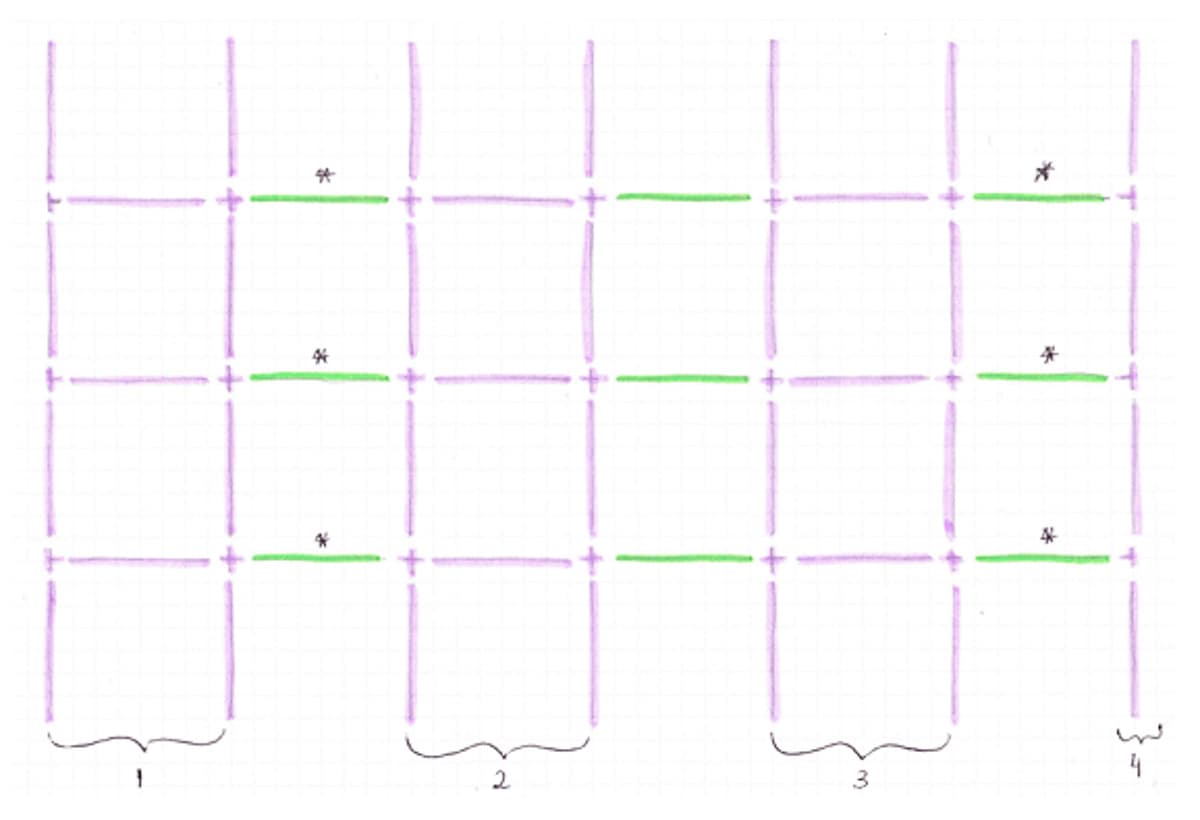
Each line in the picture above represents a 5′ PVC pipe. We started by assembling sections 1, 2, 3, and 4.
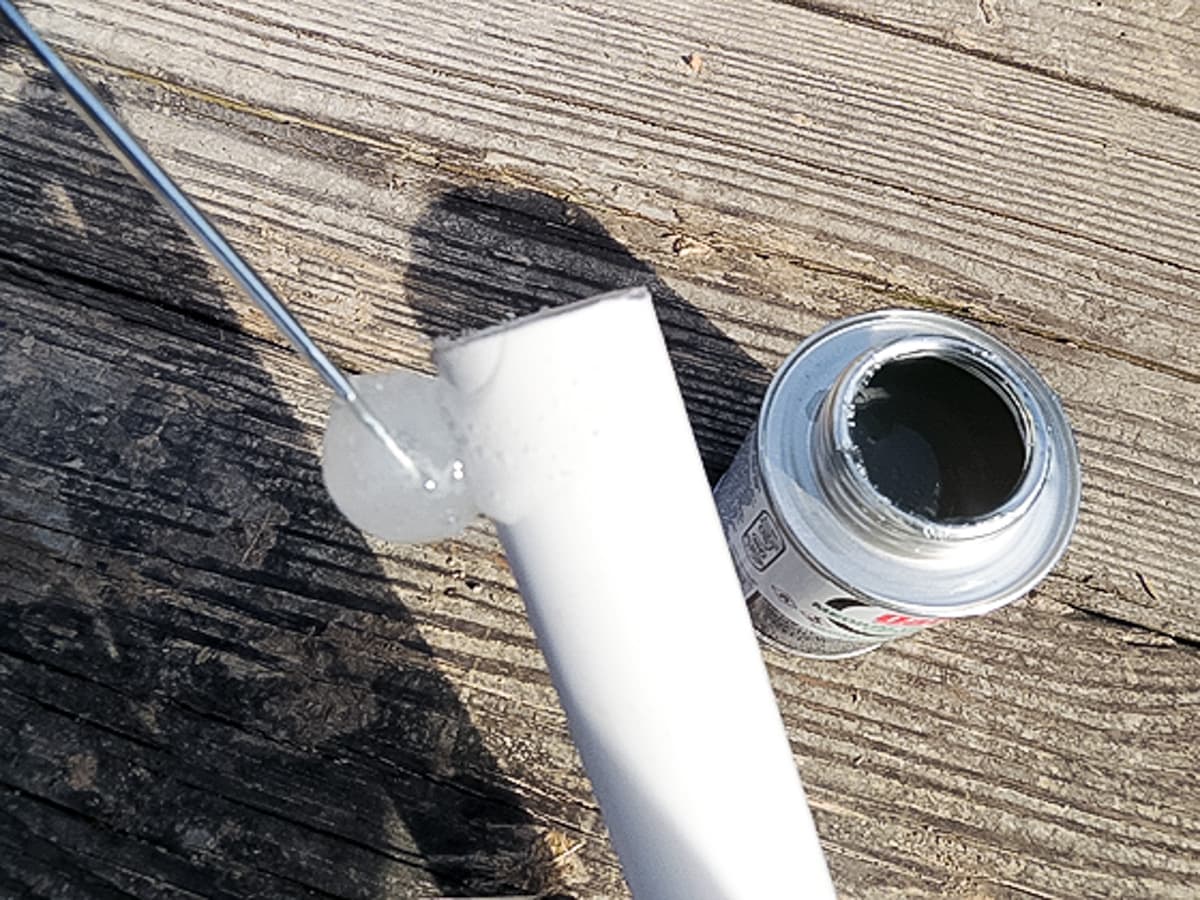
Use Oatey PVC Cement to coat the end of each pipe and the inside of the joints. Then, you just push the pipe into the + or T joints and let it dry for at least 30 minutes. (Note, it is better to do this a few hours before you install the hoops to make sure the cement is completely dry).

We ended up with three sections that look like the one in the picture above (1, 2, 3) and one end section (4). Make sure you make those sections on a flat surface, so the opening of the T and + joints all point in the same direction.
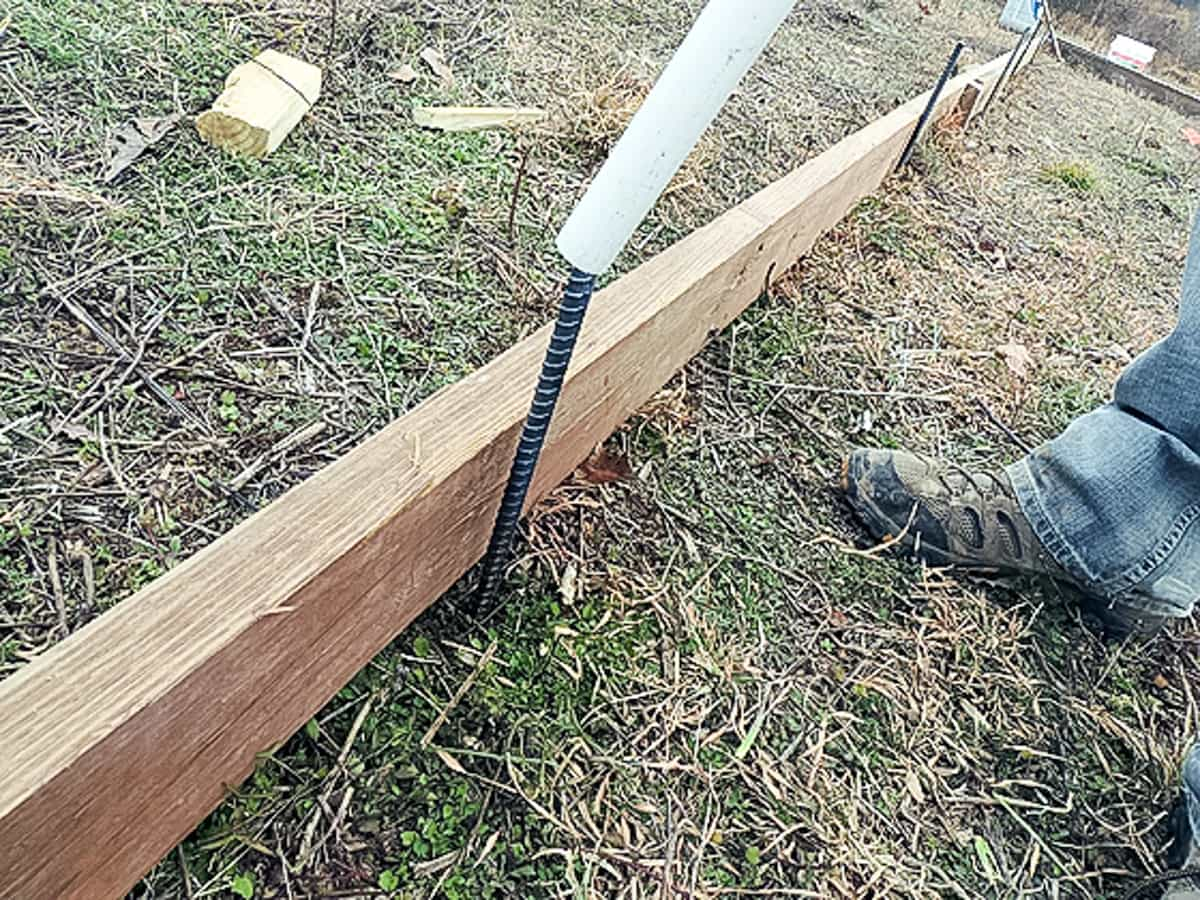
To install the hoops, you simply slide the pipes over the rebars.
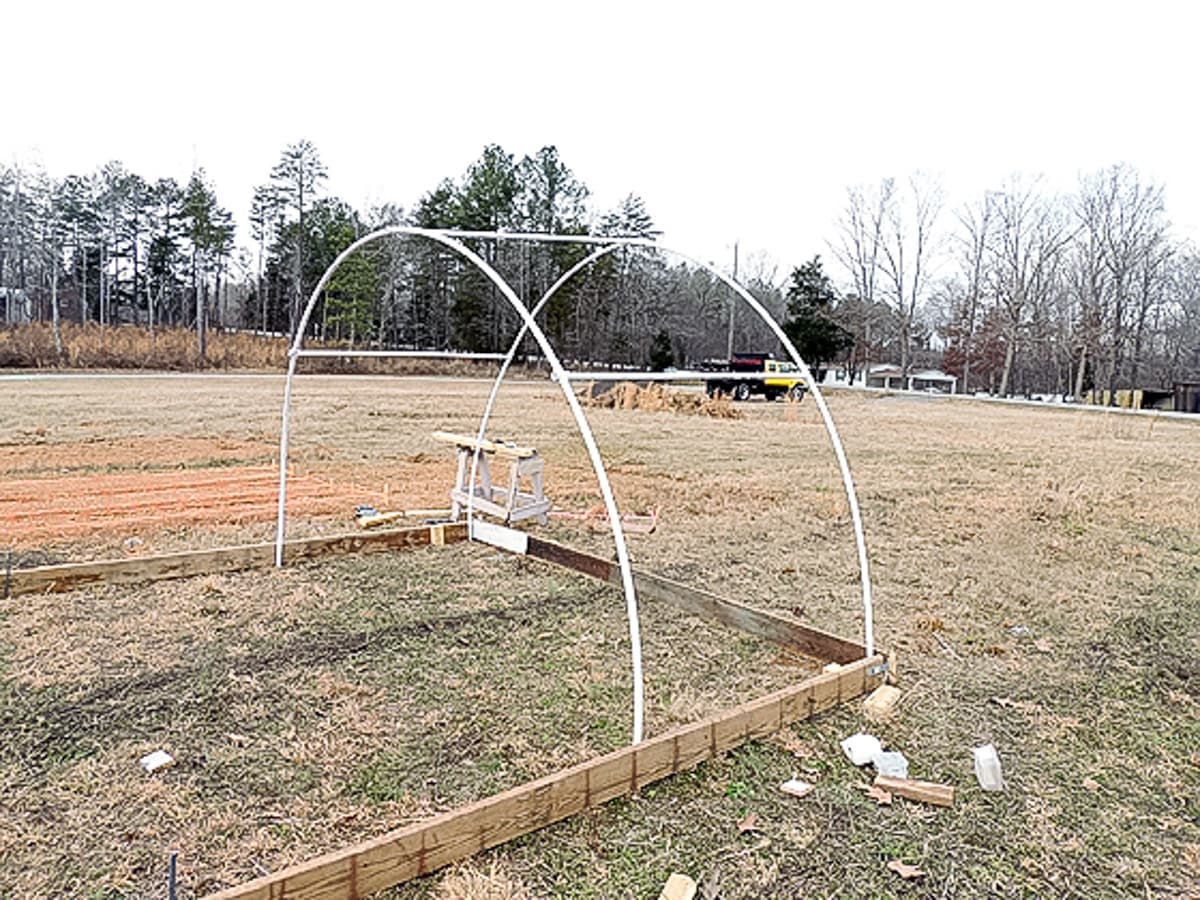
Here is the first hoop going up.
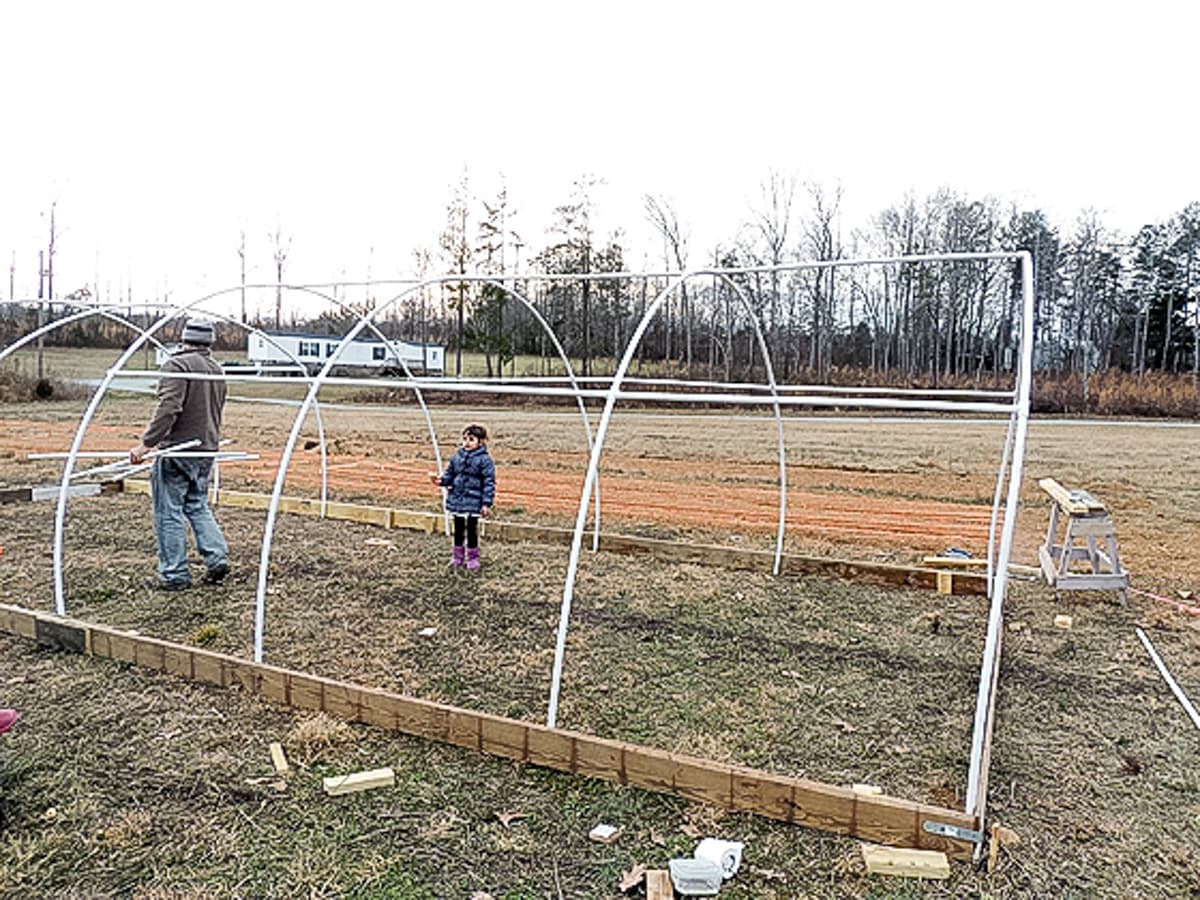
After installing sections 1, 2, 3, and 4 up, connect them with the remaining 5′ PVC pipe (the ones marked in green in the diagram above).
Notice one thing here; since each of the + joints adds about an inch, we ended up with the last hoop pushed out of the frame. To fix this, we shortened the pipe sections that have a star above them in the diagram above.
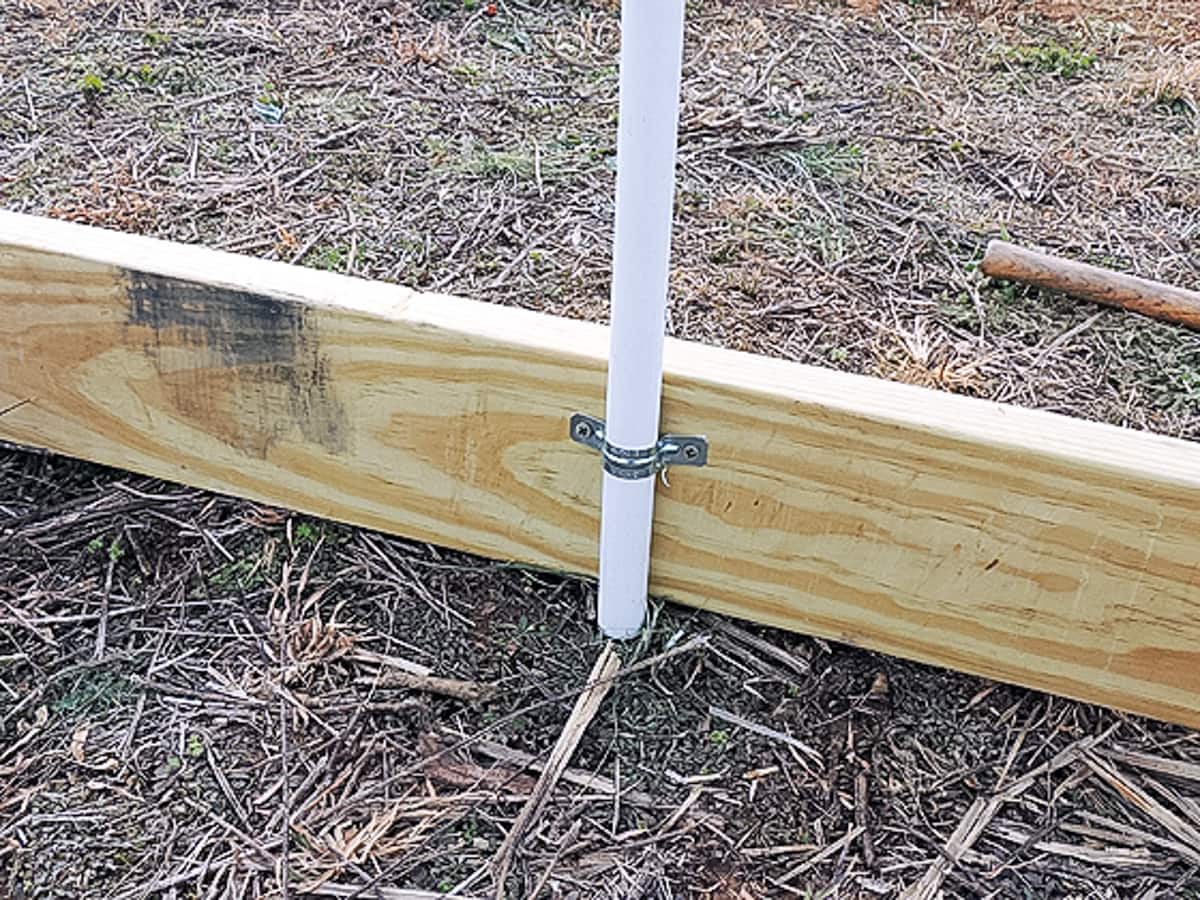
Next, we secured the pipes to the frame with the rigid straps.
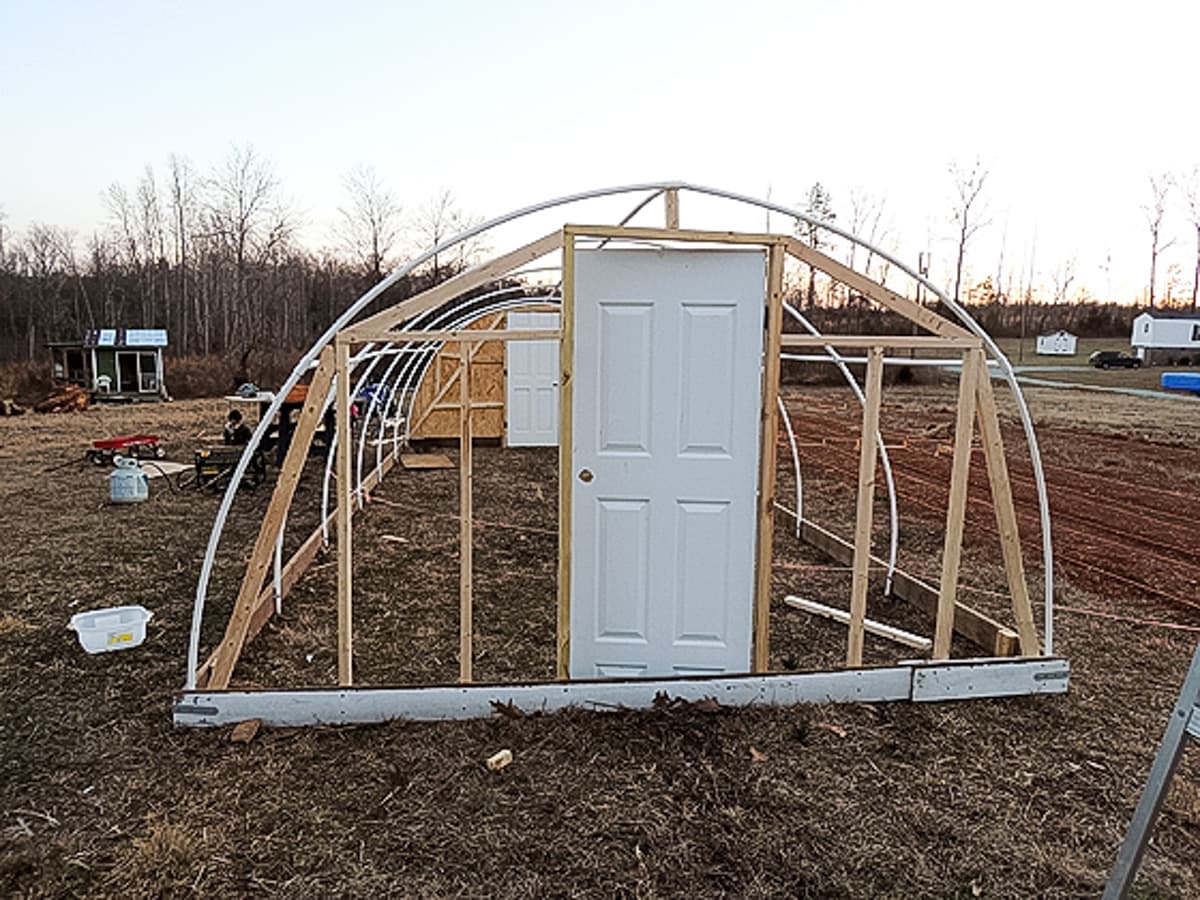
The ends were the most amount of work. We built a frame for the door and a frame to hold the plywood.
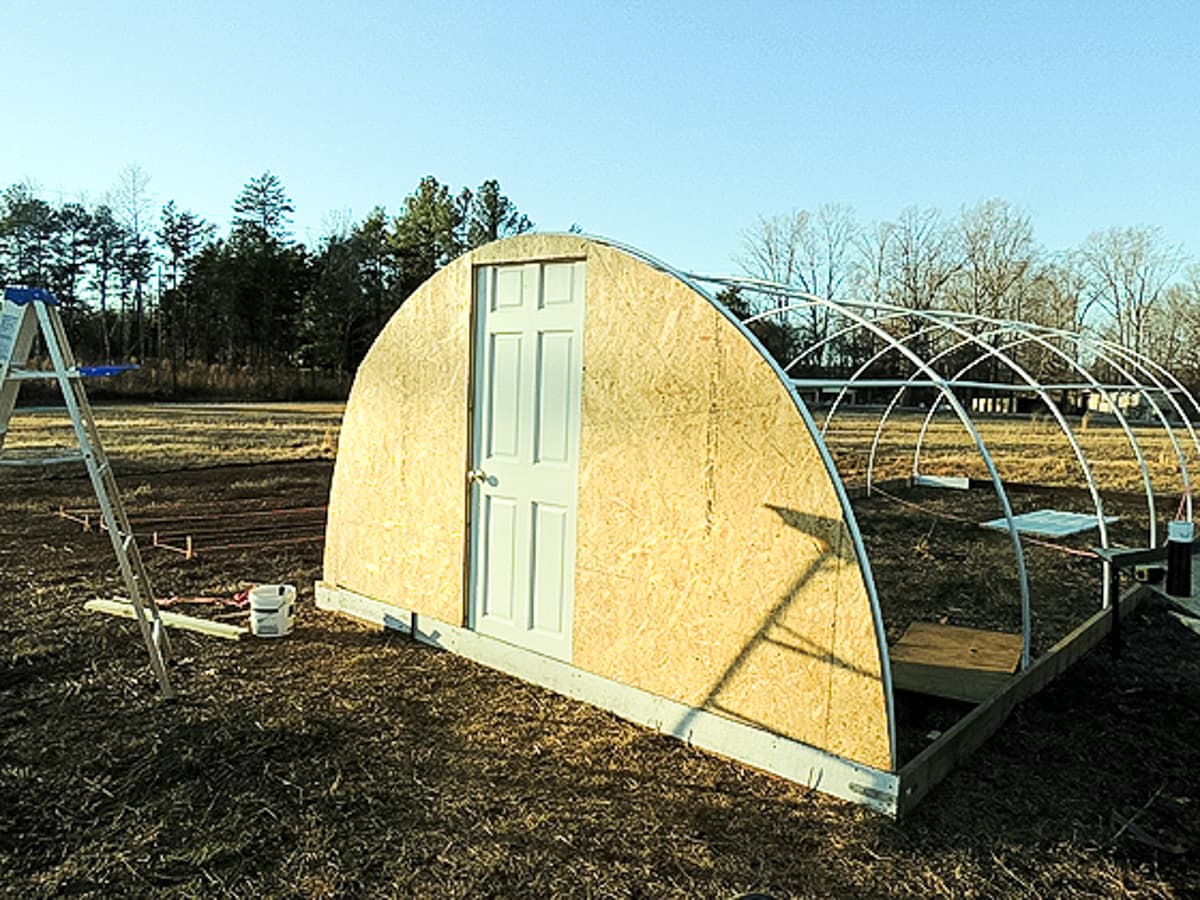
On the frame goes the plywood…
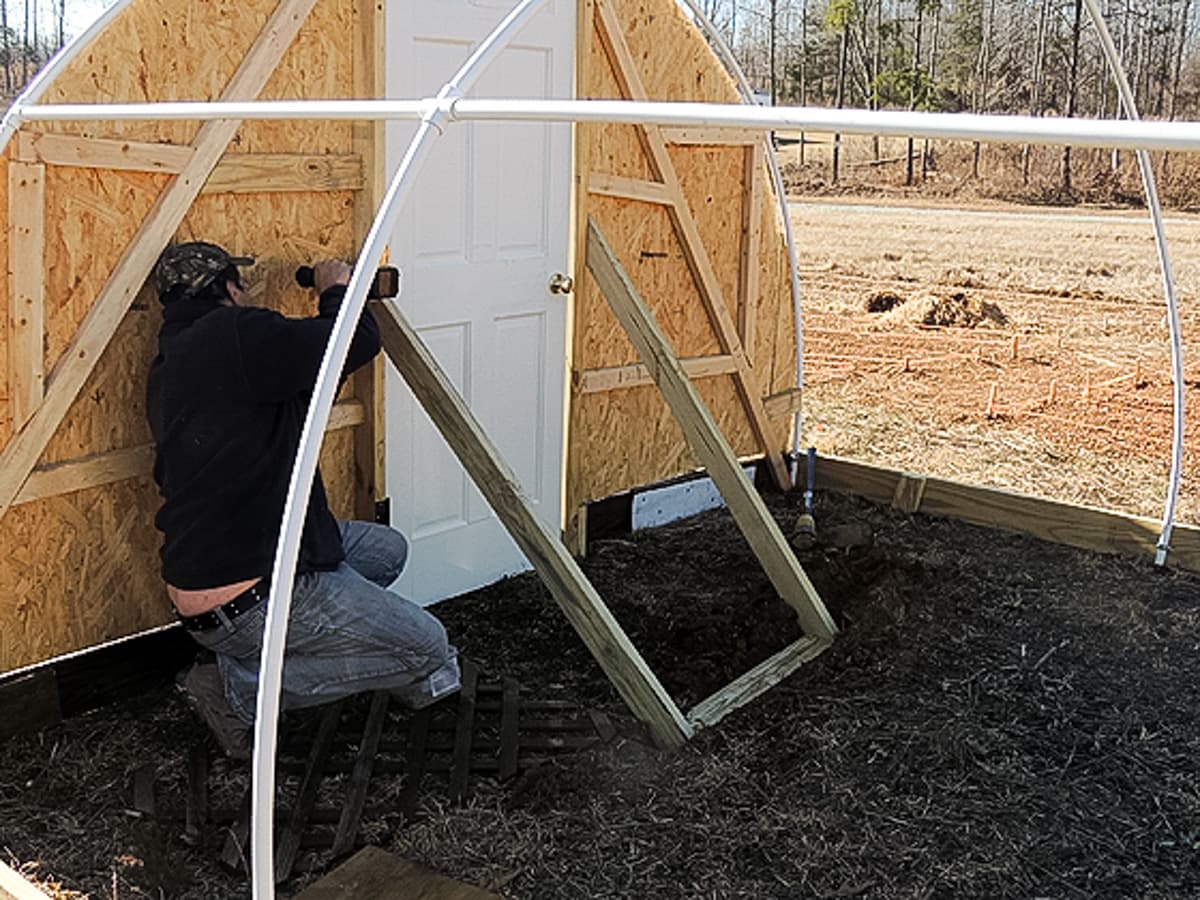
We ended up adding more support since it gets really heavy with all the plywood. Looking back we should have dug two holes for the 2x4s that make the door frame and bury them in the ground as you will do with fence posts.
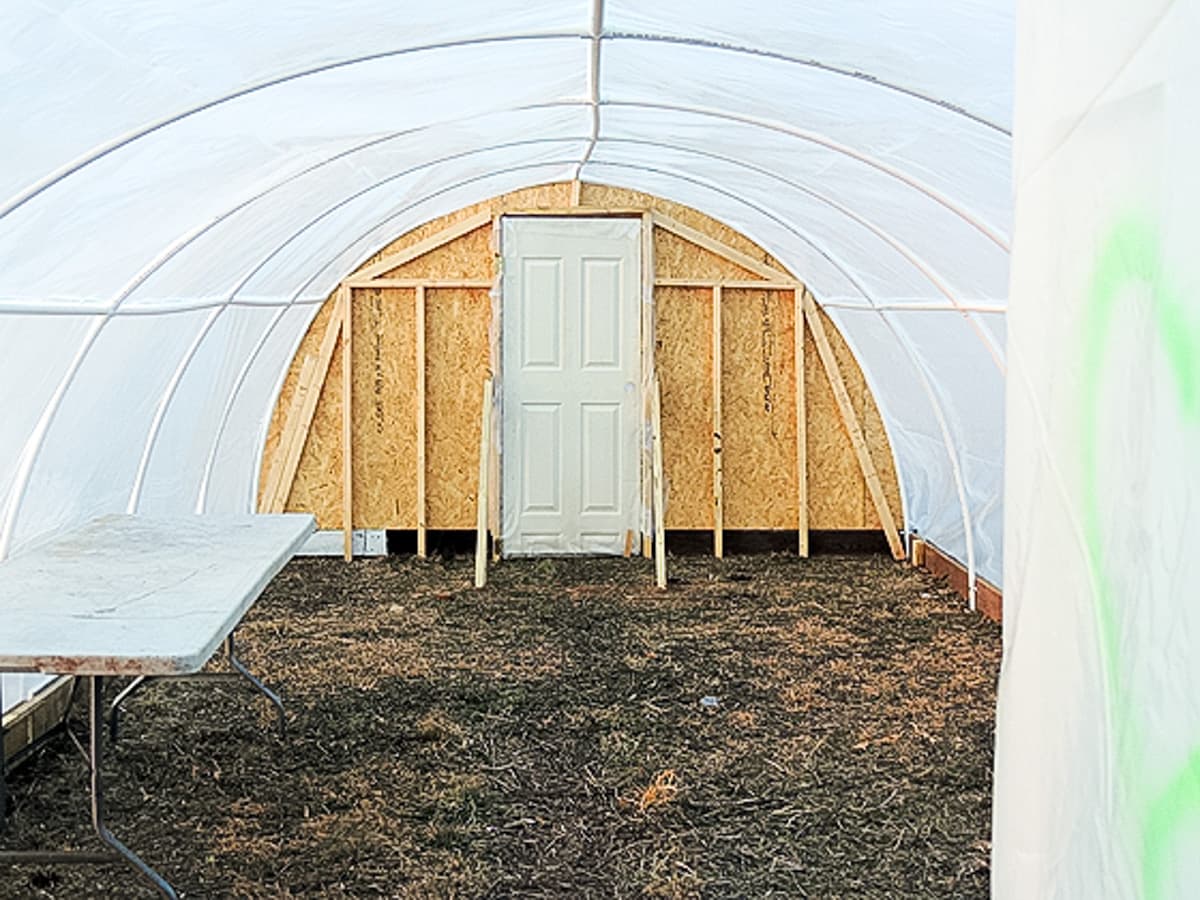
Lastly, we covered the whole thing with 6 mil greenhouse film (since we used untreated plywood and indoor doors we covered them as well. Try to use a storm door if you can find one. You can also paint the plywood and door instead of covering them with plastic). We secured the film to the frame with a stapler gun and then added leftover pieces of wood around the outside. We screwed those to the frame so the film is between those pieces and the frame.
It gets very very hot in there. It’s very important that you have two doors or at least a door and a window. You will have to open both ends on a warm day if you don’t want to cook your plants. The plants also will benefit from airflow.
I think I will cover the ground with a thick layer of mulch or weed barrier fabric, so I don’t end up with a jungle of weeds inside the greenhouse. We will also build tables and a potting station inside.
This project took us about 2.5 days, and we have three little kids running around. So for $360 and two days of work you can have a very nice size greenhouse to start plants early.

Very nice. I’m doing something very similar. My hoops will be 4 ft apart, using 1 inch grey electric PVC and shadecloth. I’m in Florida, and this means I’m concerned more with intense sun, grasshoppers and deer than cold. For the ends, I’m just using old 6 x 8’s buring 3 feet deep. No real swinging door, just a shadecloth flap. Around the shade house, field fence with electric strands to discourage the animals. These days, your Greenhouse would probably push $600 with the price of wood and PVC. I’m lucky to have a lot of old pieces laying round. This is a quick and dirty shade hoop house because it’s getting that time or I’ll miss the spring. I’ve also got a whole lot of 1 1/4 electric PVC and I’ll be tossing up a 2nd. Then I’ve got a real greenhouse to build, with a hoop bender and metal conduit with a gable roof. That one will take a lot of time. Really looking forward to an awesome adventure!
Sounds like a good plan! You can always throw a shade net on the hoop house in the summer. And you might need a fan to keep the air moving.
You said you only used this for a short time, but you never said why. Snow? Would it be better with metal rather than PVC braces?
I need to update this post! Anyway, yes, a few weeks after we built it there was an ice storm. We lived an hour away at that time so I couldn’t remove the ice from the greenhouse during the storm. When I came to check on it a few days after everything melted I found a huge piece of ice that caused the whole thing to collapse. If I lived on the farm at that time it would have been easy to prevent it by going out every few hours to brush the snow/ice off. But anyway, it will be much stronger with metal if you can do that. The PVC is good enough for places with very mild winters.
it would have also been stronger if you used the grey conduit pipe instead of PVC. It doesn’t get brittle in cold like PVC. So while the plastic may still have torn, your frame would have survived. Another trick is snowy places is have water filled dark barrels or trash cans (Brute is the best trash can, imo) inside the tunnel. It collects heat during the day and releases it at night, preventing rapid temp changes and helping snow melt and slide off. Not fool proof, but it helps.
Such great tips! Thanks. We should have definitely used the conduit, I don’t know why we didn’t… But I think that my next greenhourse is going to be built completely different…
I am going to remember the dark barrel trick tho, no matter what materials I use. Smart!
Thanks.
Husbands are like that, yes they are. But we love them and they do the heavy lifting so we keep them around.
Your greenhouse is terrific and it is pretty. After all, Beauty is form and function meeting.
I’ll definitely keep mine!
Unfortunately, our greenhouse didn’t survived the snow storm we had here this week. It is such a disaster! I’ll write all about it when we go pick up the ruins. Couldn’t even step outside this week. I hope I can save some of the stuff I have in there…
Thanks for visiting.
Love this!! I really want to do a greenhouse, we could never fit this in our yard (epically tiny suburban plot) but I think it would scale down nicely for our needs. Thanks for adding this to the Homestead Blog Hop! Hope we see you again this week.
PS Love the art work 😉 form and function lol
Lol! You can add to it or make it smaller. Pretty easy to play with it. Thanks for visiting.
Oh I wish I had the room for some thing like this!! But I just have to settle for mini hoops and cold frames in my small garden! Very cool thanks for the post!!
You can still do a lot with simple hoops and cold frames! Thanks for visiting.
I swear you have the best ideas! I’m showing this to my husband….I’ve been wanting a greenhouse for years, hopefully I can talk him into this
Thanks again for joining us at Green Thumb Thursday last week! Hope to see you this week too!
~Lisa
Fantastic project! Thanks for linking up to Awesome Life Friday! We will be pinning this post – can’t wait to see what you’re sharing this week!
Thanks for sharing at Simple Lives Thursday; hope to see you again this week.
But, can you leave your husband alone with a can of paint? 🙂 Totally my favorite on From The Farm! I love this!!!!!!
LOL! Obviously I can’t leave mine alone with a can of paint.
Hi Lee!!!!!!
Feeling better every day thanks to some loving friends!!!!!!!!!!!! Thank you so much for caring, and also wow. You guys are amazing, what a project and can’t wait for our next trip to your place. I bought a few seed pacs the other day. Did not buy heritage seeds this year yet. Hope to get them going in March. I can’t wait to show Greg your green house and go much smaller here for a potting shed sized green shack. This will help me feel better quickly. Love the garden but I stink at it.
Love Debby and family
So happy you are feeling better Debby! We will be working at the farm this weekend and it should be nice outside so feel free to come visit if you are strong enough. Almost all my seeds this year are either organic or heirloom. I am excited to see if there will be a difference in the growing experience.
You guys did a great job! I think I need one of these…but I won’t leave my husband alone with a can of paint. 🙂
Thanks for a great article. The photos and directions are easy to follow and helpful. Your sense of humor makes it seem easier than I’m sure it was. Thanks for sharing this affordable option to having a green house.
You are welcome Rhonda! Thanks for stopping by.
I can totally relate to “the look” from your husband! Thanks for sharing your plans, a great cheap, quick, and functional model.
So… You get the look sometimes too? 😉