This post may contain affiliate links, view our disclosure policy for details.

Learning how to butcher a turkey might be simpler than you think. By the end of this post, you’ll know everything that you need to know about butchering turkeys. I hope that it will make this task a bit less intimidating for you.
My friend raised turkeys for Thanksgiving and Christmas. She was looking for someone to show her how to butcher them and I was happy to jump in and help.
I know that this task can be a little intimidating. I remember how overwhelmed I felt the first time that we processed meat chickens. I wanted to make sure that I am being as human as possible, and I wasn’t sure that I’d be able to do the killing.
Now, a few years later and after butchering many chickens and also butchering my ducks, it’s no longer as traumatic and scary.
How to Butcher a Turkey…

It happened that a few more ladies wanted to learn how to butcher a turkey, so we gathered on a fall Sunday morning and got to work.
You can call it old fashion socialization! No internet involved, just good old skills passing along from person to person.
I want to take you with us in this post and show you in as much detail as I can how to butcher a turkey. Hopefully, I can make this task just a bit less intimidating for you. Let’s jump in!
When Are Turkeys Ready For Butchering?
We won’t go into breed and growing information too much in this post since if you landed here you are probably already raising turkeys, but the answer to the question of when are they ready for butchering will depend on what breed of turkeys you are raising.
If you chose the Broad Breasted White turkey (this breed is the one that we find at the store) it should be ready for butchering at 3 or 4 months old. Depending on the feed that you chose, the turkeys can weigh anywhere from 10 to 30 lb.
If you chose a heritage breed, it will probably take them a couple of months longer than the Broad Breasted turkeys to reach butchering size.
Some people get their turkeys in the spring and let them live a longer life, butchering right before the holidays.
Just consider one thing… A larger turkey is not always better. I’ve heard of many homesteaders that let their turkey grow way too large to the point that they couldn’t fit the bird in the freezer or the oven!
Think about how you are going to cook the bird and raise it accordingly.

One more thing to note… You might notice that at some point your turkeys are starting to grow short, fuzzy bristles at the base of their neck, between their breasts.
This is the turkey’s “beard”. It’s more common to see them on male turkeys but they can appear on female turkeys as well. They are a sign of maturity.
So in some cases, the “beard” can give you an idea if your turkeys have reached their mature size (they can probably still grow fatter depending on what you feed them though).

We’ll pluck the beard with the rest of the feathers when we pluck the bird but I wanted to show this picture to you since it comes out a little differently than the other feathers.
Preparing to Butcher a Turkey…
Butchering is much easier if the bird’s digestive system is empty. So remove all feed 12 to 18 hours before butchering. You can let the turkeys have access to water.
Also, try to work on a cool day. If it’s a warm day and the flies are a concern, just make sure that there is a cooler with ice close by to store the bird and prepare to move quickly between the steps.
What You’ll Need to Butcher a Turkey…
You want to gather your butchering tools and make sure that you have everything that you are going to need before you kill the turkeys.
When I prepare for butchering, I like to think about the flow in stations.
We are going to move between four stations:
- Killing.
- Plucking.
- Butchering.
- Packing.
Here are the tools that we are going to need in each station…
The killing station – there are a few different ways to kill a turkey. They are large animals and most likely are not going to fit in the chicken killing cone.
You can try to find a turkey size killing cone or maybe build one yourself, but most people don’t use a cone when killing turkeys.
Some homesteaders hold the turkey down on a table while another person is cutting the main artery under the jaw.
Some homesteaders make a hole at the bottom corner of a feed bag, put the turkey in the bag with the head sticking out from the hole, and cut the head with a hatchet.
I prefer hanging the turkey by the legs with twine from a branch of my plum tree (even though sometimes they are heavy to lift). Hanging upside down relaxes the turkey and I kill it just like I kill a chicken (we’ll go over this in a minute).
You have to decide how you want to do this and make sure that you have everything that you need on hand. If you are going to use a butchering knife, make sure that you sharpen it before you use it.
The plucking station – once we killed our turkey we move on to scalding and plucking it (assuming that you want the skin. If you don’t, check out my post on how to skin a chicken. You can do the same with a turkey).
We are going to need a pot that is large enough to fit a turkey. I find that a turkey fryer works best (make sure that you have a propane tank ready to go).
We’ll also need a thermometer to check the temperature of the water.
For the plucking, you don’t need much more than your hands but I like doing it in a half barrel (you’ll see below) just to contain the feathers.
The butchering station – here we are going to need the sharp butchering knives again. We are going to need a table to work on as well. It should be a table that is easy to clean. A simple plastic folding table will do just fine.
Also, make sure that you have a five-gallon bucket or two for the guts, head, feet and so on (find it at Lowe’s or Walmart for a couple of dollars).
Make sure to set your butchering station close to a water source. I set it close to my garden hose for easy clean up.
The packing station – the best way to handle the meat after butchering is to let it sit on ice or in the fridge for 24 hours before placing it in the freezer. If you don’t have enough room in your fridge, you will need a large cooler and a couple of bags of ice.
If you’d like, you can break apart your turkey. I prefer doing that because for just the kids and me a turkey thigh and drumstick is enough meat for a meal. Or sometimes I might cook one breast. So I break apart the turkey at the time of butchering and freeze portions in one-gallon Ziplock bags.
If you want to leave your turkey whole, you can wrap it with freezer paper and then plastic food wrap.
Another option (and what you’ll see us using below) are turkey shrink bags. These bags shrink around the turkey when dipped into hot water and protect it in the freezer. If you are using these, you’ll also have to use your turkey fryer again to heat the water.
All right, we’ve got everything that we need. Let’s butcher turkeys.
Step 1 – Humanly Killing a Turkey…

Like I mentioned before, I hang the turkey from it’s feet with a twine…

The twine is folded in half. One end is tied to a horizontal branch of my plum tree (I kill there on purpose. The blood from the animal is a great natural fertilizer for the tree)…

And the other end is hanging down from the tree. I make a loop by folding the twine on itself…

And slip the foot of the turkey through the loop. I then tighten the loop around the turkey’s leg.

Next, I extend the neck down and find the jaw bone with my thumb. I place the knife to the turkey’s throat right over my thumb and cut right on the side of the neck under the jaw.
If blood starts flowing out you know that you hit the main artery. Even though the bird is now unconscious, it will keep pulsing. This sometimes throws people off because they think that the bird is still alive.
It’s not. It’s just the muscles convulsing and the heart is pumping the blood out. At this point, the turkey is no longer feeling anything.
Right after you make the cut, keep holding the head of the turkey. If you let go, blood will fly everywhere because of the convulsing. So hold on just one minute before you move away.

Give the turkey a few minutes before taking it down.
Step 2 – Plucking the Turkey…

Once the bird is killed, some people like to wash the turkey before scalding it. To scaled the bird, we want the water temperature to be anywhere between 145 degrees Fahrenheit to 160 degrees Fahrenheit.

Hold the turkey by its legs and dip it in the hot water. Move it around a bit, side to side and up and down. We want the water to get between the feathers.
Keep the turkey in the hot water for about a minute or so. Then, lift it and try to pull some feathers. If they come out easy take the bird out of the water. If they are still hard to pull dip it in the water for a few more seconds and check again.

There is no technique to plucking… Just pull all the feathers out. Feathers are great fertilizer. If you can, bury them in your garden (I don’t do this because my dog digs in the garden to get them. I just throw them in the woods).
Step 3 – Butchering the Turkey…

Once the turkey or turkeys are plucked it’s time to butcher and clean them up. If you are working by yourself, do one turkey at a time (especially if it’s a warm day). You see a few on my table because we were a few ladies doing this together.
From here on out, make sure to have your five-gallon bucket handy. Everything that we don’t need goes in the bucket. You can bury the guts in the garden (again, it’s a great fertilizer) or in the woods for the other animals to enjoy.

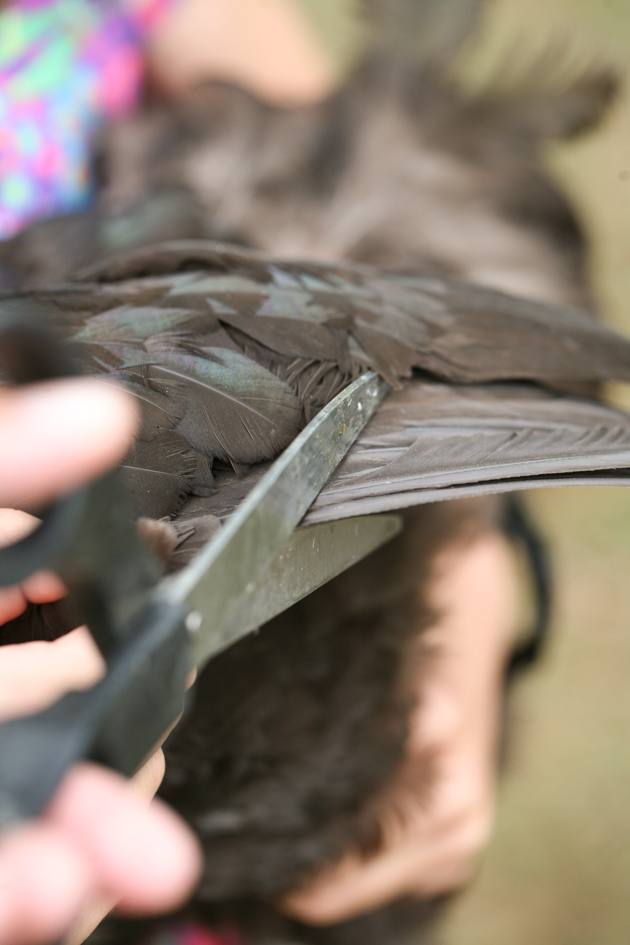
The first thing to do is cut the oil gland that is on the top of the tail…

It’s not good for us to eat and it gives the meat a bad taste. Just cut around it and remove it.

Next, we flip the bird on its back and cut the legs off. Bend the leg backwards a bit and find the place between the joints to make this easier and to keep your knife sharp.

Next, we get rid of the head. Again find the space between the neck bones and cut it off.

The neck has a good amount of meat on it and lots of gelatin rich bones. It’s great for a hearty soup or to make bone broth.
The skin on the neck is not great though… It’s thick and not very appetizing. So I cut it off and give it to my dog. She loves it.

We are going to remove the innards now so I’m including this image here. It is a chicken’s anatomy but it’s the same exact deal with a turkey, just bigger.

Under the skin of the neck, you’ll see two pipes. The thicker one is the windpipe (trachea) and the other is the esophagus. They are connected to the neck with a tissue.

Use your fingers and break this tissue to separate the pipes from the neck. Keep tracing the esophagus and at the base of the neck, under the skin, you’ll find the crop.
This is the sack where chickens and turkeys store their food before digesting it. If you removed feed 12-18 hours before the butchering, this sack will be empty and it’s much easier to work when it’s empty.
Work your fingers around the crop to separate it from the skin.

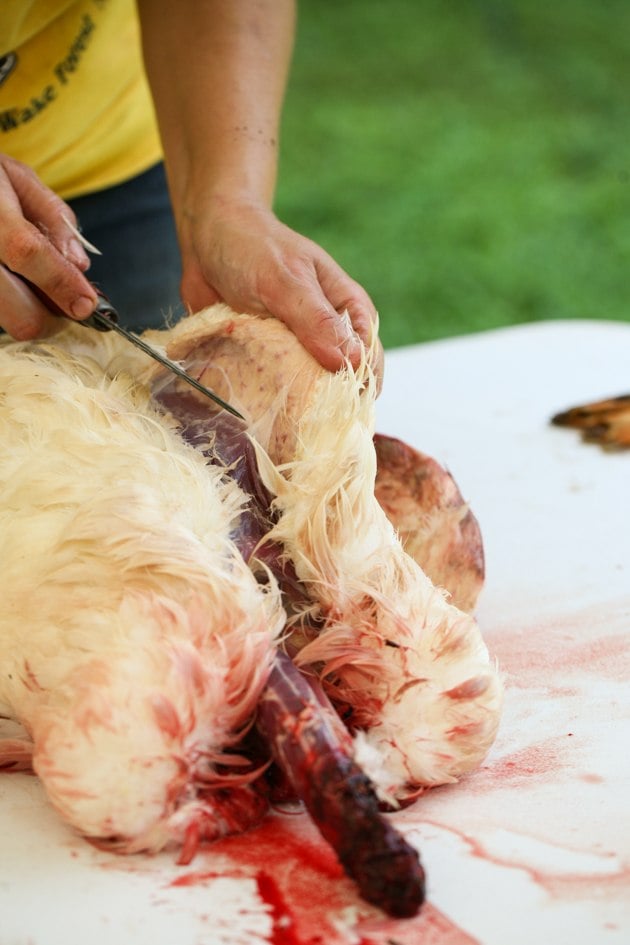
Now, turn the bird so that it’s on its back and the tail is toward you, and make a small cut above the anus. Be careful not to cut the innards, they are right under the skin there so you want to be careful with your knife.

Now, use your fingers to make the opening larger…

I usually use my knife carefully to cut the skin in a straight line towards the tail of the bird.

Reach inside…

And your goal here is to hook your finger around the esophagus and windpipe and gently pull all the guts out of the bird in one move..

When it’s all out, cut around the anus and you are pretty much done!
If at any point, you cut or broke the intestines keep working. After it’s all out just wash the turkey and you are good to go. The meat will be just fine.

I usually keep the liver and heart for my favorite simple liver and onion dish. You can also use the gizzard but I don’t like it so I give it to the dog.
Notice that the liver is attached to the gallbladder (the dark sack in the center of the photo). We want to remove it without damaging and opening the gallbladder. So carefully cut around the bladder to remove the liver.
As for the heart, sometimes it will come out with the rest of the innards and sometimes you’ll have to reach back in to get it. It’s very easy to recognize it.

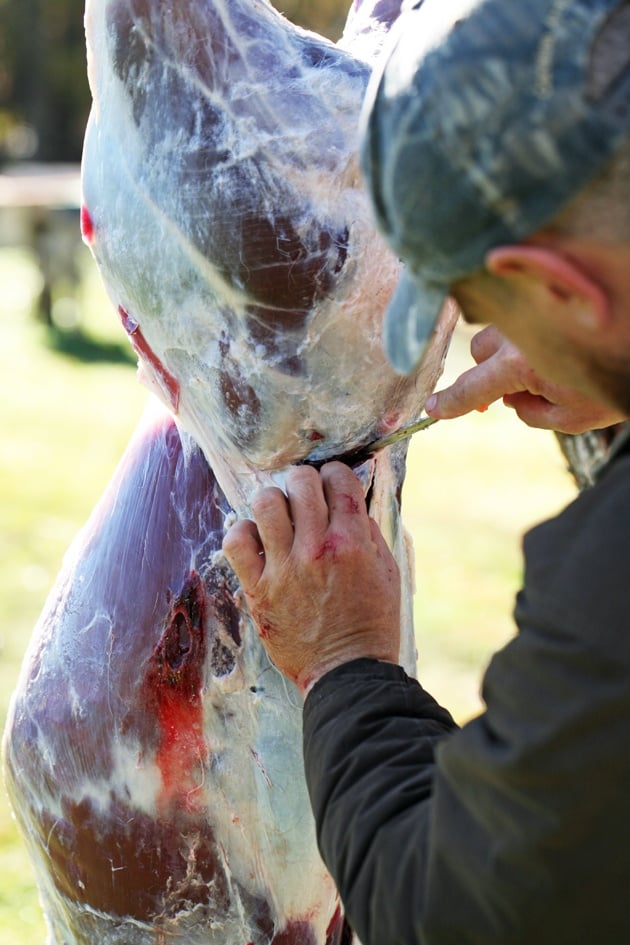
Now we go back to the bird and cut the neck off. Again, try to find the space between the bones. It’s not always easy but it keeps your knife sharp and in good condition so it’s important.

I pack the liver and the heart together and the necks in their own bag. These cuts of meat also go to the cooler to rest for 24 hours before I place them in the freezer or cook them.

If you’d like, you can reach back inside the bird and look for the lungs. Check their location in the Chicken Anatomy picture above. This is optional, you can leave it there if you’d like. The kidneys also stay in there usually.

Now our turkey is clean and ready for washing and for it’s cooler/refrigerator rest!

Give it a good wash with the garden hose and check if there are any little feathers that you want to remove. Place it in a bag and in the fridge or a cooler with ice for 24 hours.
Step 4 – Packing and Storing the Turkey…

When you are ready to pack your turkey for the freezer, take it out of the fridge or the cooler and dry it the best you can with a paper towel.

Then wrap it. If you are using the shrink bags, place the turkey head end first into the bag…

Bend the legs back as much as possible and place the zip tie in front of the legs. You need to make sure that you don’t tighten the zip tie. Air should be able to escape the bag as you dip it in the hot water.

Bring (clean) water in the turkey fryer to 180 degrees Fahrenheit and dip the turkey in the hot water. It will take a few seconds for the bag to shrink around the bird. Once it shrinks, tighten the zip tie.

That’s it! The turkey is ready for storing in the freezer. If your turkey is packaged right it should last for a year or even a bit longer in the freezer.

Of course, there are other ways to store your turkey and whatever way you choose will depend on how you like to cook and handle your turkey later. Many people like to leave it whole for the holiday table.
You can also break it apart and freeze parts of it in portions, like a couple of thighs in one ziplock bag and a breast in another.
Another option is to roast it right away and can the meat. You’d can turkey meat the same way that you can chicken. This is a little bit more work but if you are tight on freezer space, or if you want to have meat ready on the shelf to cook with or eat canning is a great option.
It might also be a great option for you if you can’t rely on electricity where you live or if you live off the grid.
I hope that this post helped you understand the process better. It’s always better to have someone experienced around to show you how to do it the first couple of times but even if there isn’t such a person, you can do this.
Many people want to raise their meat. I think that raising, especially when it comes to poultry, is fairly simple for most people. The killing and butchering part is often the concern for many people.
Follow the steps and move through them. After a couple of times, you’ll be a pro!
If you liked this tutorial, make sure to check these as well…
Hi there! Thanks for the tutorial. We let our turkey growth get away from us a bit and I’m afraid he won’t fit in a turkey fryer for the scalding. Do you have any recommendations on what to do?
You can always skin it! I have a “how to skin a chicken” tutorial here on the blog. It will be the same process.
Wonderful tutorial! At almost 67 and raised & taught to put-down & put-up
meats it still “gets to me”. Except for fish. I can fish & fillet all day! Everyone needs to make a living so “Thank you farmers” for all that you do! I was planning on doing Rock Cornish Game Hens (Mini Turkeys) for Thanksgiving but they cost $3.99 a pound! I went with the $1.99 a pound Butterball turkey. Cheers to You & your Clan!
Thanks Sheri! I know you do a lot of growing and homesteading. Butchering and processing animals is a lot. I haven’t done it in a while because it’s too hard for one person to do it all. I don’t know if you have TikTok but if you do, follow me there. I post mainly there now.
I’m not on TikTok…I think! Mercy it got way to crazy for me and I have a life! I’ve sworn off adding more internet sites so please keep your newsletter going. I so enjoy being able to sit at my computer and read the “Big” type! Happy Holidays to you!
We are planning on butchering our turkeys for Thanksgiving. How far in advance is necessary to butcher them?
It’s better to let the meat sit for a couple of days before using it. So a couple of days before should be fine. If you need to process before that then you can freeze the bird.
This was an interesting article to read thank you Lee.
You are very welcome! Thanks for stopping by.
Thank you so much. My wife was born in Israel and spent a few years on a Kibbutz also but she was small, so she didn’t participate in harvesting livestock. I have processed fish and big game, but I had no experience with birds. This step-by-step article really simplified our turkey slaughter/processing attempt and got us through the learning curve. We now have 3 massive turkeys ready to be cooked and eaten.
Yay!! I’m so glad it was helpful.
Heck yeah!!! I feel much more prepared to help process our bronze broad breasted turkeys now! What a great article.
Yay! So glad it was helpful!! Go put some food in the freezer now.
Thank you so much for the very easy to follow instructions. I’m almost 60 and although I have processed animals before they had been killed by someone else and brought to me dead. I am planning to retire soon and homestead by myself, so this information is crucial. Thank you, Cheri
You are welcome! I’m so happy that it was helpful. Thanks for stopping by.
Hi , thank you for this useful step by step.. if you were to just refrigerate and not freeze how long would it last before needing to be cooked
Thanks
Cat
Probably three days or so. Maybe four or five but I wouldn’t go longer than that.