This post may contain affiliate links, view our disclosure policy for details.

This is a step by step picture tutorial on how to butcher a rabbit. Butchering rabbits on the homestead is really a simple thing to do. Once you learn the process and practice a few times you’ll see how quick and simple it is.
For the longest time, I wanted to raise rabbits for meat. After raising Cornish Cross chickens for meat (and not liking them so much), and raising Black Australorps chickens for both meat and egg production (and loving them), and raising Muscovy ducks for meat production (and loving them too!) I can tell you that I think that rabbits are easier than both the ducks and the chickens.
I will have another post for you on how to raise rabbits, but aside from the raising of them, the processing is so much more simple than that of a chicken or a duck. It literally takes five minutes from dispatching to wrapping and placing the meat in the fridge.
How to Butcher a Rabbit…
I still don’t raise my own rabbits here on the homestead. Lately, I’ve made the conscious decision to feed my kids the kind of food that I ate as a child. I grew up in Israel. My mother always made all of our food from scratch and food (and feeding others) has always been in the center of our home. It’s an inseparable part of our culture. In fact, I think it’s maybe the largest piece in the pie when it comes to Israeli culture.
Since we live far away from our family in Israel, I choose to pay more attention to how I run my home so my kids are more familiar with our traditions, holidays, food and so on. I feel like it’s bringing us closer to family. When the kids meet everyone else they fit right in, they speak the same language (as in, eat the same food, celebrate the same way and so on…).
So we don’t eat a lot of pork (we make an exception with this pork sausage cause it so so good!), and we don’t eat cheese and meat together in the same dish, and I try to make more traditional dishes (which are delicious!) like stuffed peppers, and Meditteranean egg salad, and shakshuka and so on… It’s not a religious decision, it comes from the reasons I explained above of just wanting to feel closer to the family since we can’t live close to them at the moment.
We also hunt and process the deer (we don’t hunt or eat deer in Israel but for us, deer meat is just like beef), and we raise chickens and butcher the chickens, and we raise ducks and butcher the ducks and this is where most of our meat comes from (I also help my neighbors butcher turkeys in exchange for some meat)…
We’ve never eaten rabbit meat in Israel but I have to admit that when it comes to rabbits I might make an exception. They are so easy to raise and so easy to process and their meat is delicious (I ate rabbit meat many times before I decided to eat more traditionally).
So I am still debating and thinking about this one… This tutorial that I am sharing with you is coming from the backyard of my dear friend who raises rabbits for meat. For us homesteaders, there is no better social event than helping one another on the homestead and so, I’ll often go and help them with rabbit butchering.
The first time I butchered a rabbit I was amazed at how simple it is in comparison to the other animals we raise for meat. Add this to the fact that they multiply like, well… Rabbits, and also, the fact that they are ready for butchering so quickly and can be fattened on grass alone and you have the perfect animal for meat production.
When is a Rabbit Ready For Butchering?
A rabbit is ready for butchering anywhere from 8 to 12 weeks of age depending on the breed. Since rabbits breed all the time (breeding management is a huge deal when raising rabbits) and they are ready for butchering so quickly, you can see how you can have a constant supply of meat for your family if you raise rabbits for meat.
Again, depending on the breed, a rabbit will probably weigh around 4-7 pounds before butchering and you can expect it to weigh somewhere around 3-5 pounds after butchering. This might not be enough meat for a meal for a large family, but you’ll see how easy it is to butcher a rabbit so consider the fact that it is relatively easy to have more than one rabbit for a meal. Check out my tutorial on how to cook a rabbit for more info and a delicious recipe.
Tools we are Going to Need…
There aren’t many tools that we are going to need to get this job done… Like everything else, there is more than one way to butcher a rabbit, but in order to butcher a rabbit the same way that I am going to show you in this tutorial you are going to need…
- A killing stick – around two feet, one inch thick. We are going to need this stick to dispatch the rabbit. You’ll see how it looks in the photos below.
- A hanging structure – this can be a board with two strings with a loop at their ends held to the board by nails or it can be two metal hooks or anything else you can come up with… We are going to need to hang the rabbit from its hind legs so anything that will hold it in that position will do.
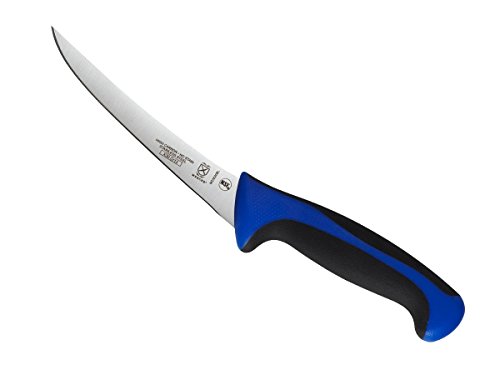
- A butchering knife – whichever knife you like. For me personally, it’s easier to work with a short-blade knife.
- Gloves – some people prefer working with gloves when dealing with raw meat (I don’t use gloves).
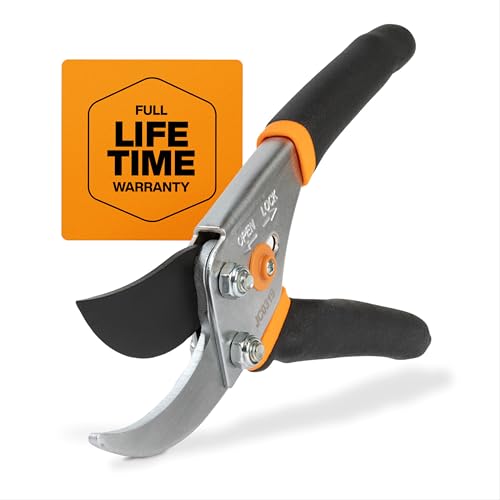
- Garden shears – we are using the shears to clip the front and the back feet. It simply is the easiest way to do it because rabbit bones are very thin. I think you should have shears specifically for butchering rabbits, don’t use the ones you use in the garden.
- Plastic bags – to collect the guts and pelt and head and such. You can also use a bucket or something like that.
- Poultry shrink bags – this is probably the best way to pack your meat for the freezer. These are poultry heat shrink bags but I am sure that they will work the same way with rabbits. You place your meat inside and dip the bag in hot water. It shrinks around the meat and protects it in the freezer.
- Vacuum sealer and vacuum bags – if you don’t want to go with the shrink bags you can use a food vacuum sealer.
Before Butchering Rabbits…
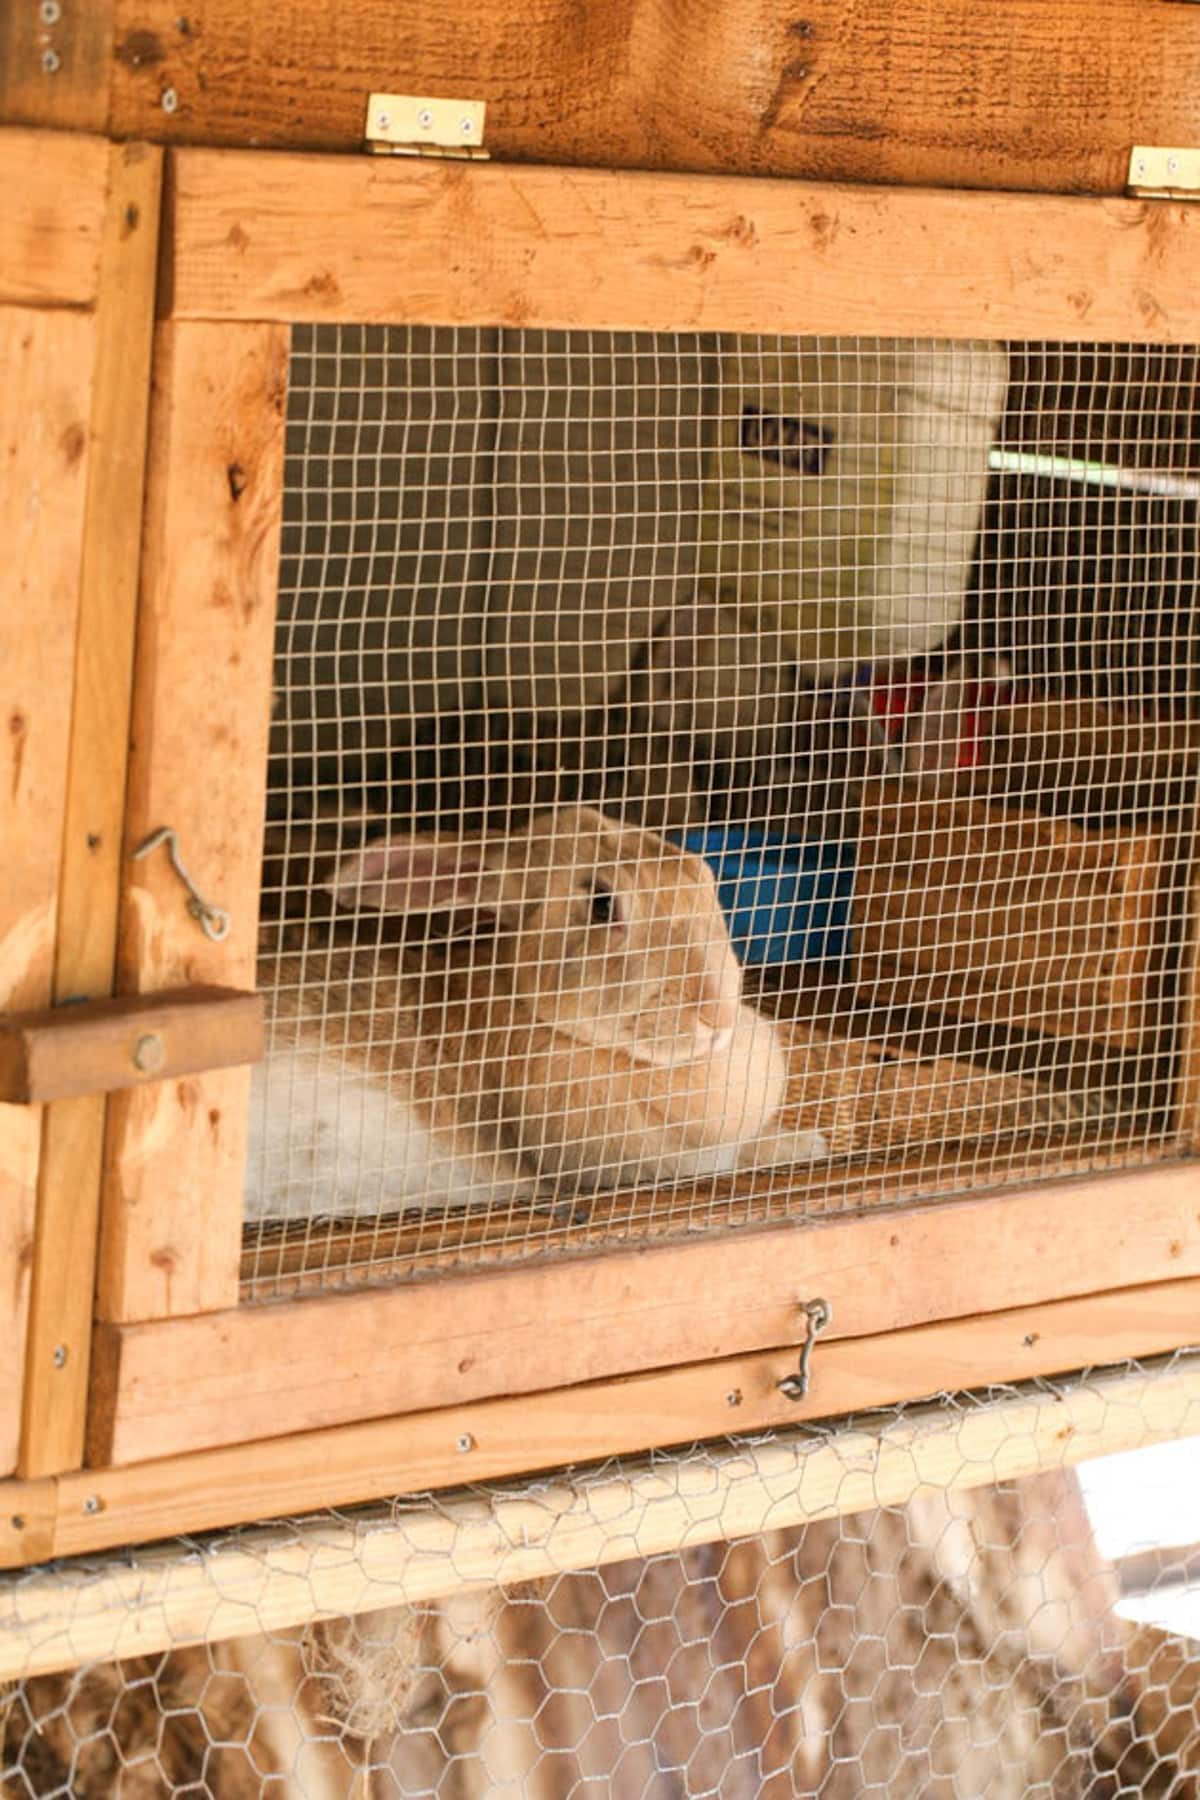
You might want to separate the rabbits that you are going to butcher from the rest of your rabbits a day (let’s say 12 to 24 hours) before butchering and not feed them. It’s not a must, but when the animal’s stomach is empty it makes the butchering job much easier.
How to Butcher a Rabbit Step by Step…


Step one – dispatch the rabbit. I have to admit… Dispatching a rabbit is a pretty horrifying experience. I remember the first time that I cut a chicken’s throat with a knife, that was horrifying too, but for some reason, the rabbit experience was even harder. There are a few ways to do it…
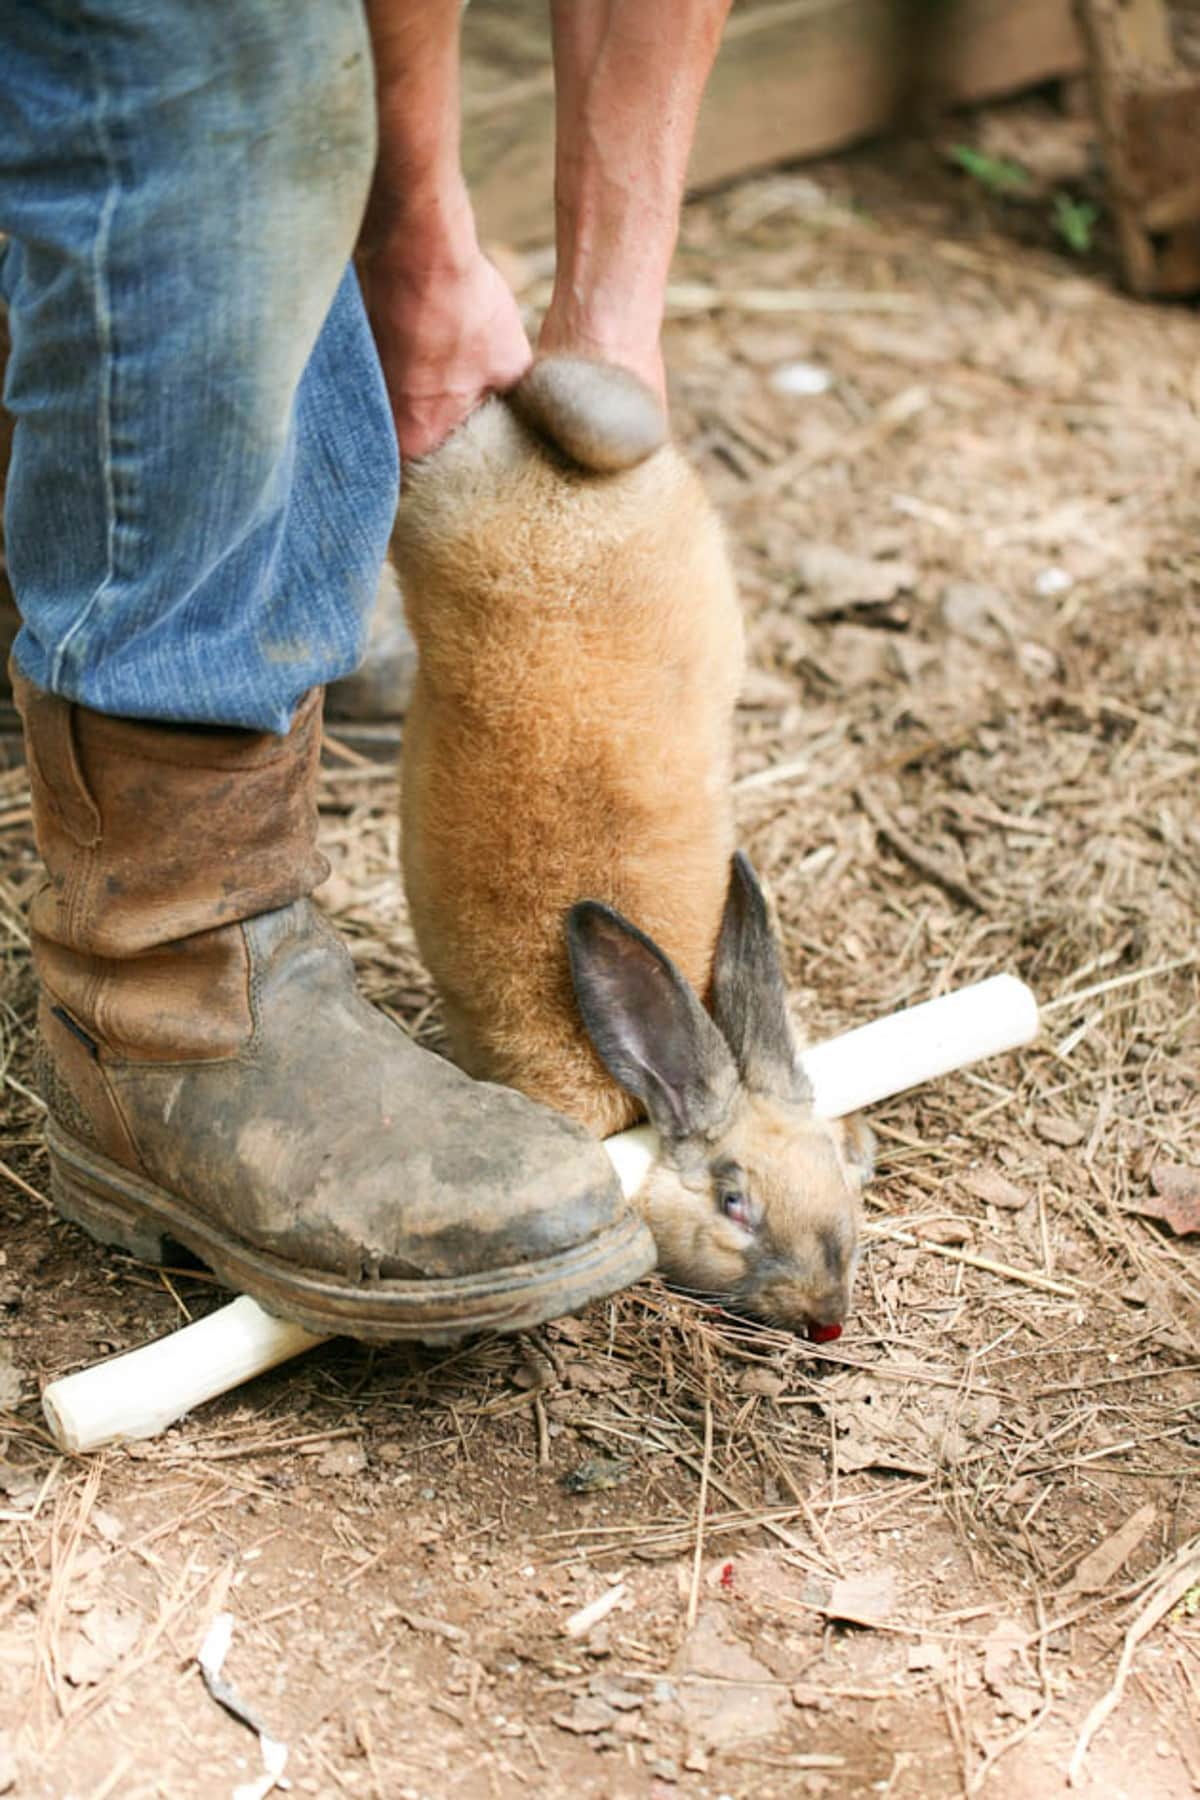
You can shoot your rabbit in the back of its head with an air gun, you can hang it upside down and snap its neck backward to break its neck, you can use a tool they call a “hopper popper” which is a cervical dislocation tool, or you can use a stick like I’ll show you here.
Grab the rabbit from its neck or ears to remove it from the cage and then hold it from its hind legs. We are looking to dispatch the rabbit with the least amount of pain and in the most humane way. Stunning the rabbit simply knocks it unconscious and is the best way to do it.
To stun the rabbit, hit it hard (I mean hard) in the back of its neck right behind the ears. Now we want to work fast to disconnect the cervical vertebrae and kill the rabbit before it wakes up. Place the rabbit on the ground, place the stick horizontally over the neck, step on one end of the stick and hold the rabbit’s hind legs. Then pull to disconnect the vertebrae and the rabbit is gone. This is seriously the hardest part. From here on out it’s easy cleaning.
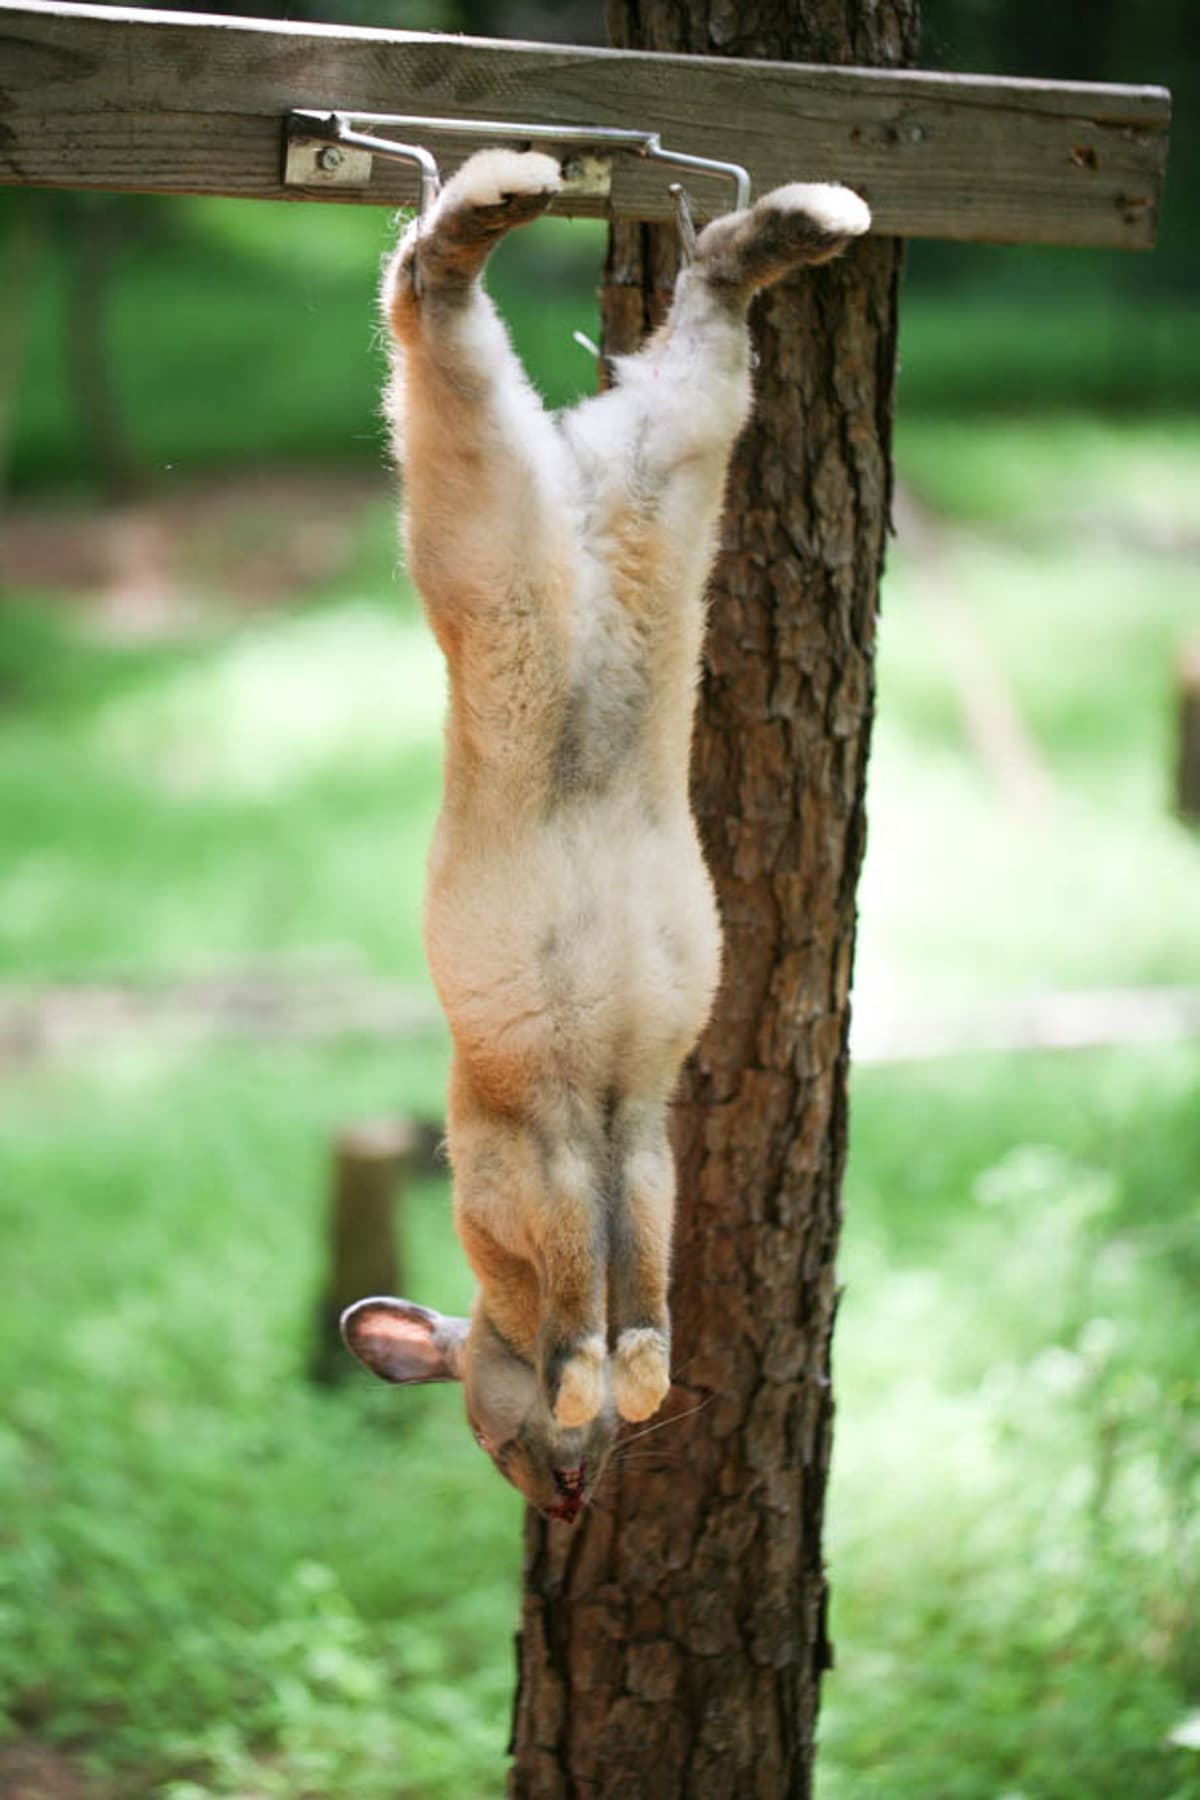

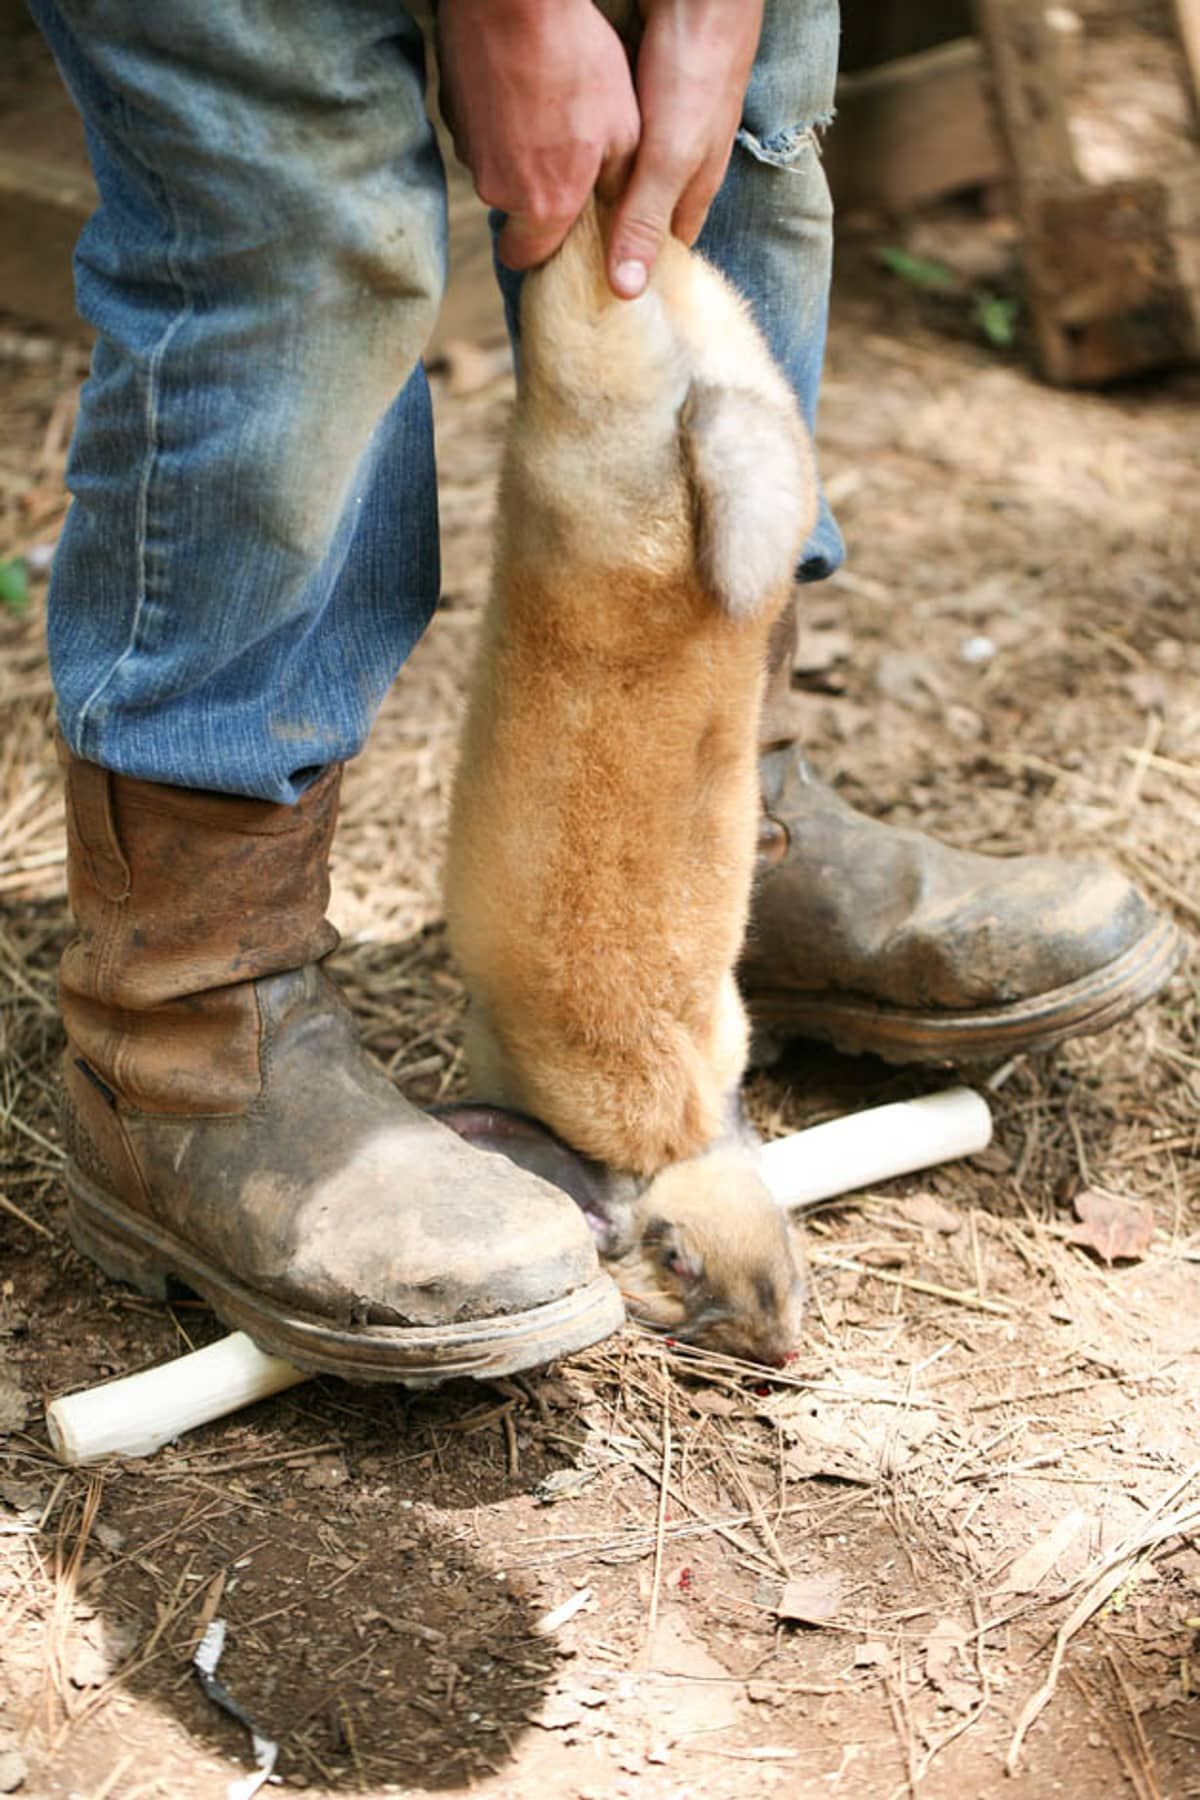
Step two – hanging the rabbit and removing the head. In the tools section, when I mentioned a hanging tool, I meant something that will hold the rabbit in the position that it is in the picture above. Hanging from the back legs, head down. You can purchase one of those or you can weld something similar yourself or you can simply hang your rabbit by two strings. It doesn’t matter.
Once the rabbit is hanging the first thing we do is go ahead and remove the head. There is a gap in the bones there because of the way we dispatched the rabbit so a knife will do it. The head can go to the dog or the cat, you can bury it in the garden, or you can throw it in the woods for the other animals to enjoy.
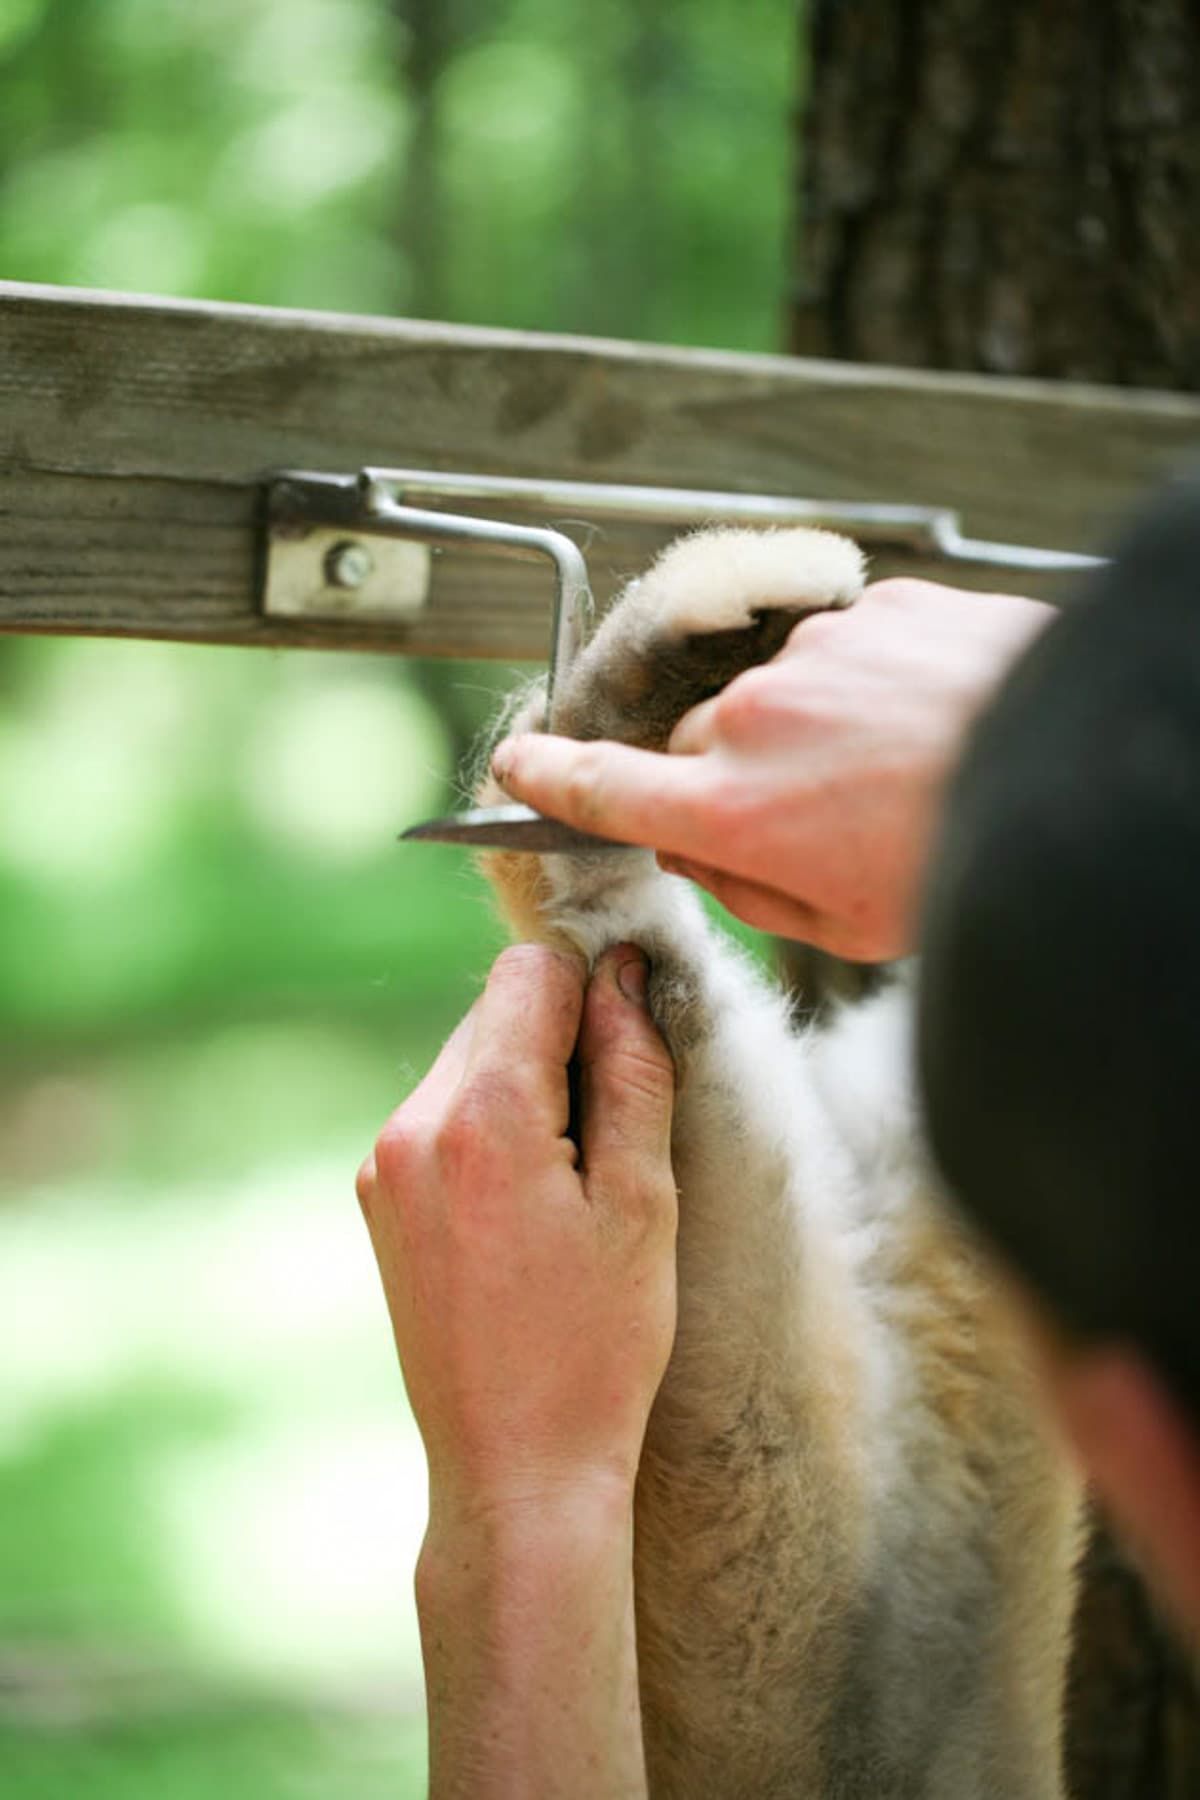
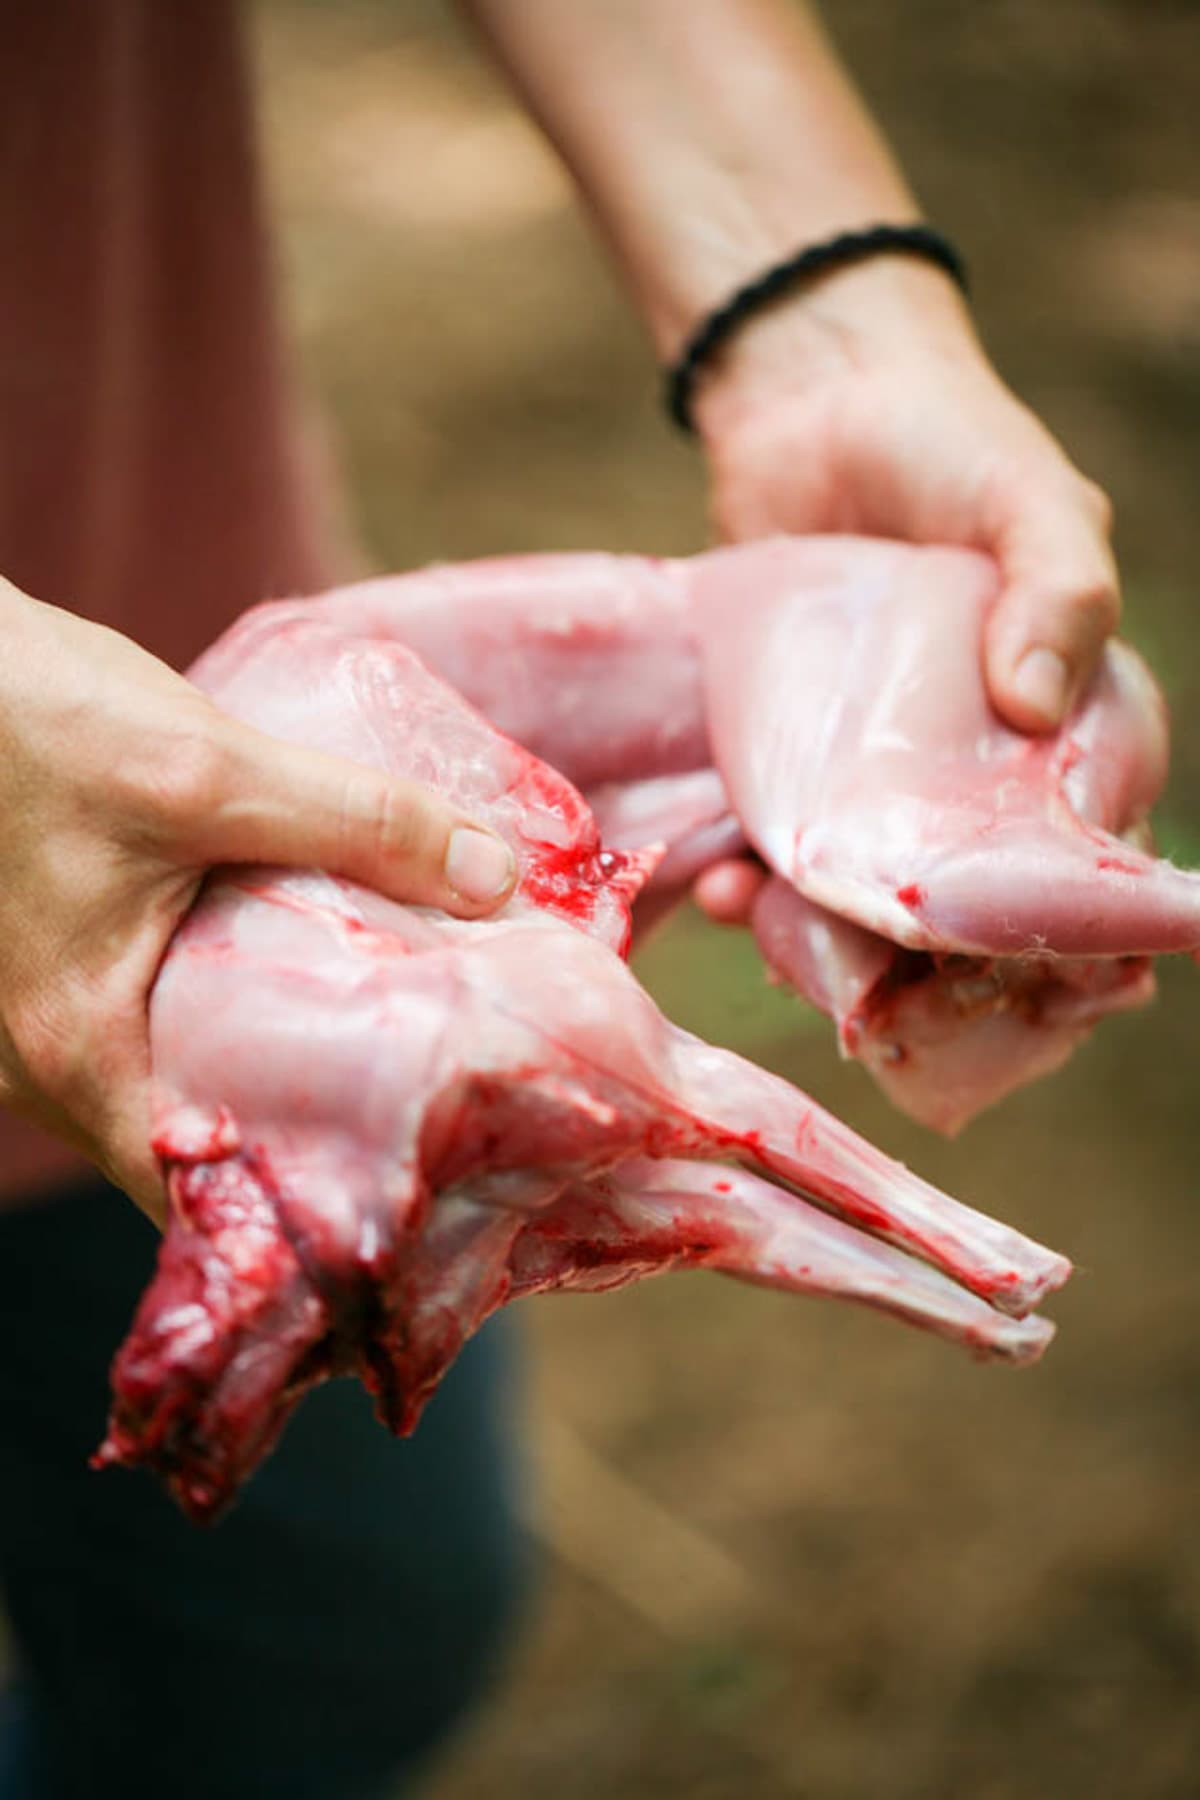
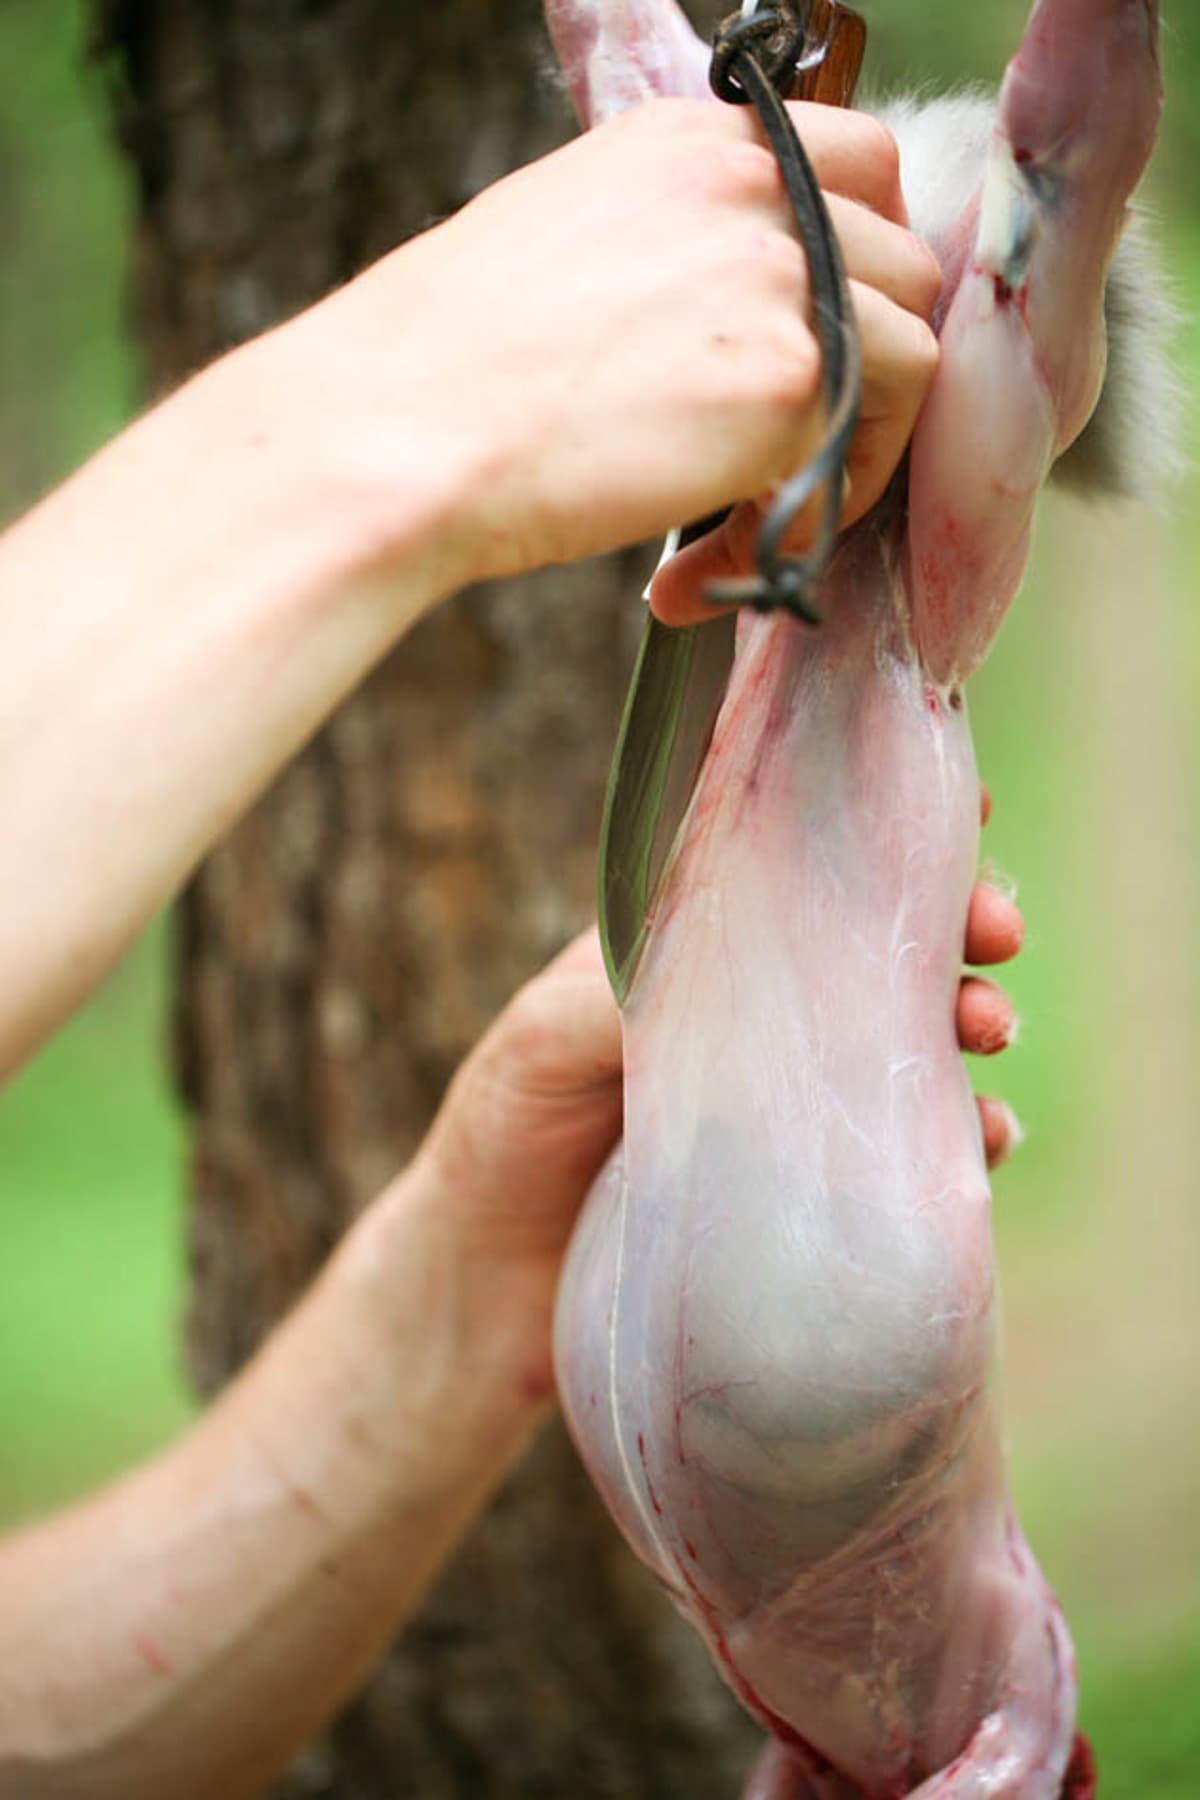
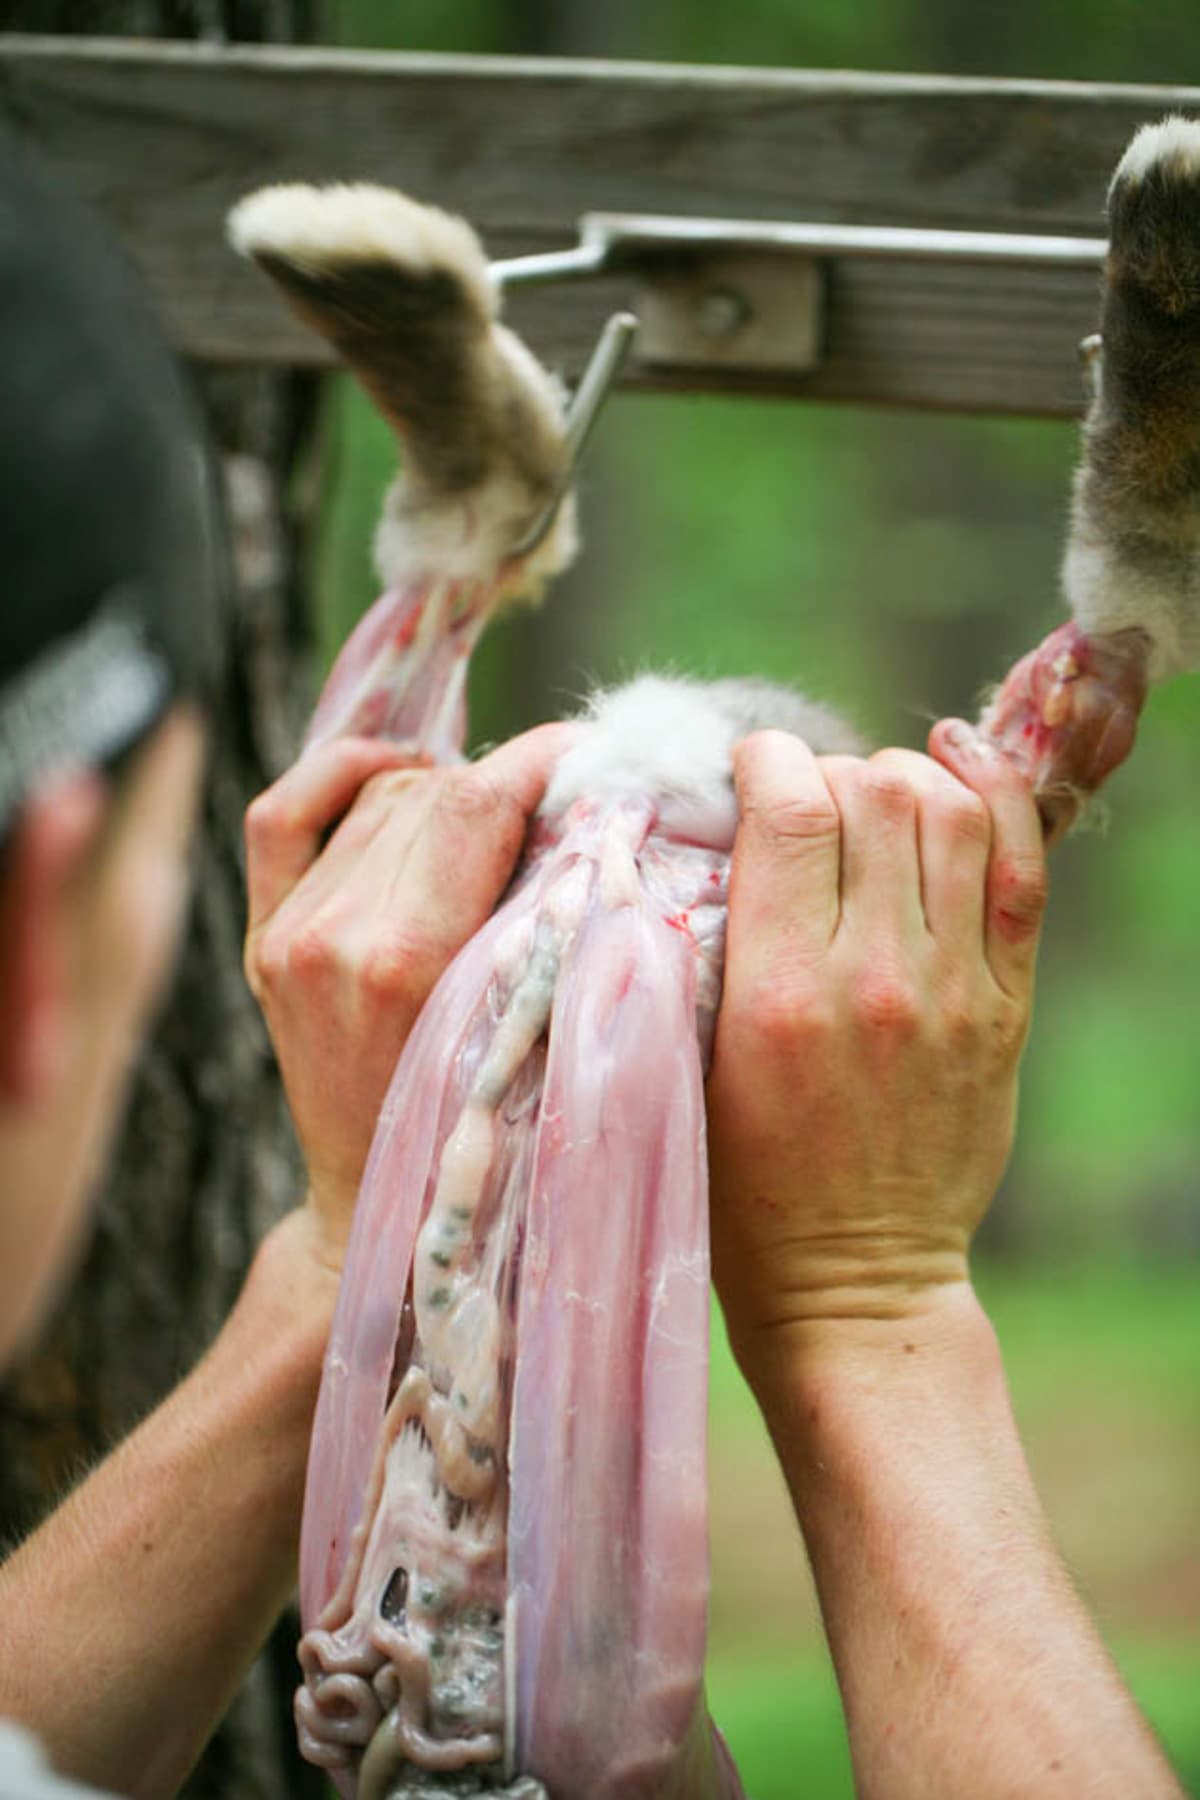
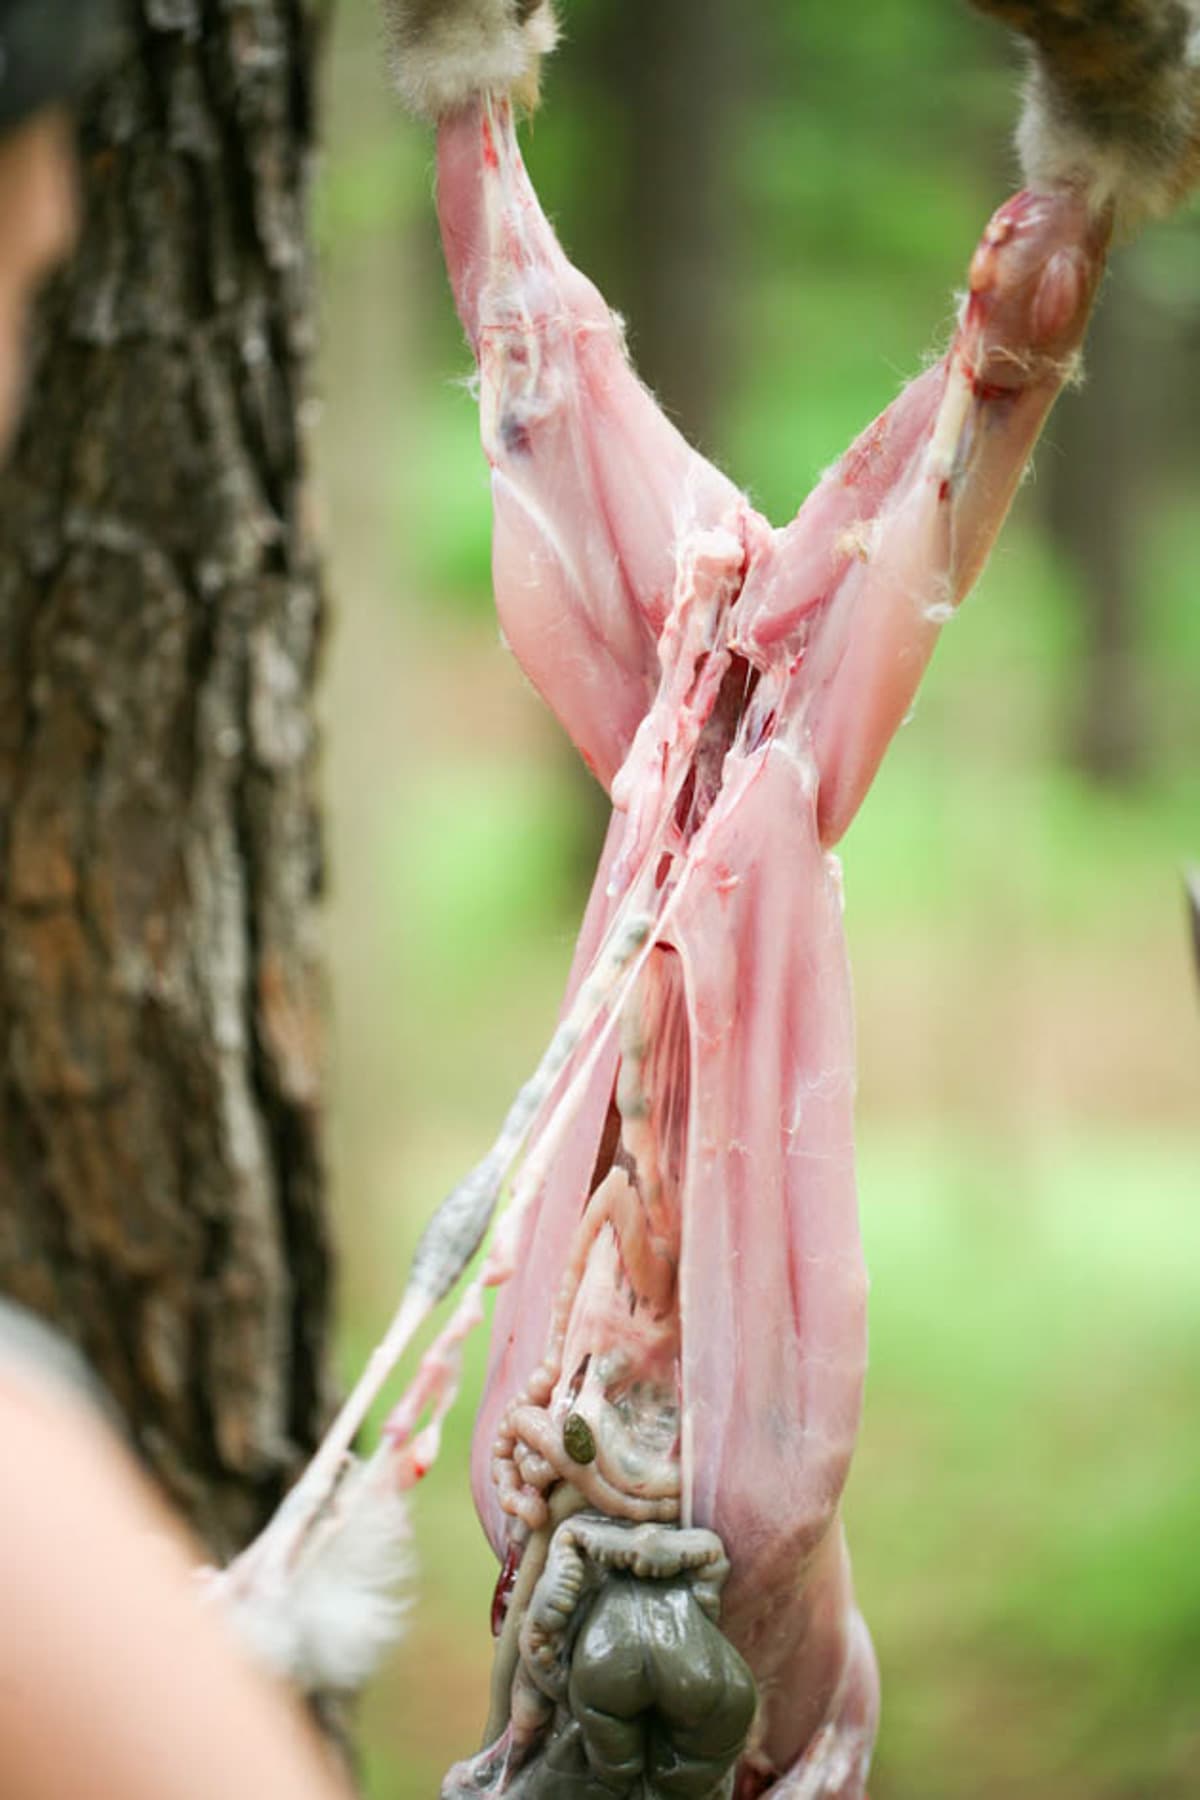
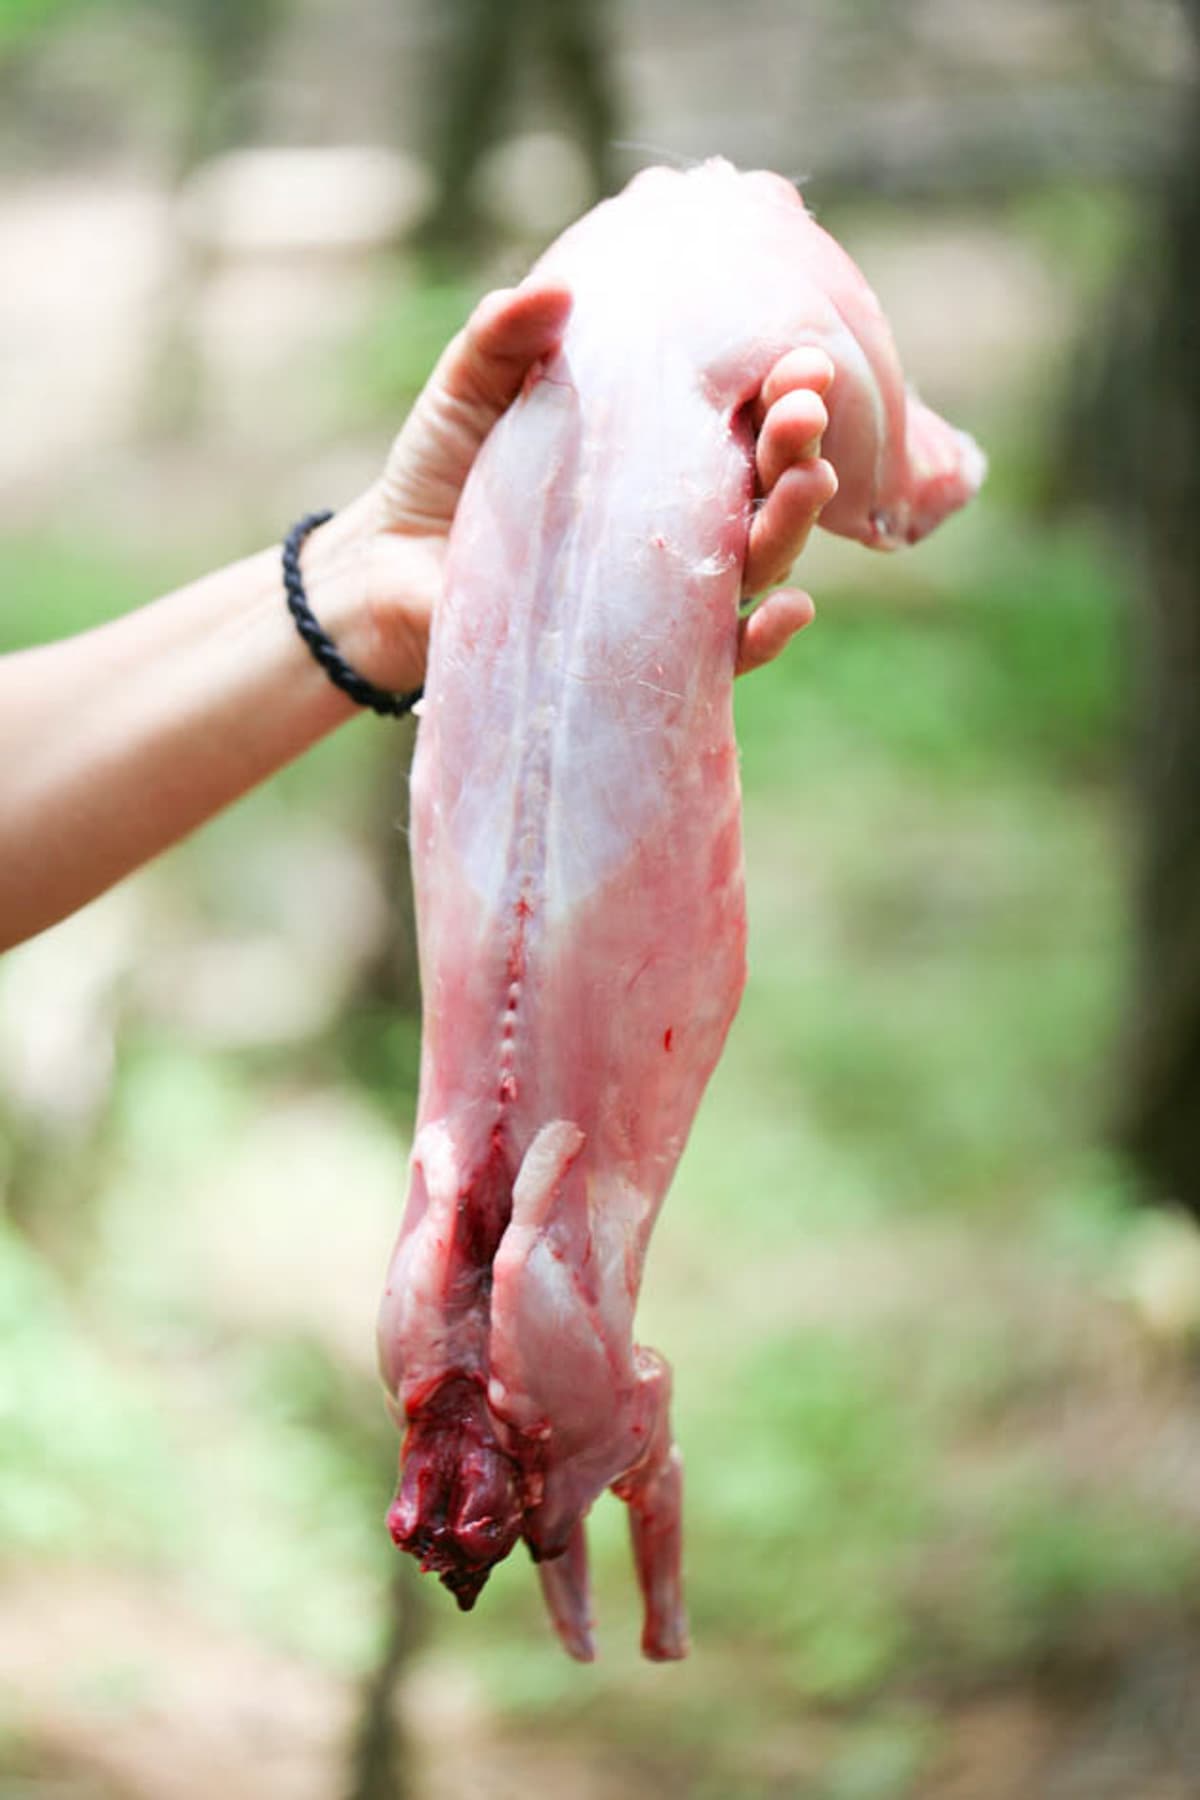
Step three – skinning the rabbit. Place the butchering knife right under the joint and cut the skin around the leg. You have to be very careful here because rabbit skin is very very thin. Go slow and cut around the leg, try not to cut the meat or the tendon that is in the back of the leg, just the skin.
After you cut the skin in a circle around each leg right under the join, slit the skin on the inside of the legs in a V shape from each of your cuts toward the anus and around it. Then start peeling the skin with your hands from the legs and pull it down the body of the rabbit. It will come off easily. You can keep the rabbit pelt and tan it if you like or do the same as we did with the head (here is how to tan a rabbit hide tutorial if you are interested).
Next, we need to remove the front feet. This is easily done by clipping them with the shears. The bones are thin and there isn’t much meat on the front legs anyway, so there isn’t much to be concerned about. Simply clip the lower part of the leg off.
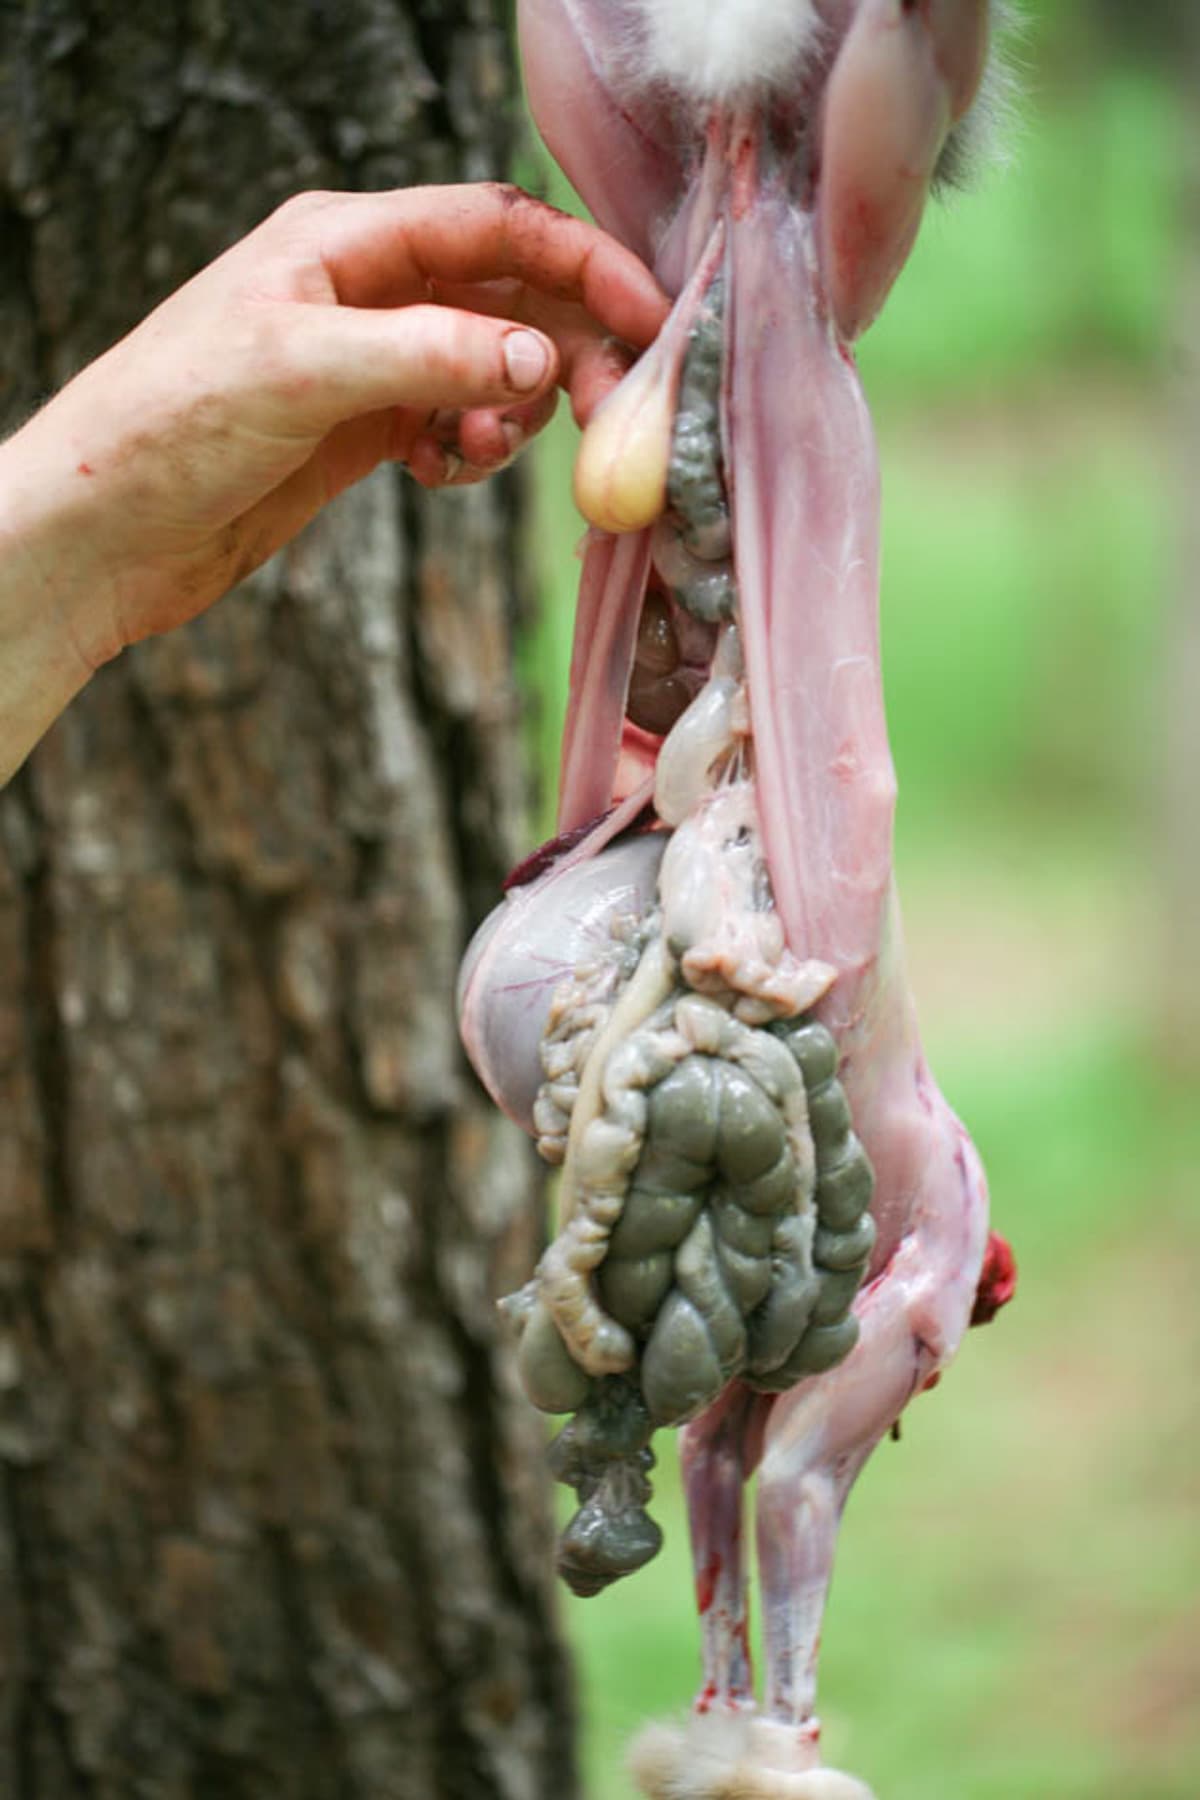

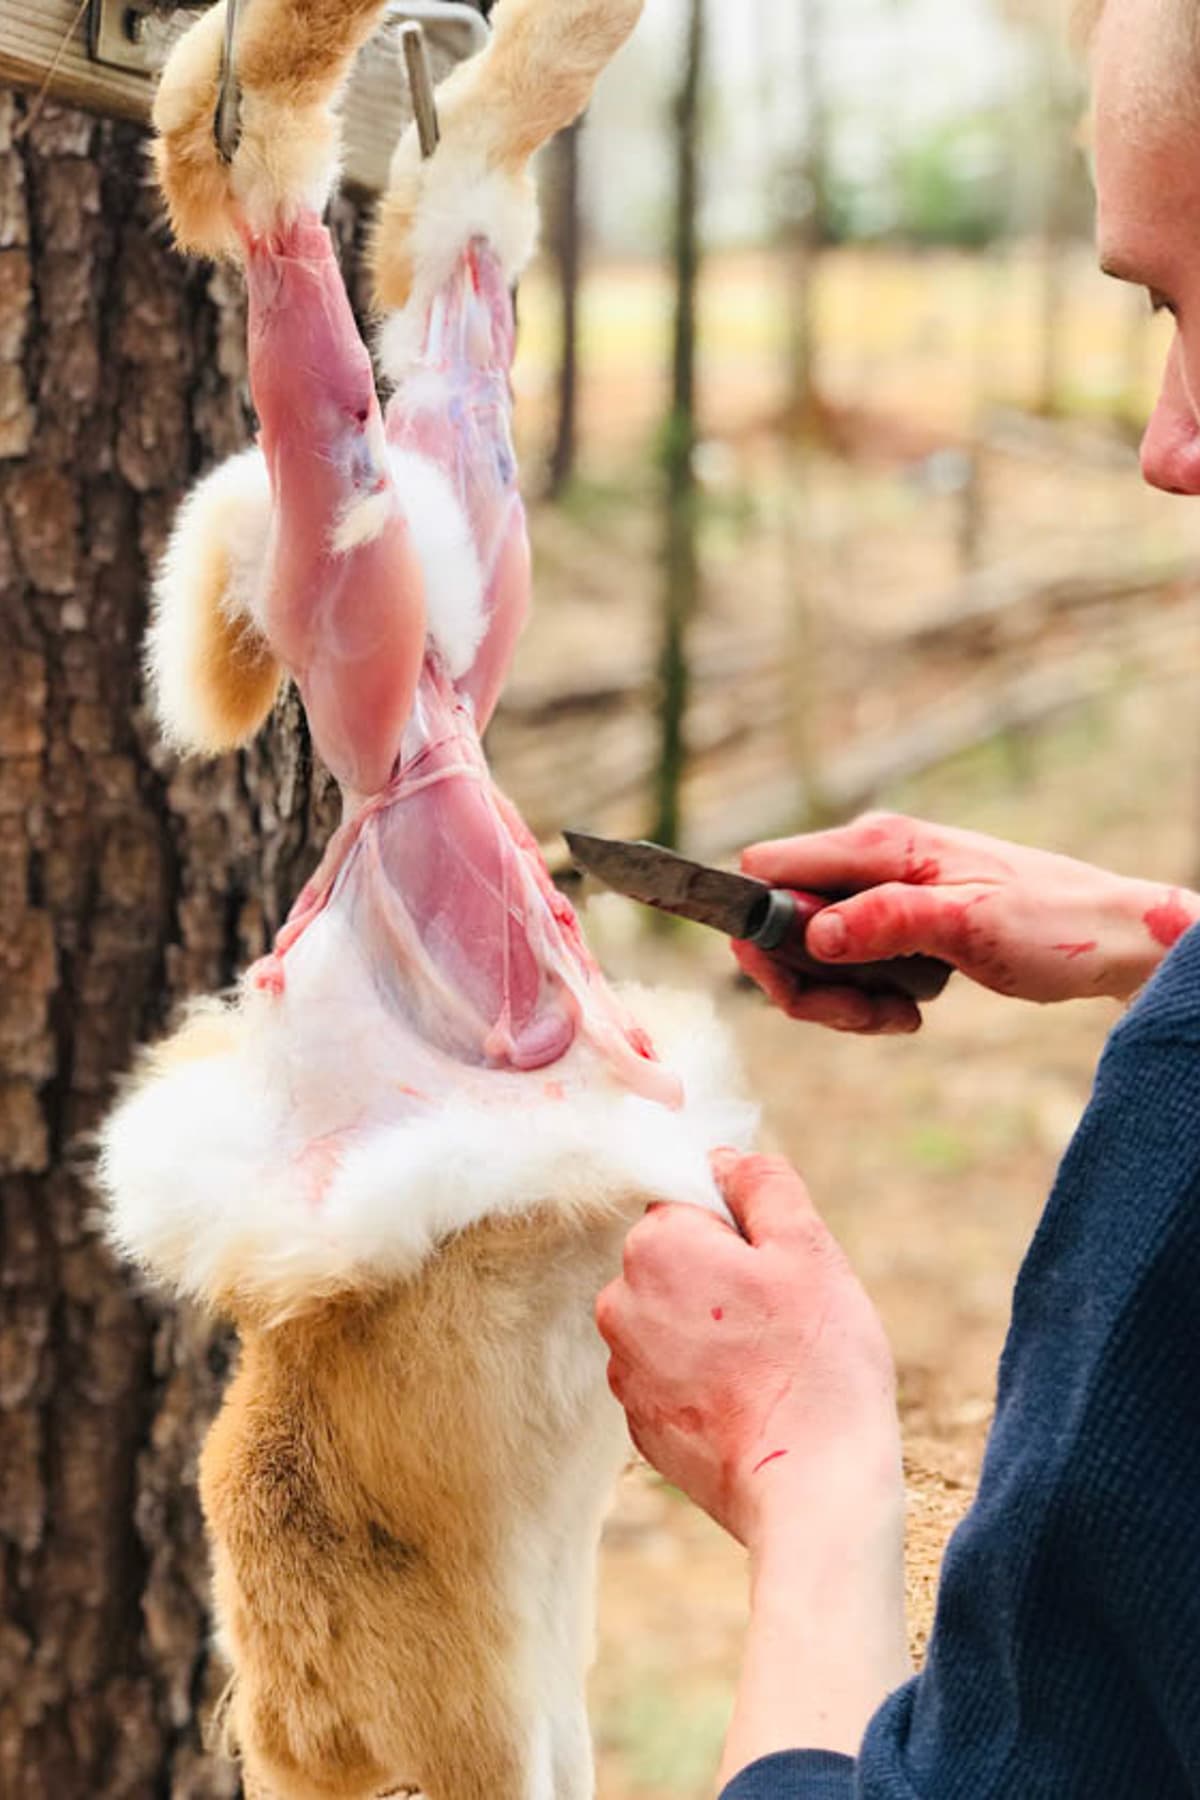
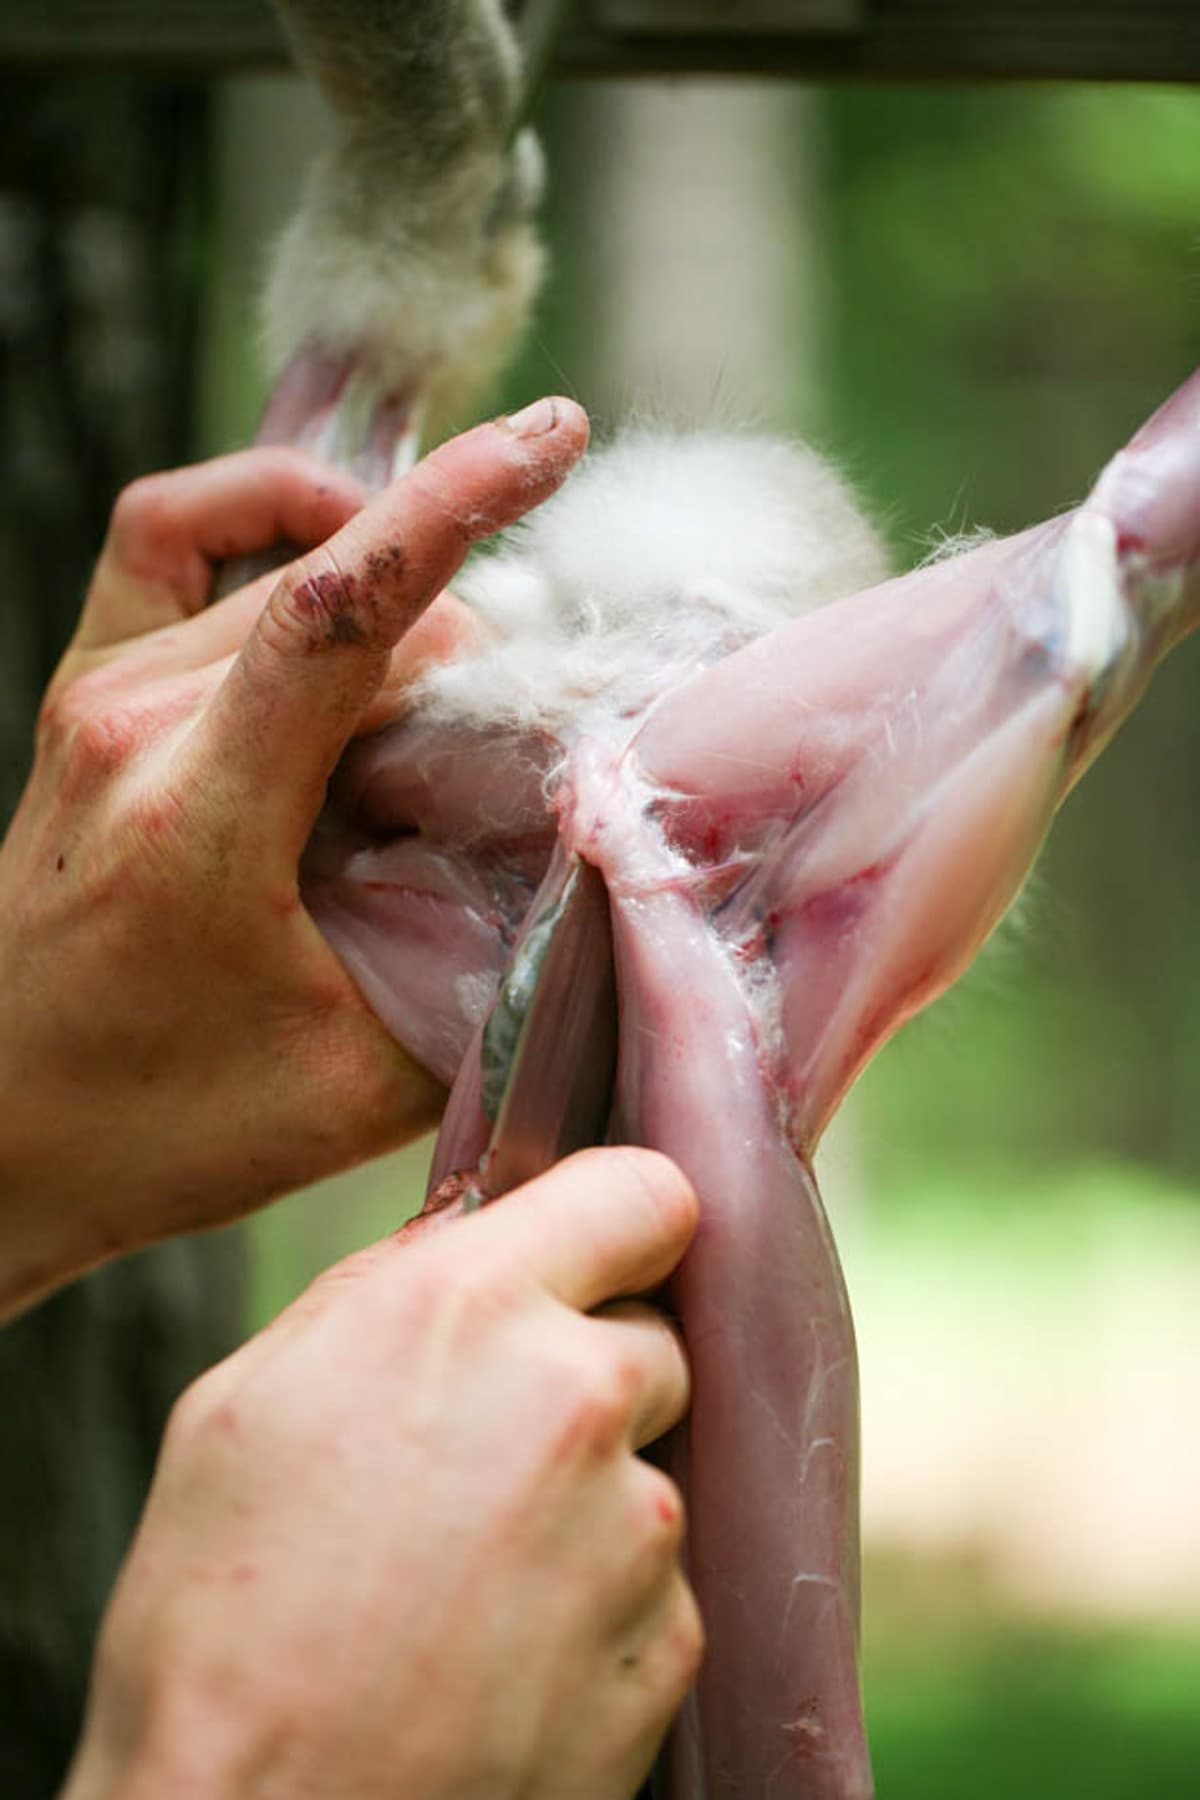
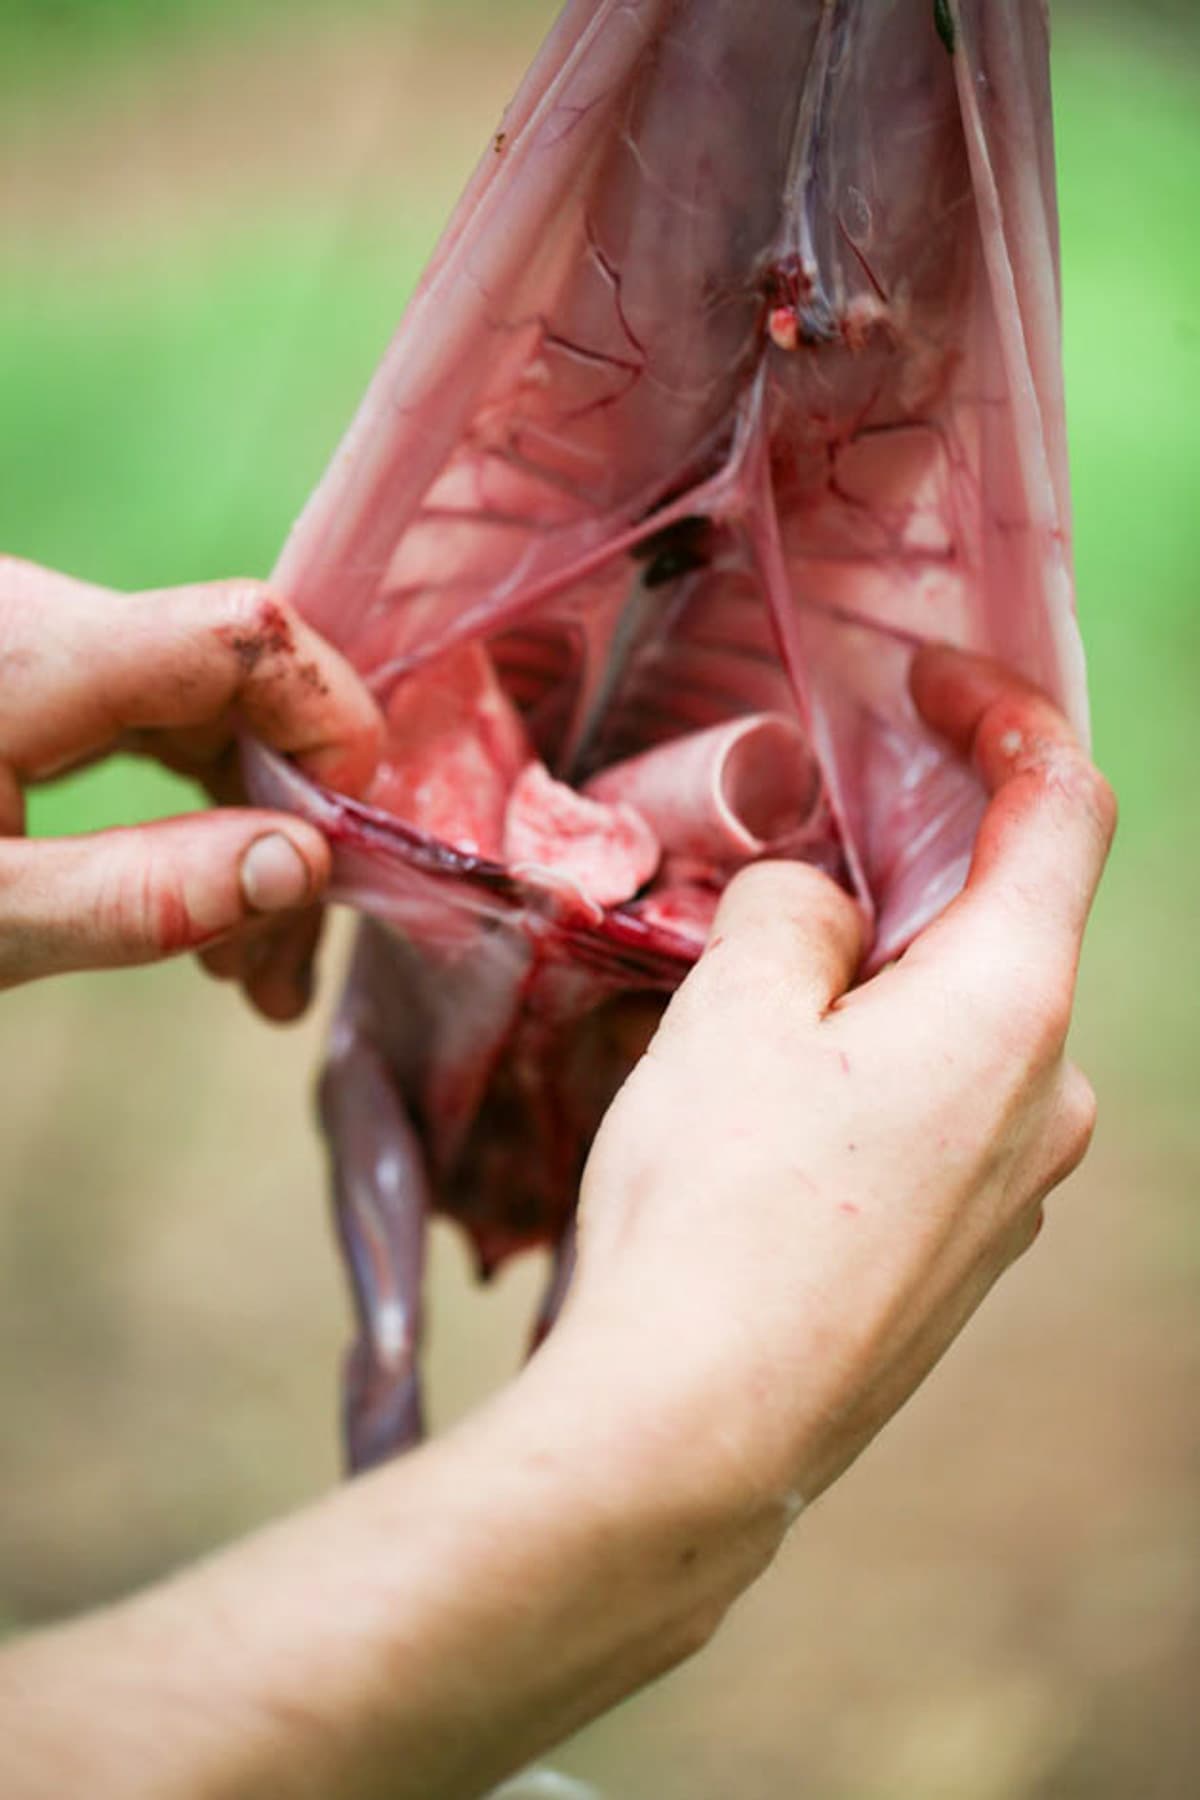
Step four – remove the bladder. Start at the top, right between the hind legs, and cut the abdomen open. Work with the blade of the knife pointing out toward you and be very careful not to cut the intestines. You can insert two fingers into the rabbit’s abdomen and position them on both sides of the knife. Use your fingers to pull the flesh away from the guts and guide the knife down the abdomen.
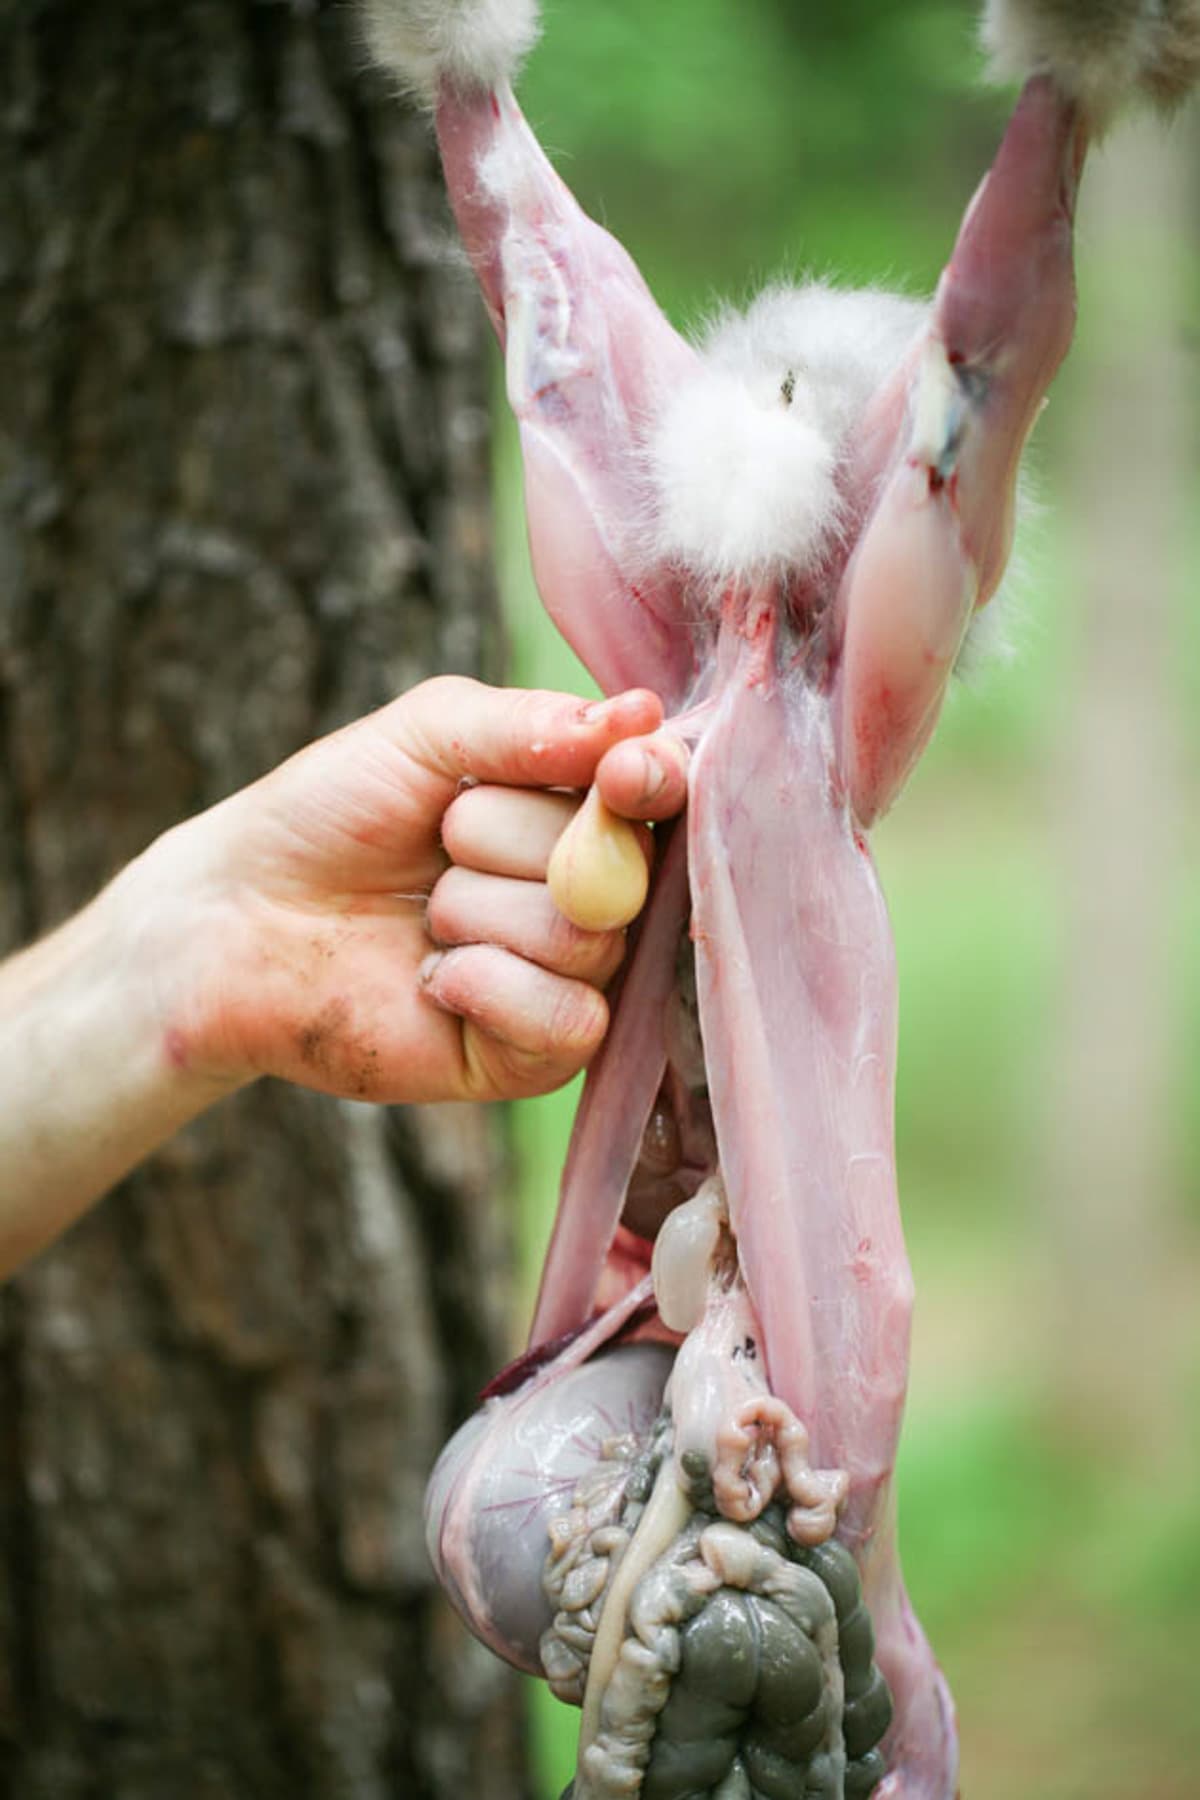
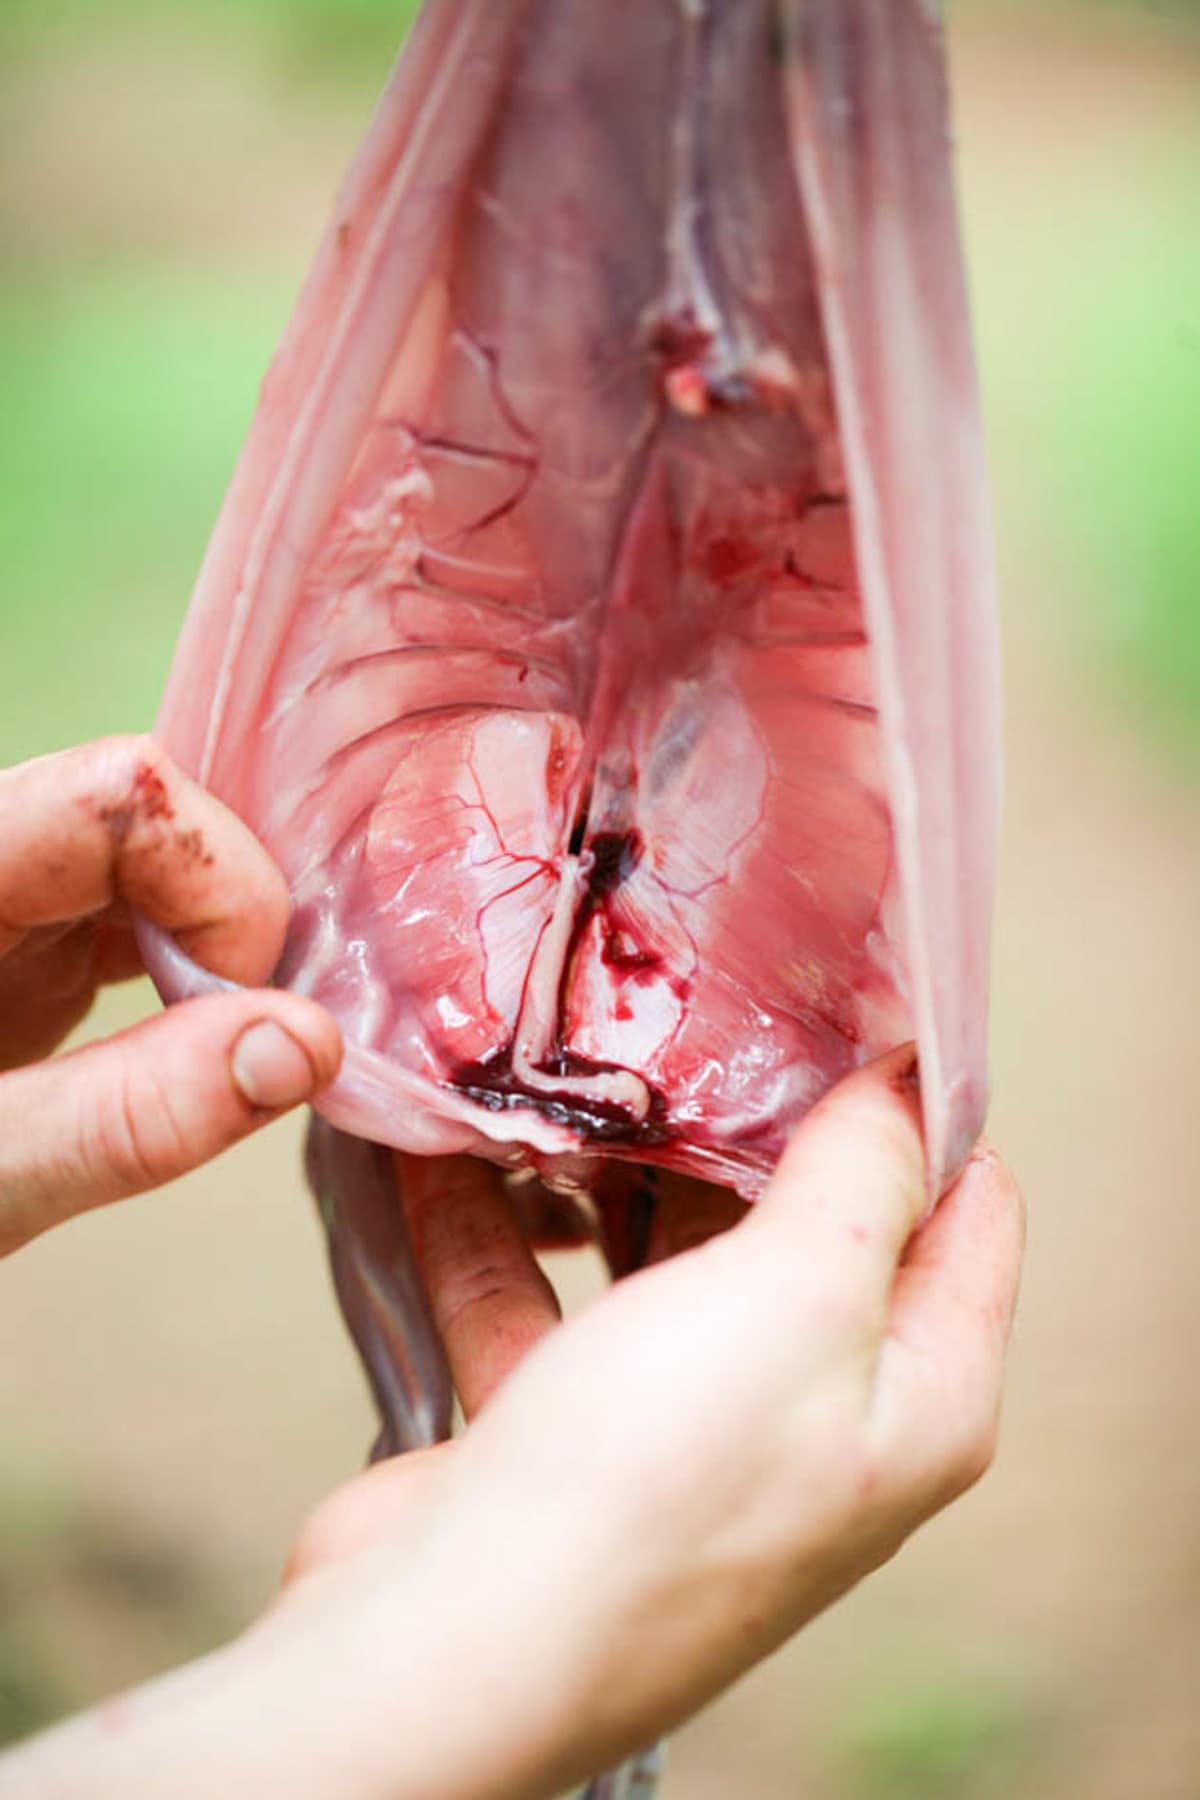
Let everything hang there for a minute and first go for the bladder which is that yellow sack. You want to remove that first so you don’t end up with urine all over your meat. Hold it with two fingers and cut it right off to remove it. If it happens and the bladder pops, the urine won’t ruin the meat. You can simply wash it off.

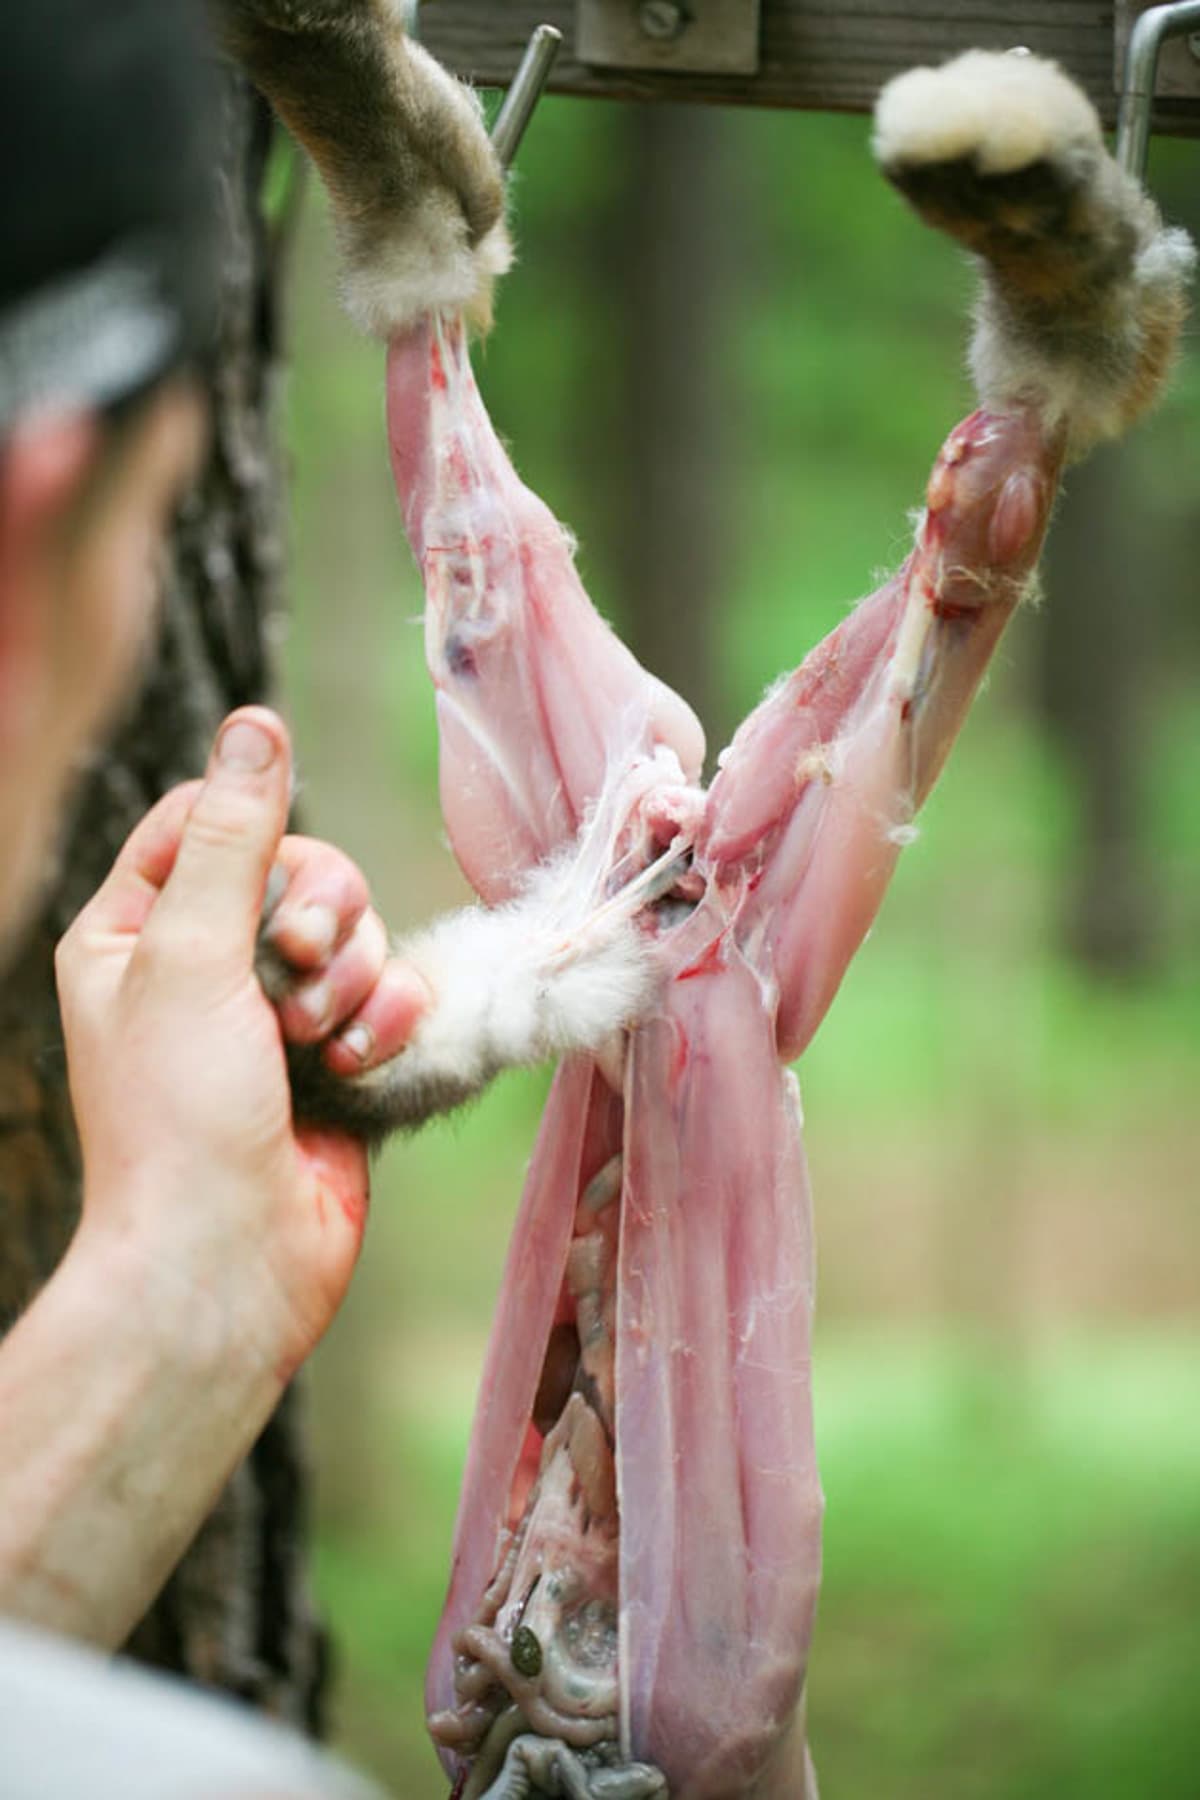
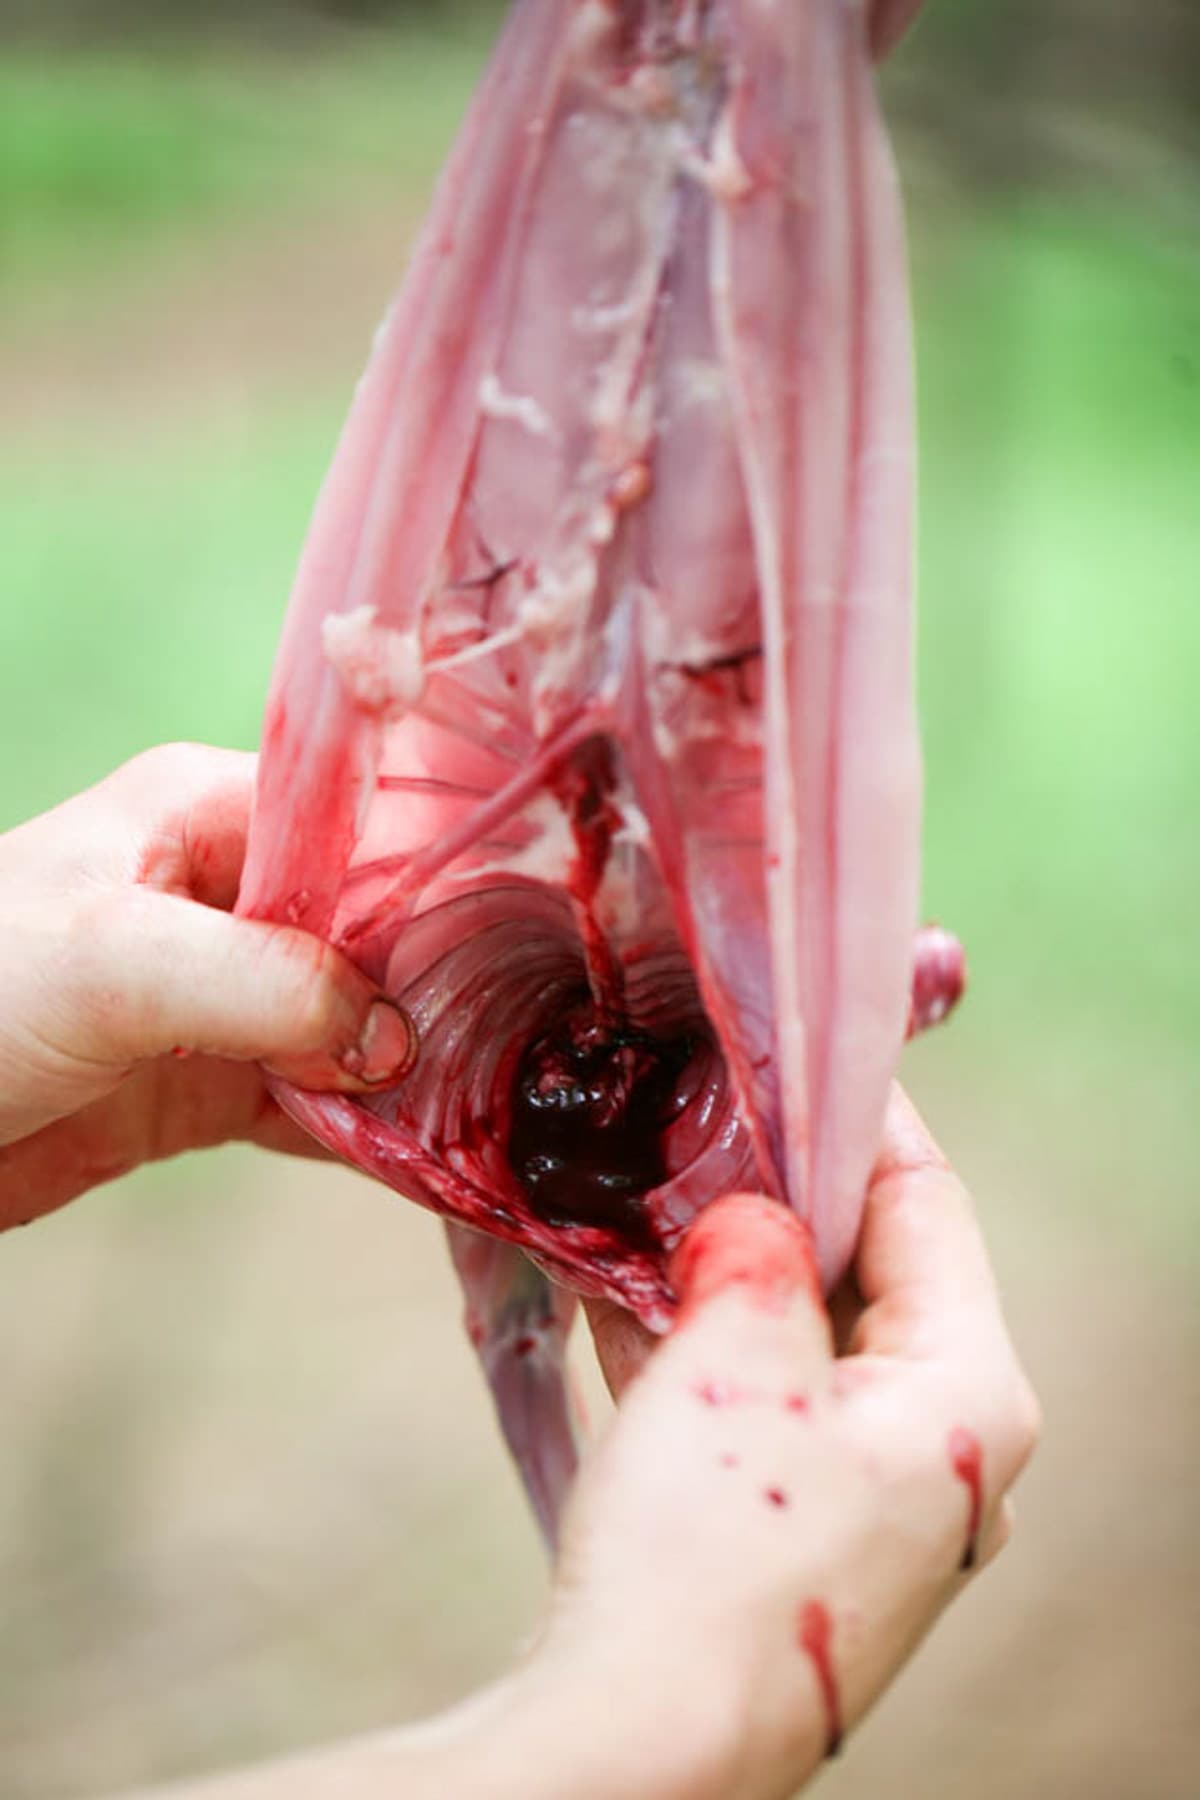
Step five – free the intestines. The intestines are still hanging there and since we want to remove everything at once without cutting into the intestines we have to free the end of the intestines which, of course, is connected to the anus. In order to do that, you want to break the bone that is right between the two hind legs, cut around the anus, and remove the intestines as one piece.
Hold the back legs and bend them backward. Rabbit bones are very thin so it’s not hard to break them. Then go in with the knife and cut the flesh that is covering the bone… The last image is after we removed the intestines but I put this picture here so you have a better understanding of what bone I am talking about. You see that pathway that is between the hind legs? This is what we are trying to achieve…
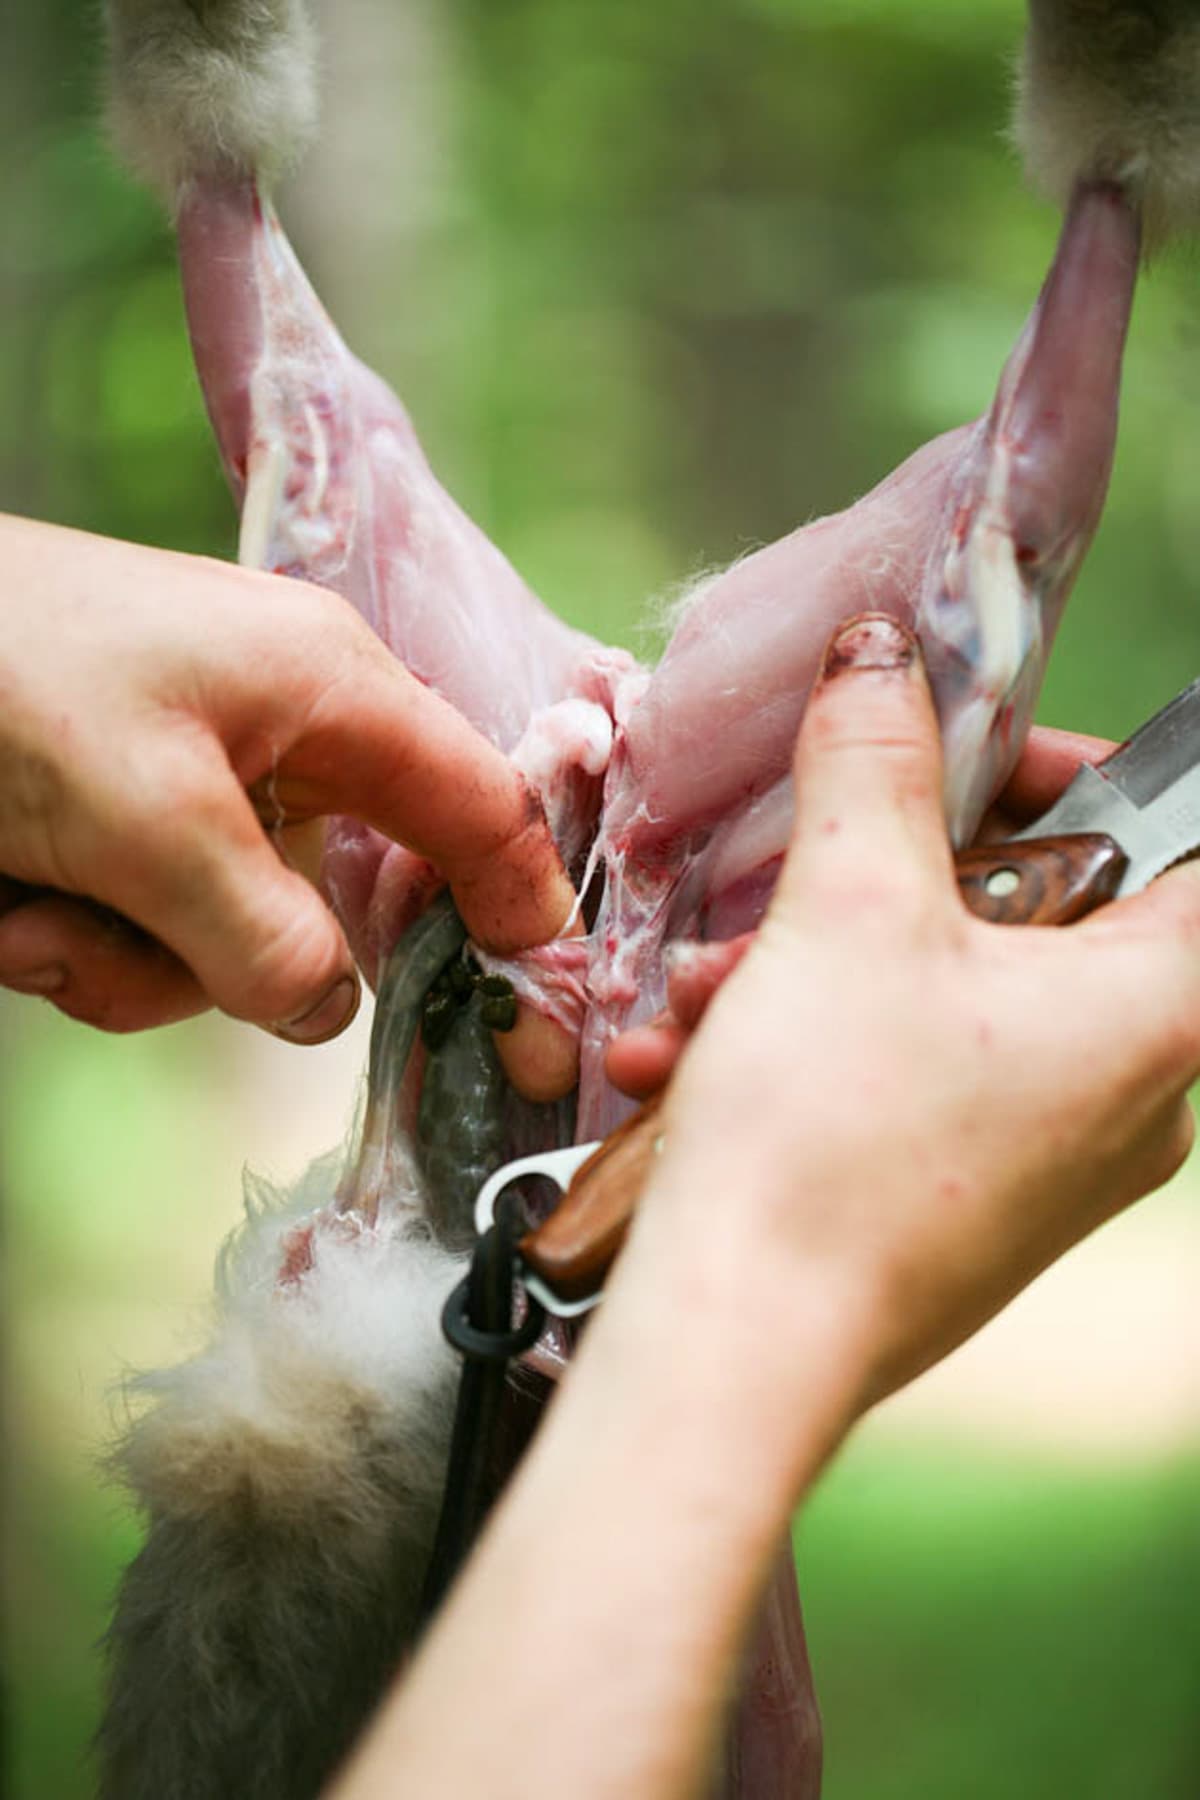
Step six – remove the intestines. Once there is a clean path, cut around the tail and the anus to release them. Reach for the tail and pull it gently forward. If there is still some flesh in the way you can tear it with your fingers or use the knife but be very careful not to cut open the intestines. Keep pulling gently until the intestines fall out.
In this group of intestines, you can find the liver and kidneys which you can eat or feed to your dog. You want to remove the membrane from the kidneys and make sure that you remove the gallbladder from the liver. You also want to make sure that the liver is dark and even in color. If there are any spots on it it’s better not to eat it because it might be a sign for sickness. This video shows those parts and how to clean them.
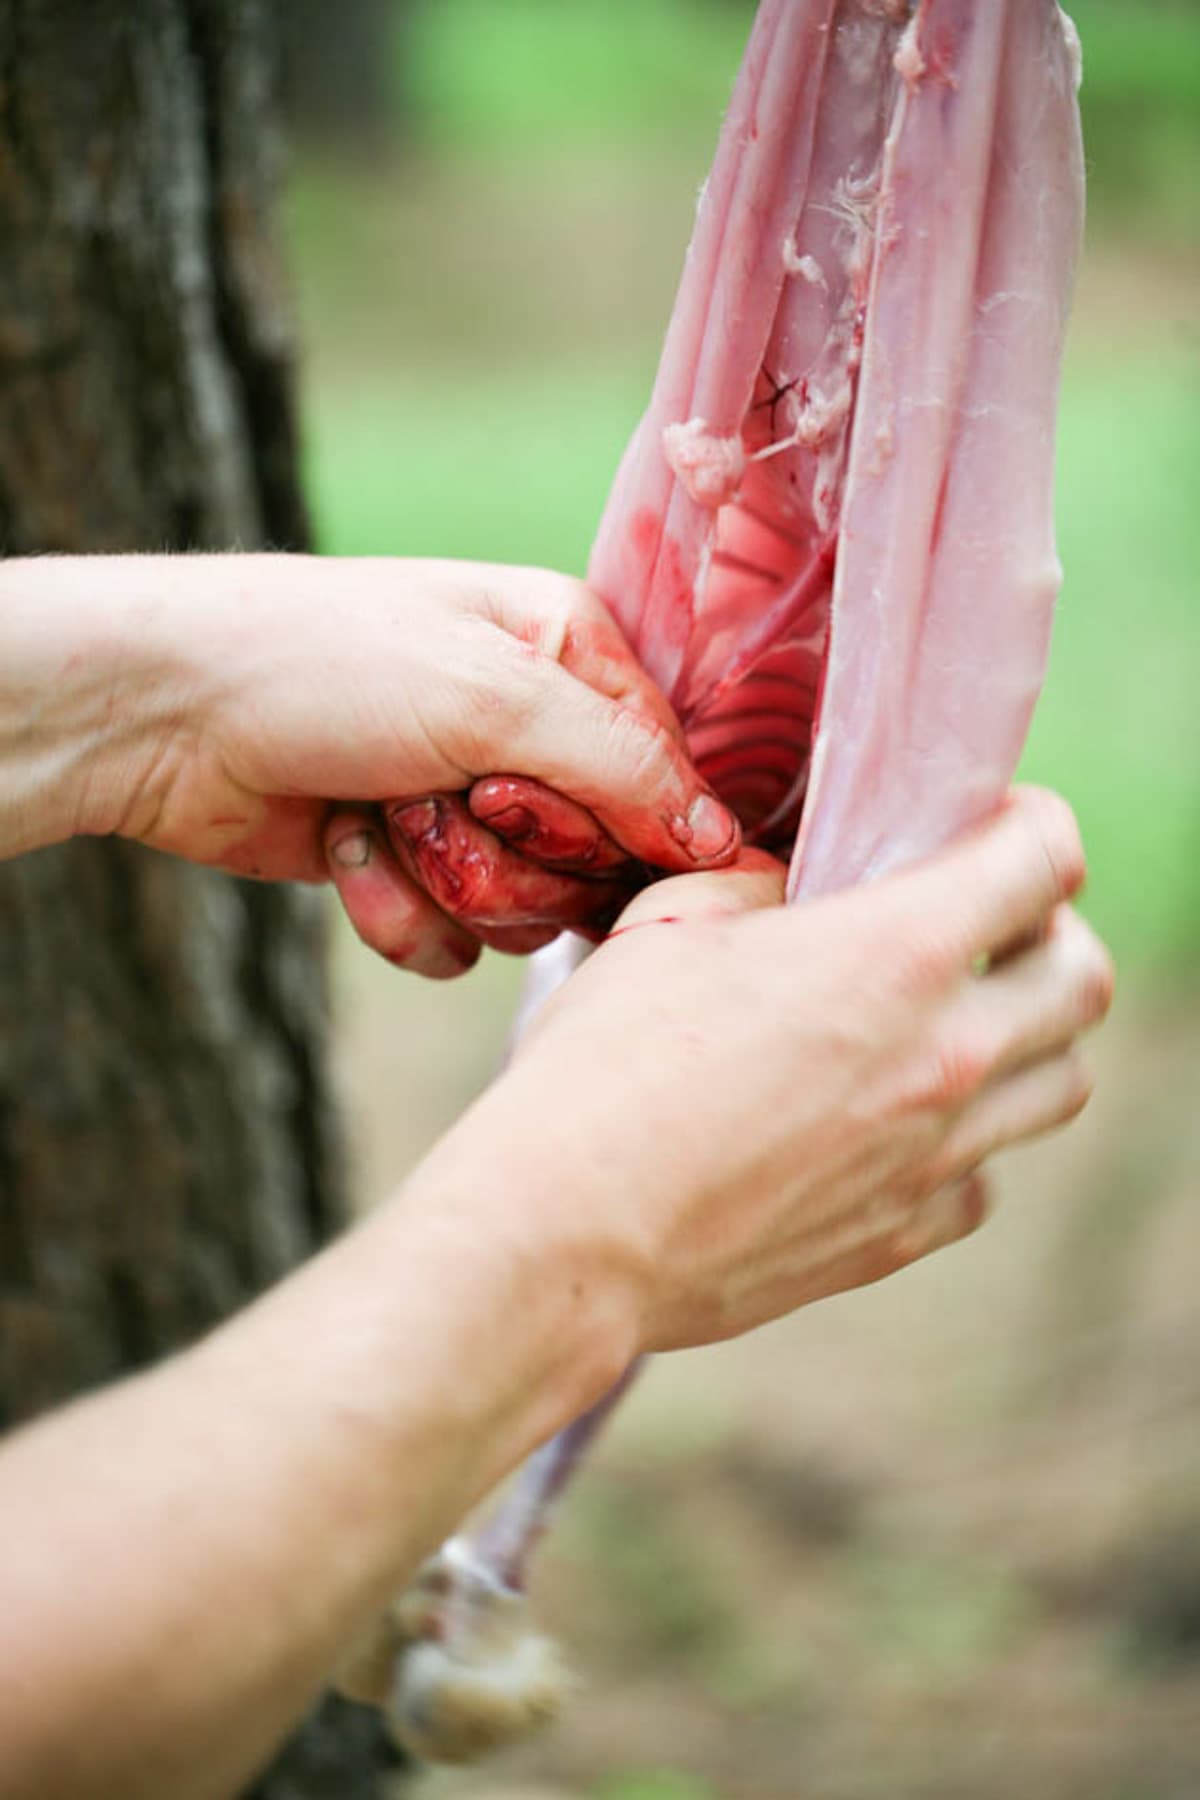
Step seven – removing the heart, lungs, and esophagus. After cleaning the intestines, you will notice that there is another cavity that is separated from the stomach cavity by a thin film. When you tear this film and open the second cavity you’ll find the heart, lungs, and esophagus. Stick your fingers in there and pull those organs out. You can keep the heart and eat it if you like.
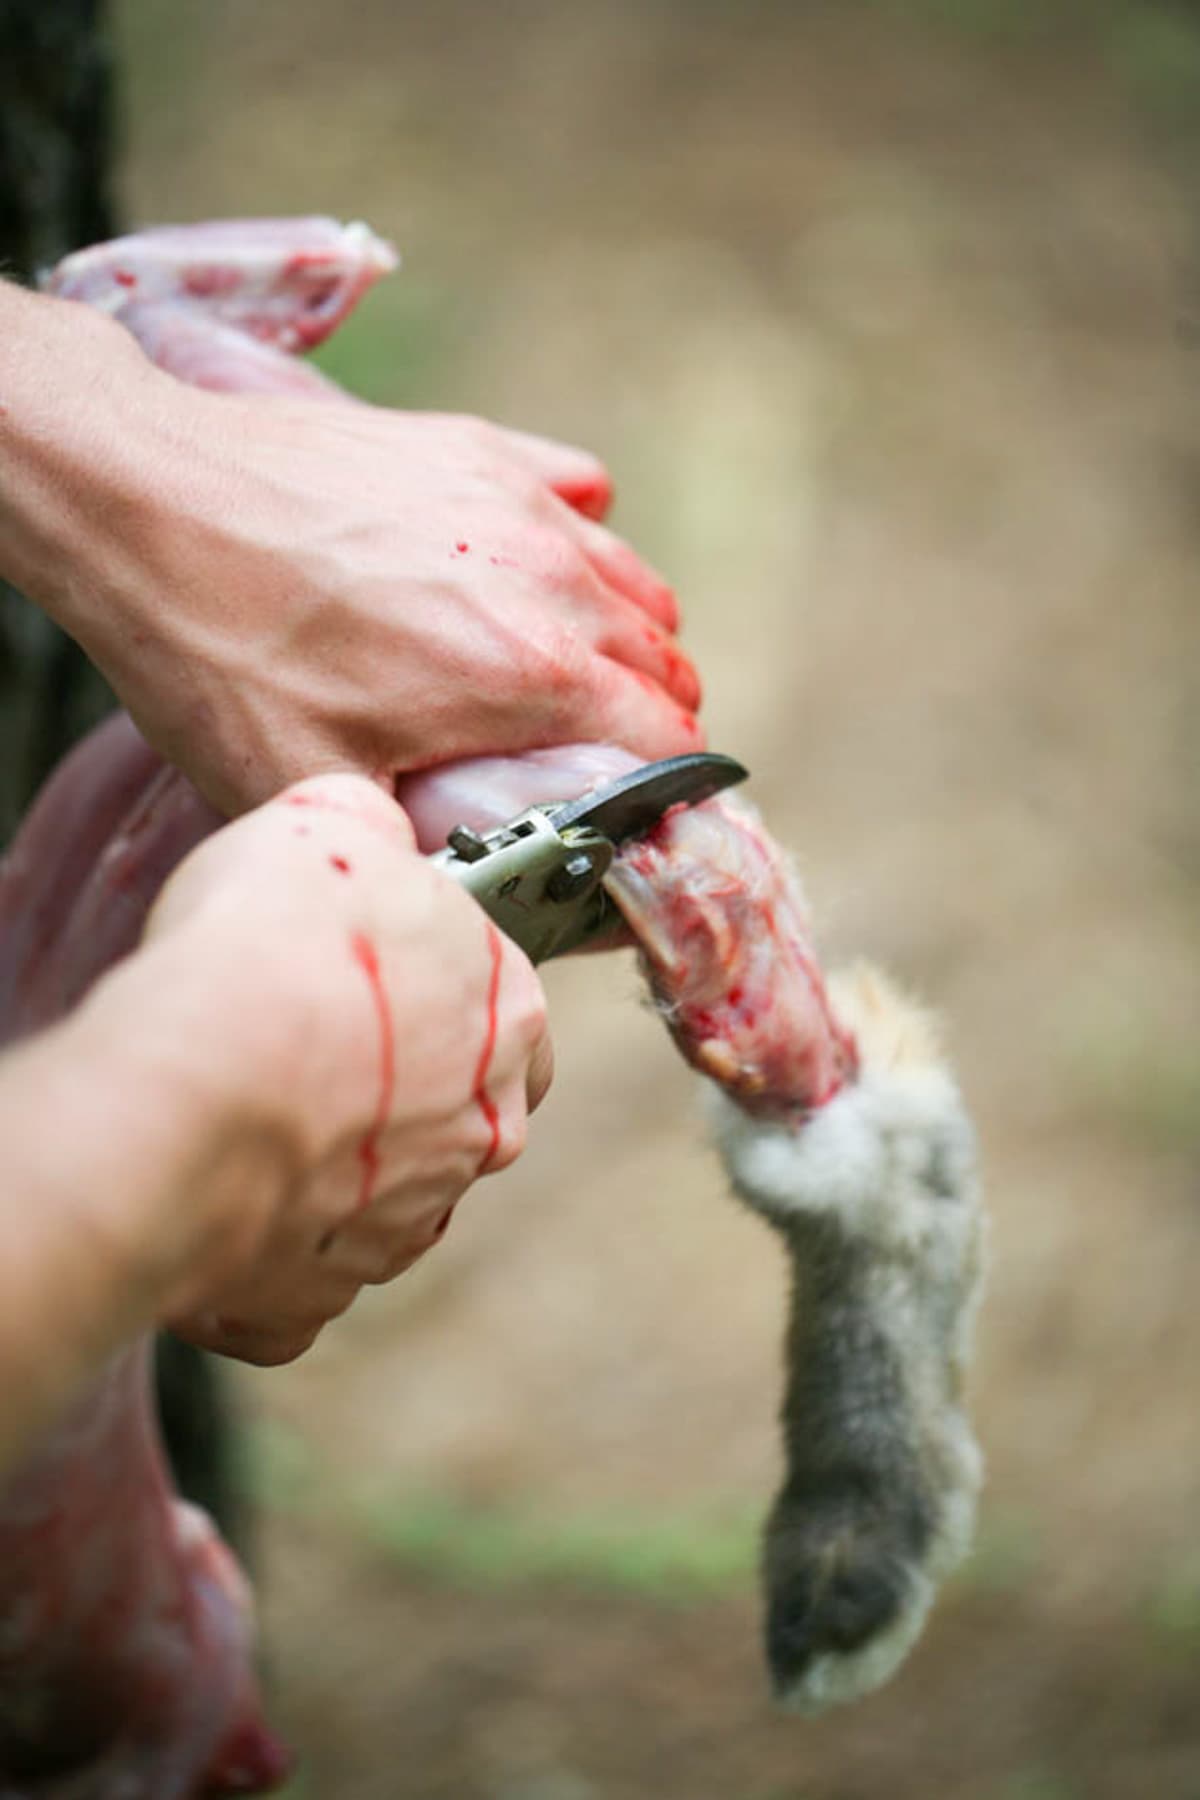
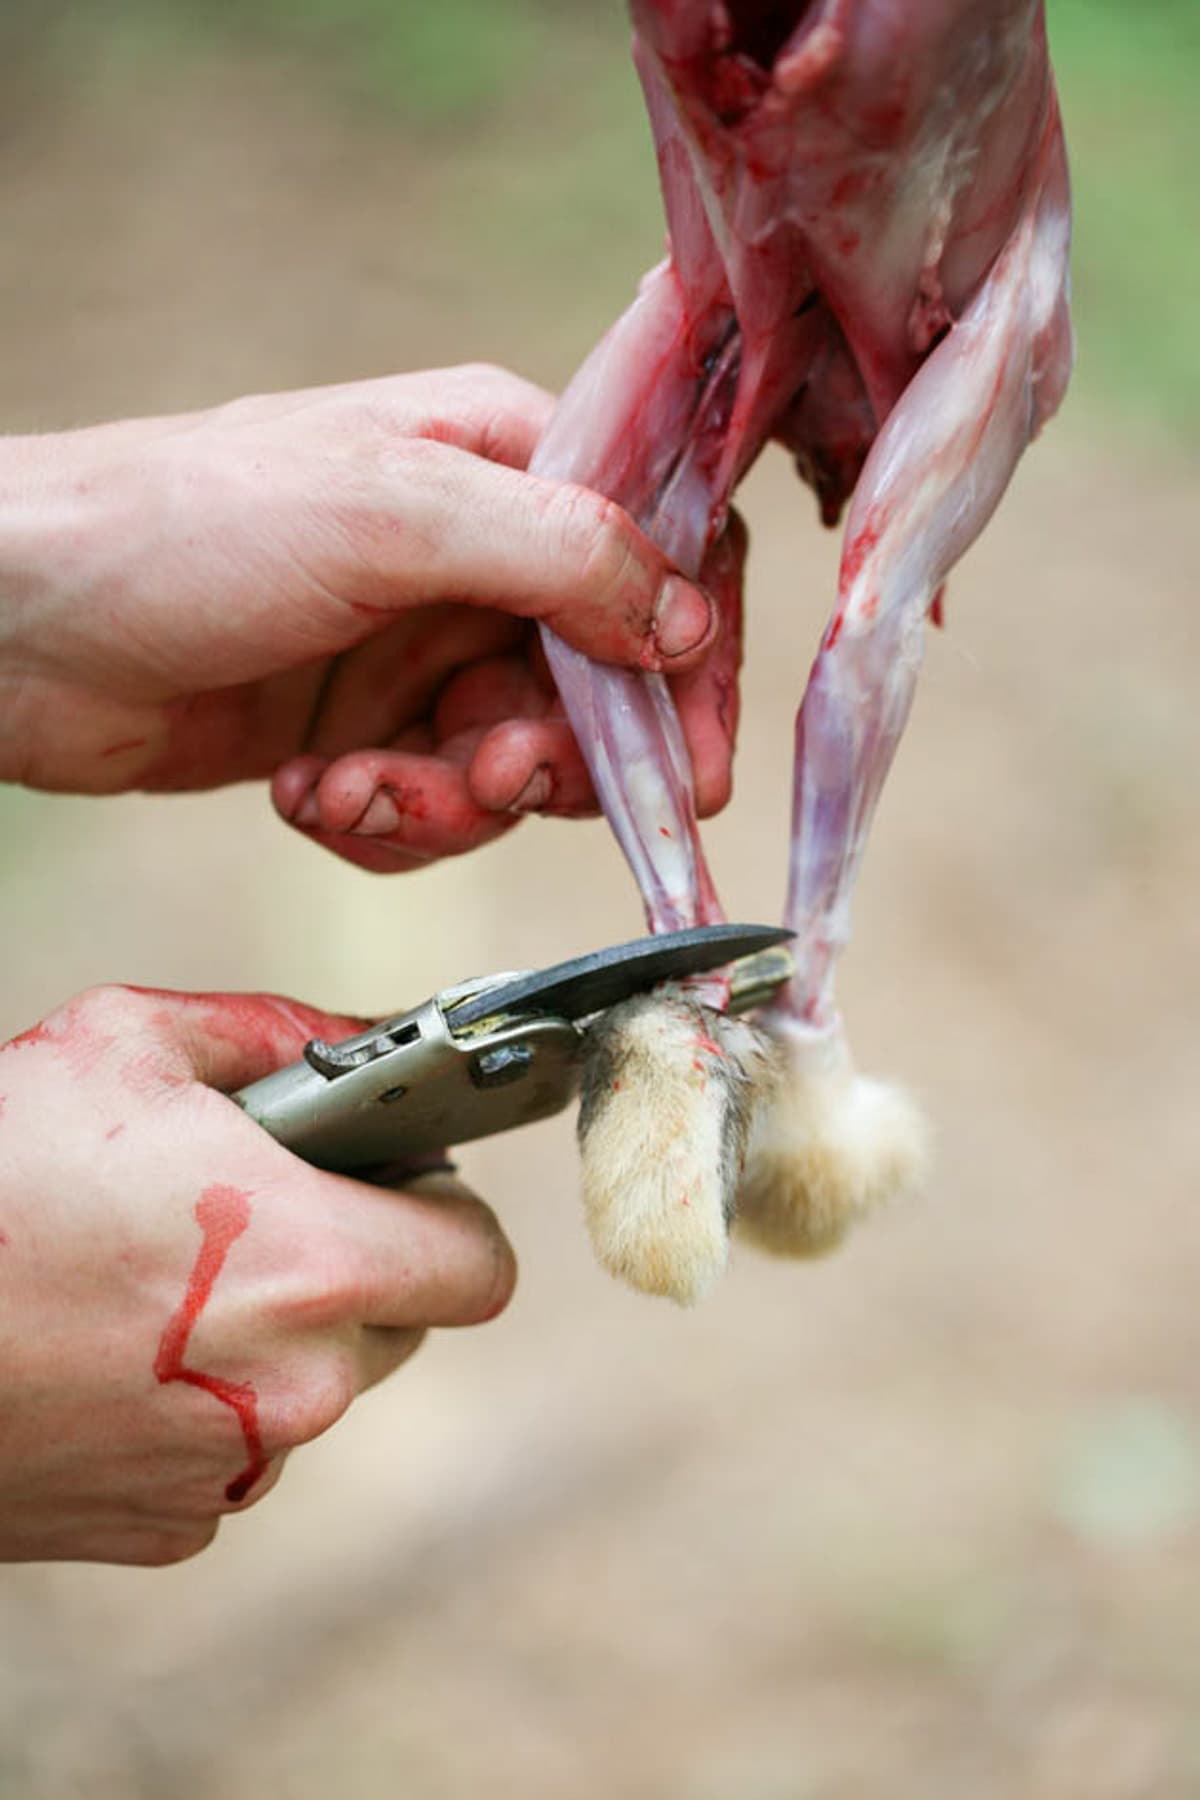
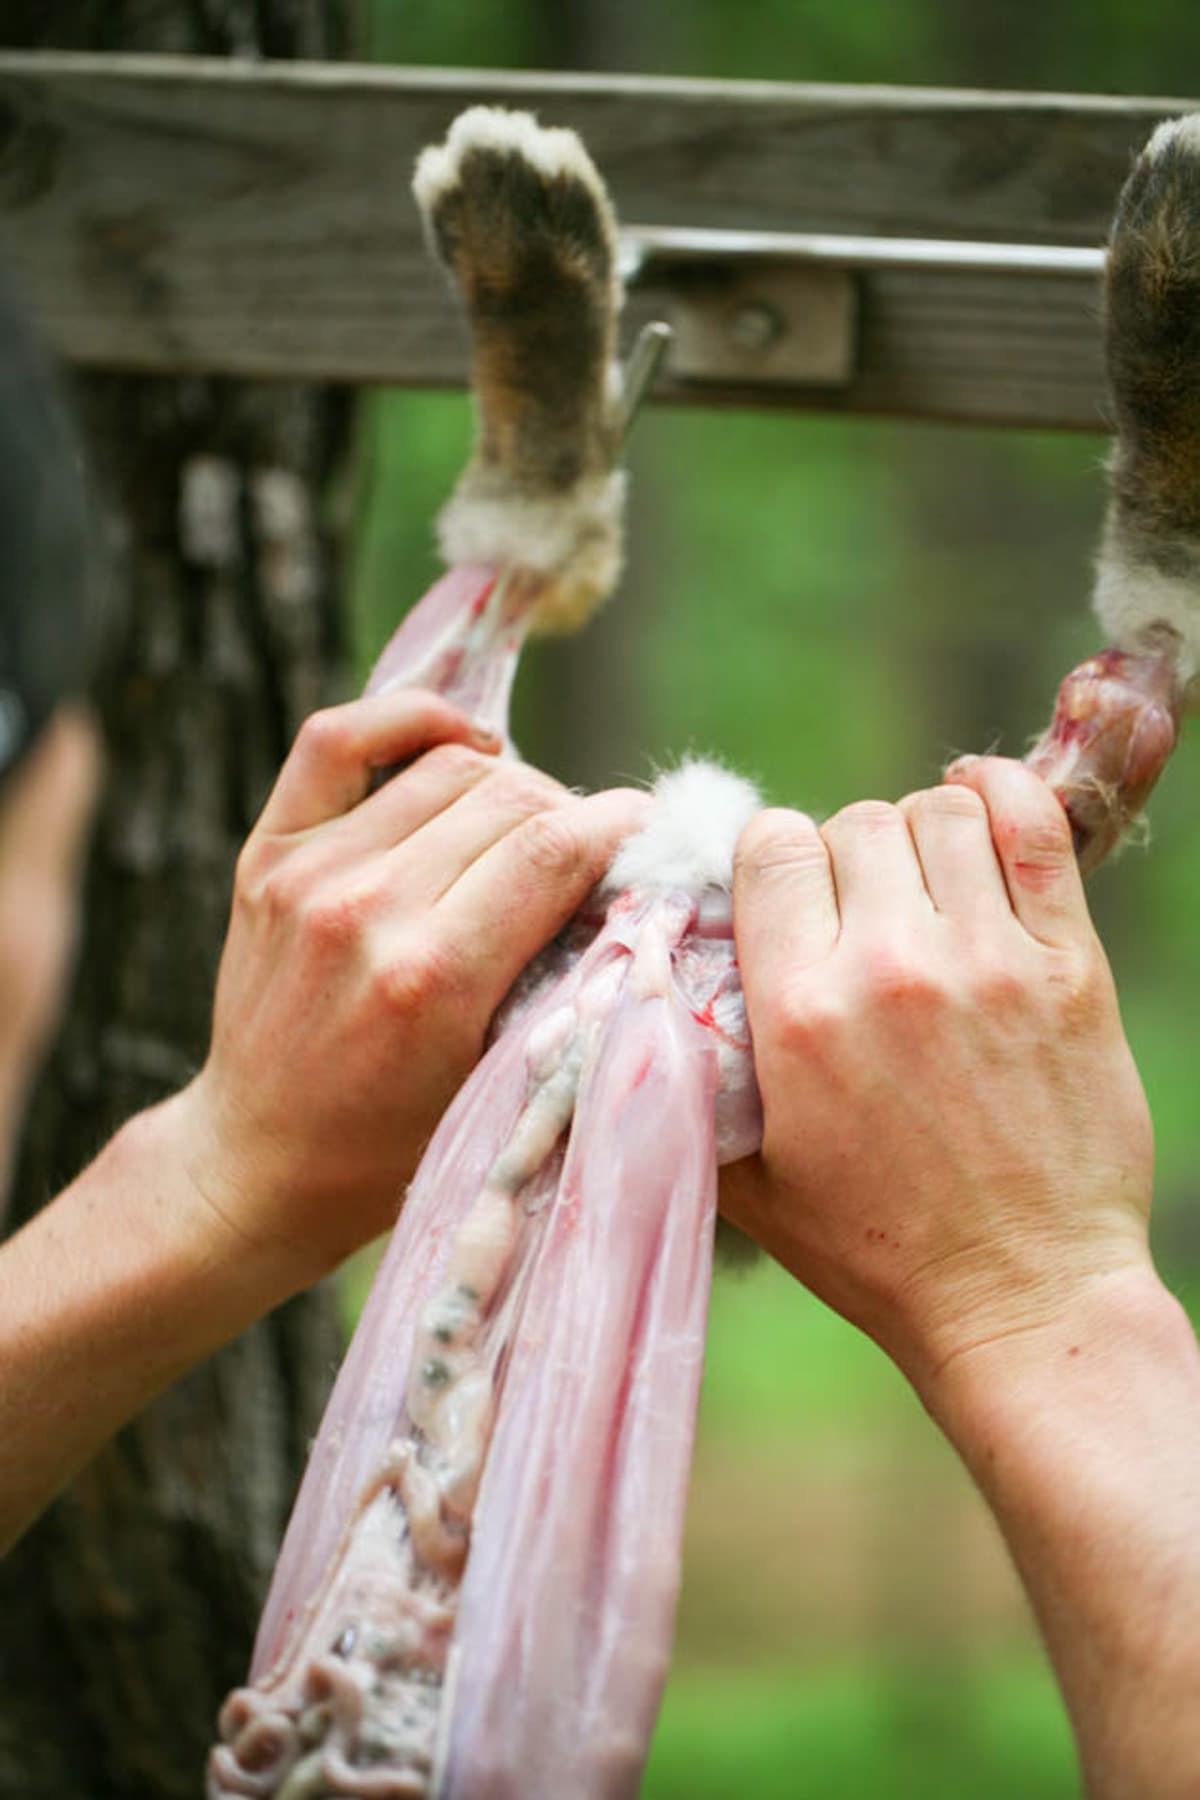
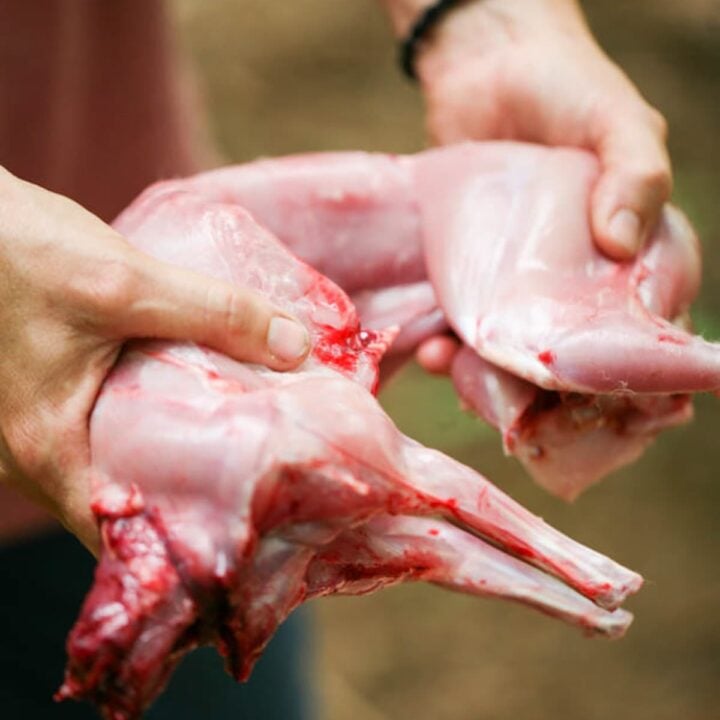
Step eight – remove the back feet and wash. The rabbit is clean. All that is left to do is clip the hind feet with the shears and give the rabbit a good wash with cold water. Then place the meat in a plastic bag on ice (in a cooler filled with ice) or in the fridge to “relax” for 24 hours.
Storing Rabbit Meat…
- In the freezer – after 24 hours you can pack the meat for the freezer or cook it. Like I mentioned before, you can use the shrink bags which I’ve used for turkey before but I’m sure they’ll work well for rabbits too, or you can use the food vacuum sealer.
- Can the meat – the other option that we have here is canning this meat which is a simple thing to do. You can can rabbit meat the same way as you would can chicken meat. This will save you room in the freezer and you won’t need to remember to thaw your meat before cooking it (which is seriously my favorite thing about canning meat!).
How to Use Rabbit Meat…
You can use rabbit meat the same way as you use chicken meat! In fact, they even taste pretty much the same. Here is my recipe for rabbit in cream sauce, it’s delicious! You can also use the meat in chili, or cook rabbit in wine sauce, or make roasted rabbit or whatever… The possibilities are endless!
That’s it, friends! I hope that this tutorial was helpful. I hope that it isn’t looking too intimidating. really, after the first and second time, you’ll be able to process a rabbit in minutes. It is the easiest animal to process.
More Farm Animals Content…
- Guinea Fowl – Pros and cons
- Guinea Fowl Eggs – What You Need to Know
- How to Skin a Chicken
- How to Clip Chicken Wings
How to Butcher a Rabbit
A step by step tutorial on how to butcher a rabbit at home.
Materials
- 1 rabbit 8-12 weeks old.
Tools
- Killing stick
- Hanging structure
- Butchering knife
- Gloves
- Garden shears
- Plastic bag
- Poultry shrink bags or a vacuum sealer and vacuum bags
Instructions
- Step 1: dispatch the rabbit: Hold the rabbit by its hind legs. Hit it hard on the back of the neck to stun it. Place the rabbit on the ground, place the stick across its neck, step on the stick and pull the rabbit from its hind legs to disconnect the vertebrae.
- Step 2: hang the rabbit and remove its head.
- Step 3: skin the rabbit: place the butchering knife right under the joint and cut the skin around the leg. You have to be very careful here because rabbit skin is very very thin.
Go slow and cut around the leg, try not to cut the meat or the tendon that is in the back of the leg, just the skin. After you cut the skin in a circle around each leg right under the join, slit the skin on the inside of the legs in a V shape from each of your cuts toward the anus and around it.
Then start peeling the skin with your hands from the legs and pull it down the body of the rabbit. It will come off easily.
Also, use the garden shears to clip the paws of the front legs. - Step 4: gut the rabbit: we start at the top, right between the hind legs, and cut the abdomen open. We work with the blade of the knife pointing out toward us being very careful not to cut the intestines.
Next, hold the bladder and remove it.
Hold the two back legs and bend them backward. You want to break the bone that is right between the two hind legs. Then cut around the anus, hold the tail and remove all of the intestines at once. - Step 5: remove the heart, lungs, and esophagus: tear the thin film that separates the second cavity and remove the organs.
- Step 6: pack the butchered rabbit. Use the garden shears to clip the back paws. Wash the rabbit, place in a plastic bag, and refrigerate for 24 hours.
After 24 hours, pack with shrink bags or in vacuum sealer bags or you can can your rabbit meat.
Notes
Use your rabbit meat the same exact way as you would use chicken meat.
Recommended Products
As an Amazon Associate and member of other affiliate programs, I earn from qualifying purchases (there is no change in product cost or charge to you! Thank you for helping me support the blog).


Do you can the rabbit with the bones? or separate the meat and just can that?
I’ve never canned rabbit but rabbit has really small bones and I think that it will be hard to separate the bones from the meat before canning so I’d say, can with the bones.
By chance, have you learned HOW to clean the intestines to use for sausage casings? I also raise rabbits for the table, and it just doesn’t make any sense to spend money on artificial or processed casings when each animal comes with enough to hold the meat of that carcass.
Enjoyed your tutorials, even learned a few things….
Best Wishes to you and Yours,
K Cason,
Camden, Arkansas
Ohhh… I would LOVE to learn that. My grandma used to do it but she is no longer here. I agree with you! We have everything we need in the animal, no need to buy the artificial stuff. If you find a good tutorial on how to clean the intestines please let me know!
Thanks to your illustrations, they are helpfull. l
Happy they help! Thanks for stopping by.