This post may contain affiliate links, view our disclosure policy for details.

Canning chicken meat at home is simple. It is ready to be used as a main dish or can be added to many other dishes. In this post, I’ll show you how to can chicken step by step.
Lady Lee’s Note…
Over the years, I’ve gotten so much better at meal planning, shopping for what I need instead of what I think I need, and staying within a budget. However, I am still not as good when it comes to thawing things ahead of time so I can use them in the said meal plan… Which is a problem… And also the reason that I learned how to can meat.
It might take a little extra work, but once you place that sealed jar on the pantry shelf it’s there to save you in case of brain malfunction. It saves me over and over again I tell you.
I don’t can all of my meat but I try to always have a few jars on the shelf. It really doesn’t take too much time and it’s a super simple process. Let me show you how to can chicken meat.
Benefits of Canning Chicken…
- No need to thaw – as I mentioned above, the fact that canned chicken is right there on the shelf ready to use is a huge life saver for me!
- Save space in the freezer – if you are a homesteader or (and) a hunter you know how valuable freezer space is. I always assumed that canning chicken would be this huge project that I would have to spend a lot of time researching and performing but I was so surprised to find out that canning meat is very simple. So now, in order to save my freezer space for other things, I try to can some of my meat.
- A great skill to have – I am not one to expect the worst out of this universe, so I’m not going to tell you to make sure you are prepared for it. However, I’ve seen times where there isn’t as much meat at the grocery store as there should be so I’m just going to add here that learning how to can chicken is a great skill to have in your tool belt… Just in case.
Raw Pack vs. Hot Pack…
When canning meat, you can choose to use the raw pack or the hot pack method. In the raw pack method, you cut the meat, pack it into the jar, add a tiny bit of liquid or nothing at all, and process the meat. It’s a simple method that I show how to do in my post about canning venison meat.
In the hot pack method, you cook the meat just a little bit before you pack it into the jars, add some liquid and process. The benefit of the hot pack method is that during the cooking the meat loses water content and shrinks and you can pack more into a jar. Some say that it also improves the shelf life (however, I gotta say that my raw pack venison lasts for a year and more…).
For meat like venison or beef, I always prefer the raw pack method. But when it comes to poultry or rabbit meat I prefer the hot pack method simply because it’s hard to take the raw meat off the bone and I feel like a whole lot of it is left behind.
Canning Chicken 3 Different Ways…
- The first way is to cut a whole chicken into pieces, leave the bone in, and pack the jars with the chicken pieces (bone-in). Then, clean the rim of the jar, cover it with the lid, close it with the band, and process in the pressure canner the exact same way I do below.
In this way, we left the bone in and didn’t add any liquid to the jars. The chicken will release its own juices while you process it in the canner.
My problem with this was that it was just hard to stick the pieces of chicken with the bones inside the jars. It seems like there is a lot of wasted room and I don’t eat the bones so why can them? - The second way to do this is to try to take the raw meat off the bones, pack the jars with the raw meat (don’t add any liquid), clean the rim, close the jar, and process the same way that I do below.
My problem with this method is that it takes forever to remove the raw meat from the small bones, it’s a nightmare of a job, and there is always a lot that is left behind.
If you are canning chicken breast or boneless chicken thighs from the store, this will probably be the easiest way to go, but here on the homestead chicken comes whole so this doesn’t work for me. - I choose the third way… I choose the hot pack when it comes to poultry (or rabbit) meat. When the chicken is cooked, the meat falls off the bone and it takes just minutes to pack the jars. I get to use ALL of the meat, nothing is left behind and there is no wasted space in the jars. In this canning chicken tutorial, I’ll show you step by step how I do this.
Ingredients…
- Chicken – you can use a whole chicken or chicken pieces, like, just chicken breast or chicken thighs.
- Water or chicken stock – in the tutorial below, you’ll see that I used the water from the pressure cooker (the water I cooked the chicken in) to add to the jars. If you are canning chicken that is already cooked like leftover roasted chicken or leftover Thanksgiving turkey for example, you can use water or homemade or store-bought chicken stock instead.
- Salt – some say that salt helps preserve the taste of the chicken. If you add salt, use kosher, canning, or sea salt. Add 1/2 teaspoon to a pint jar or 1 teaspoon to a quart jar.
- Spices – I like leaving my canned chicken unseasoned so I can season it a different way each time that I use it, but if you like to add thyme, black pepper, chili peppers, or other spices to your chicken it is very possible. In fact, you can season it in a way that you can eat it right out of the jar. Even if you add seasonings, processing will be the same as in the tutorial below.
Tools…
- Cutting board
- Pressure cooker
- Pint jars
- Lids and bands
- Canning utensils
- Paper towel
- Pressure canner – I have a presto dial gauge pressure canner that I love. I’ll also give you instructions for a weighted gauge canner like this one.
Step-by-Step Instructions…
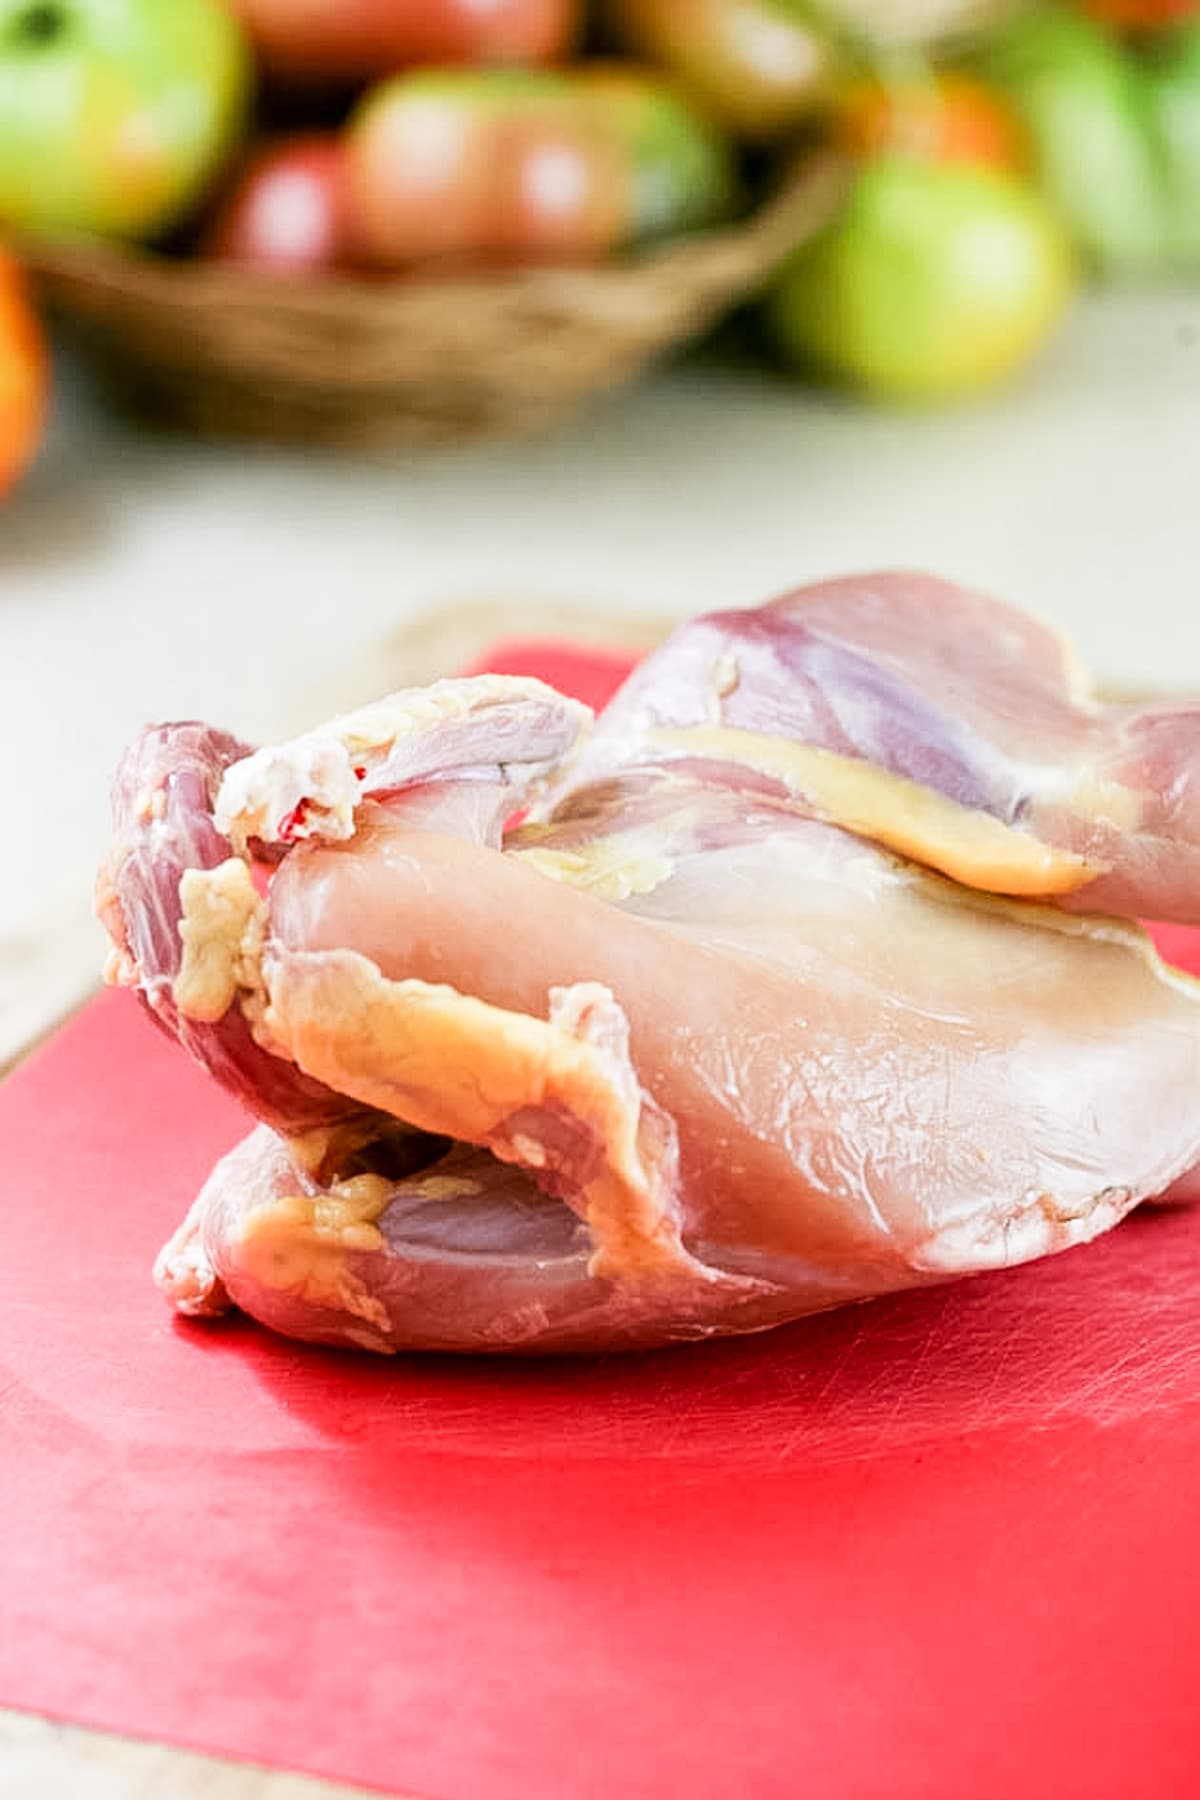
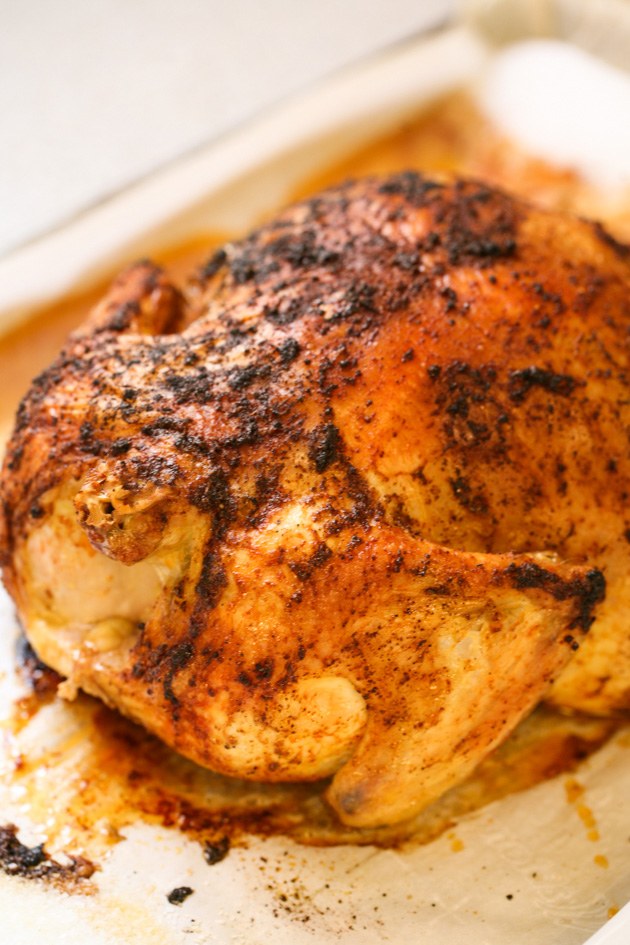
Step one – cook the chicken. I raise my own chickens for meat here on the homestead. This is the hen that I skinned in my post on how to skin a chicken. She was an older hen and a very annoying one. Even though I clipped her wings she still somehow kept finding a way to get out of the fence and ruin the garden. It was time for her to go (read here about how to butcher a chicken). Since I just used my last jar of canned venison that week, I thought it was a good idea to can her meat instead of wrapping her and sending her to the freezer.
She wasn’t a Black Australorp chicken, which is the breed I now raise for both meat and egg production, but an Ameraucana chicken that I got way back when so we could have some colored eggs (she was laying green, beautiful eggs). She was a smaller chicken than the common Cornish Cross that you might choose to raise for meat and also smaller than the Australorps so I only got two pints of meat, but still, I wanted to go ahead and can the meat so I have something on the shelf.
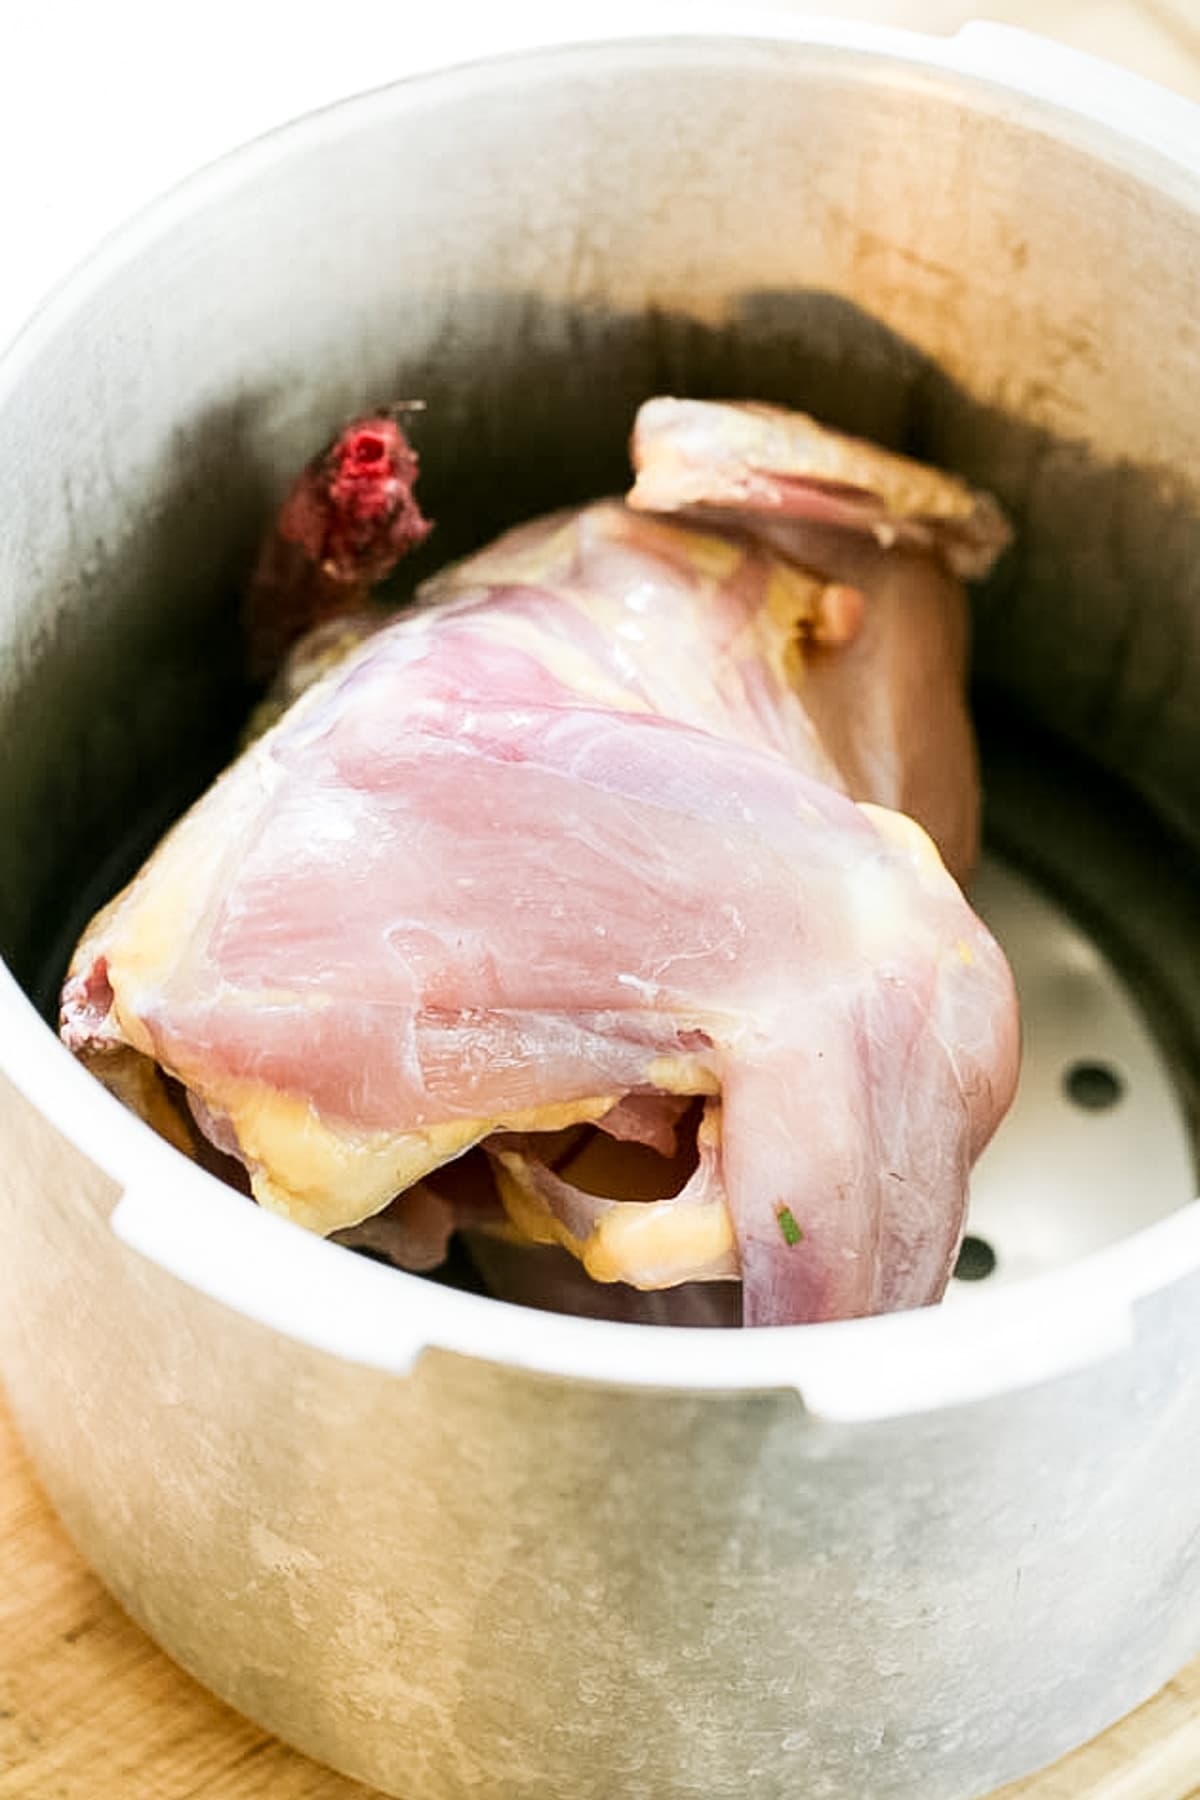
Since she was small, she fit right into my Presto pressure cooker which is not too big… Sometimes, if I process a larger chicken or a few of them I have to cut it up. If I do, I make sure to find room for the carcass in the pot (there is still a whole lot of meat on it) or I use it to make chicken stock. If you pluck your chickens you can leave the skin on and can it or you can remove it. It doesn’t matter, it’s your choice.
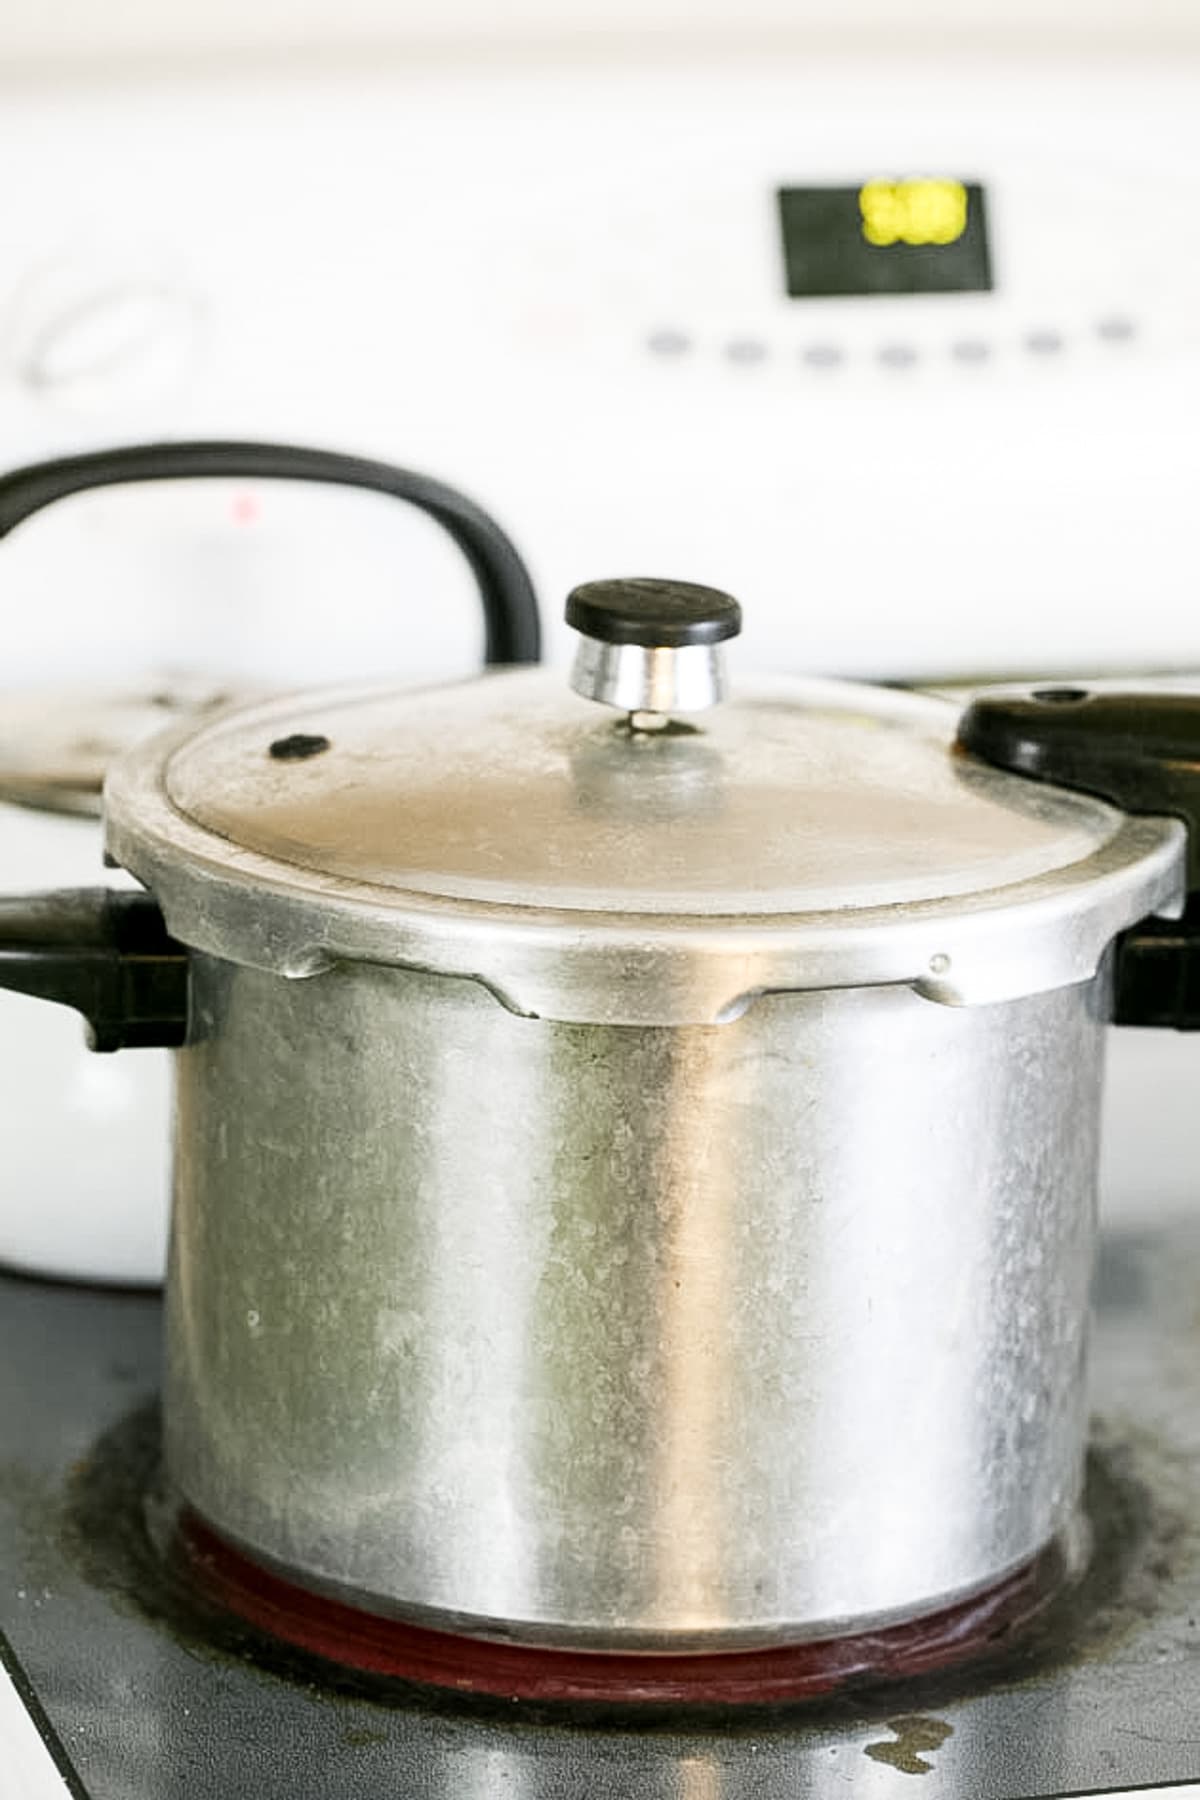
If you are using the Presto cooker, add the chicken and four cups of water. Then, close the pot, set it on the stovetop, and turn the heat to high. When the weight starts to wiggle, lower the heat just a little bit to keep the weight at a gentle wiggle, and cook the chicken for 30 minutes.
30 minutes might be a little longer than the pressure cooker book is going to tell you that you need to process a chicken (so its meat will fall off the bone). I do 30 minutes because I don’t raise meat breed chickens, which are not so active. Breeds like the Cornish Cross, which is what we buy at the store, don’t move much so their meat is more tender. My chickens are more active so their meat is a bit tougher and so I need to cook it a bit longer to bring it to the point of falling off the bone. If I am processing a larger, older chicken, I might even add an additional 10 minutes or so. When the time is up, remove the pot from the stovetop and take it to the sink. Let cold water cool it for a couple of minutes.
If you don’t have a pressure cooker, you can boil the chicken in water until the meat is soft and falling off the bone. This takes longer so I always use my pressure cooker instead (in many cases you can also use your pressure canner as a pressure cooker. They are bigger and you can fit a few chickens inside).

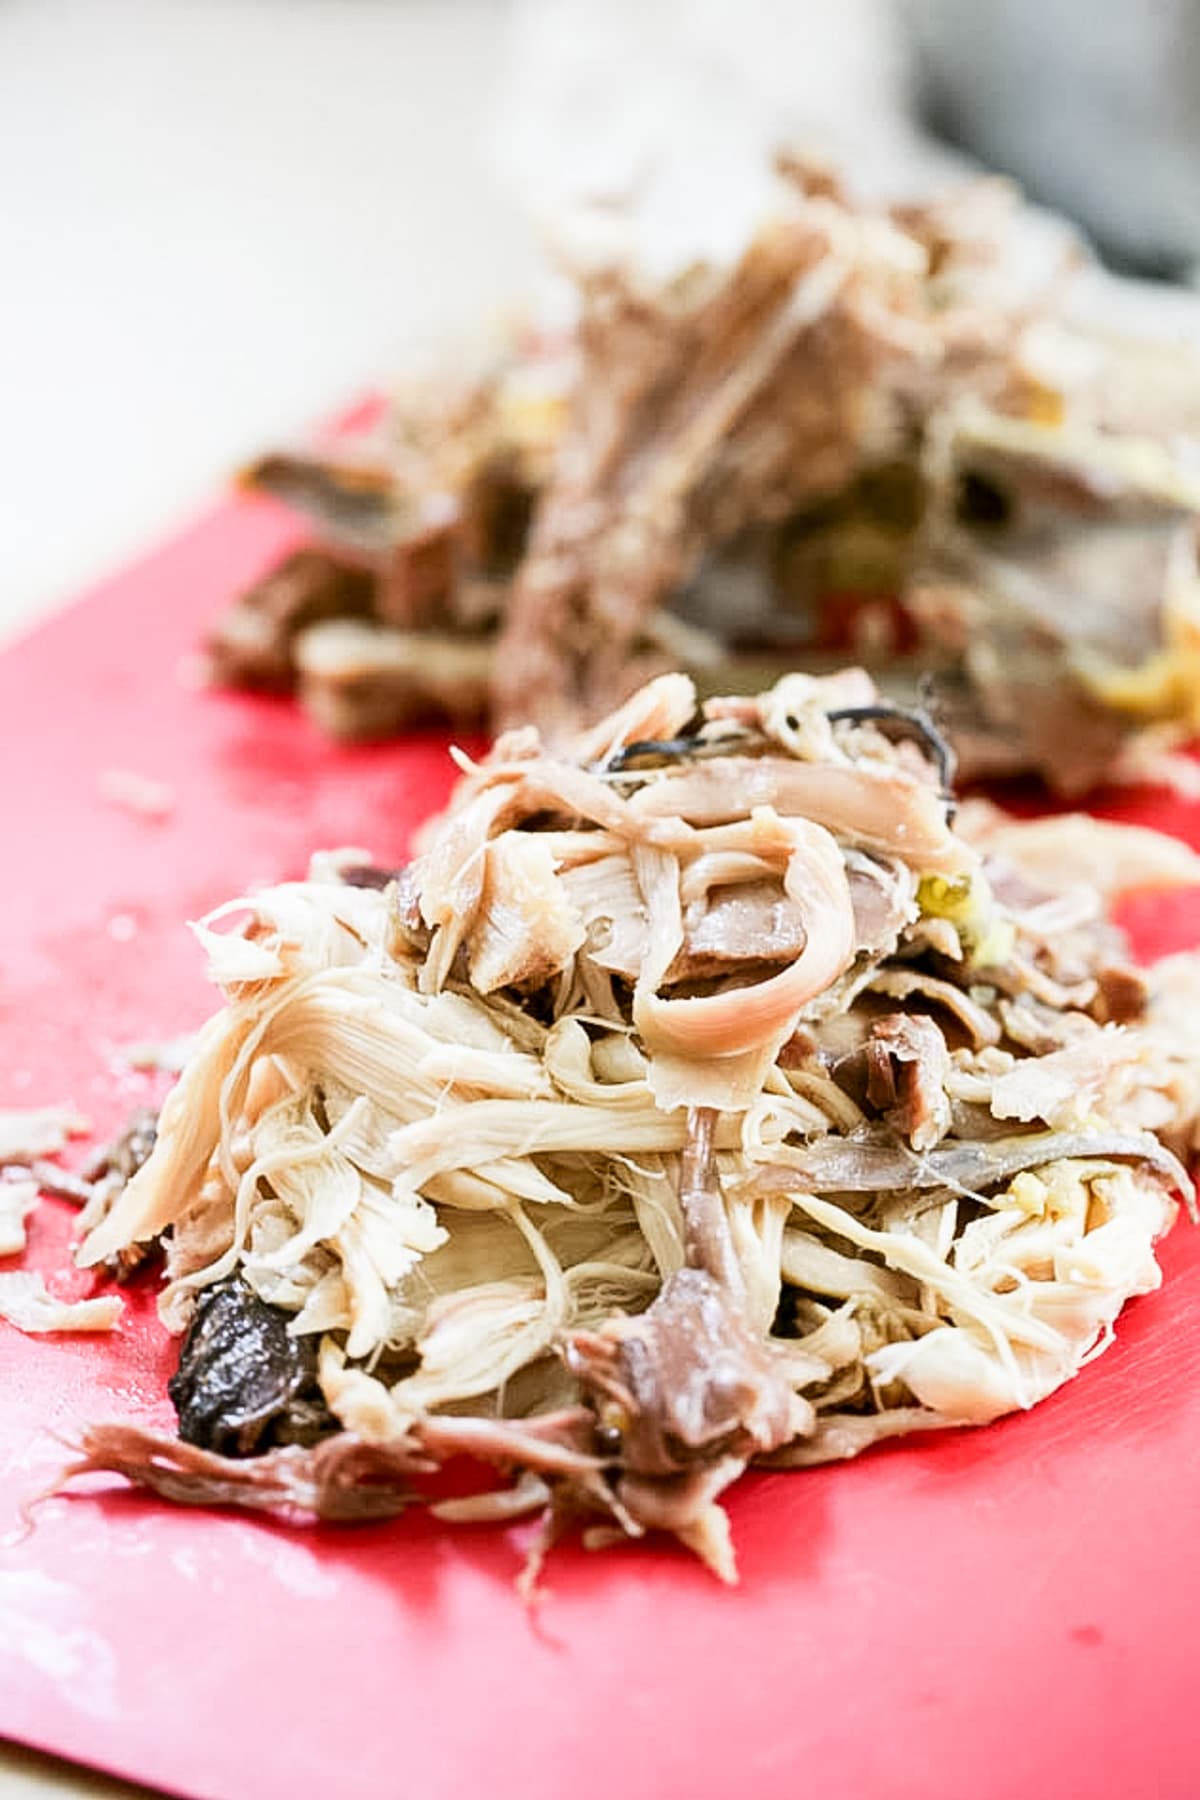
Step two – remove meat from the bones. When the crockpot has cooled enough, open the lid carefully and remove the chicken from the pot (save the pot with the liquid in it close by, we are going to use that liquid in a moment), let the chicken cool for a moment and then take all the meat off the bones.
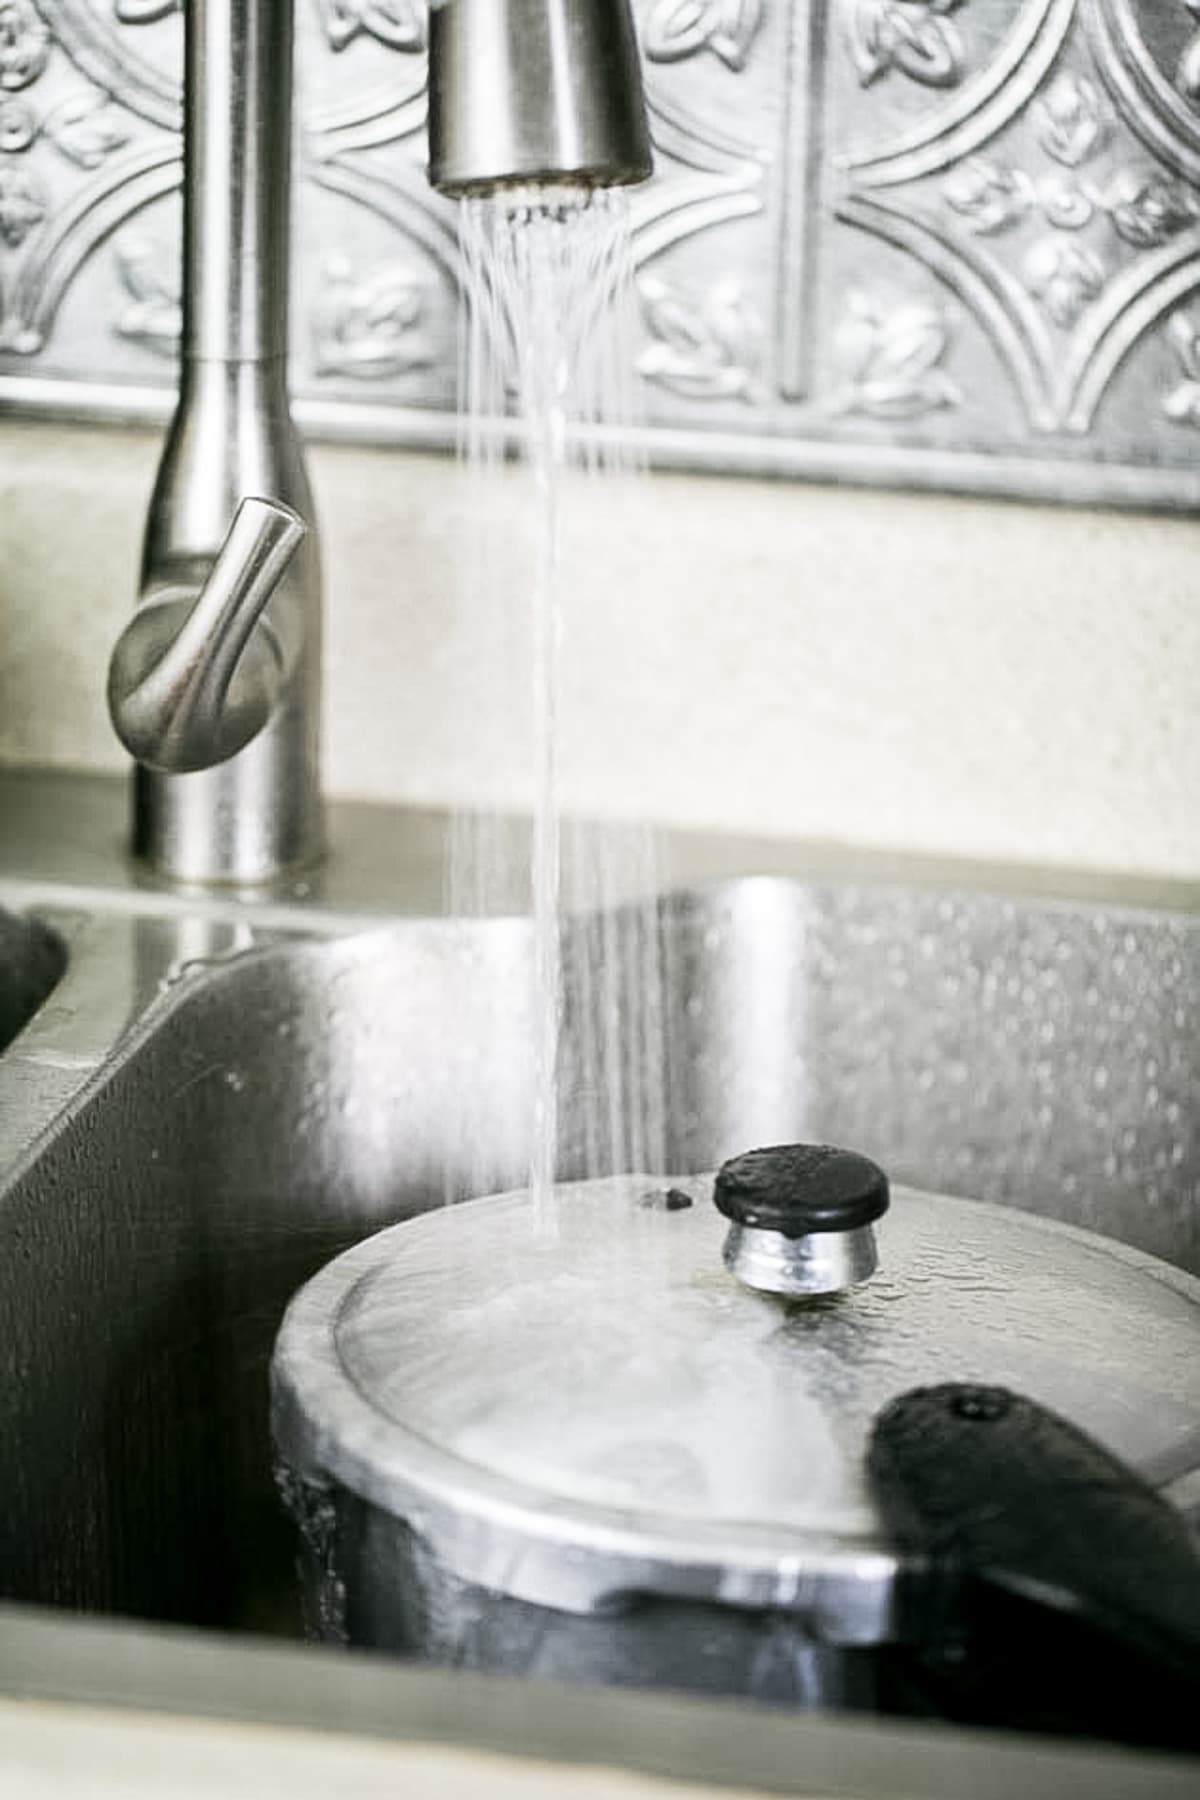
Step three – prepare the jars for canning. Wash the jars, lids, and bands, with hot water and a little bit of dish soap. Add 2” of water to your pressure canner, set it on the stovetop, and turn the heat to high so the water in the canner starts warming up.
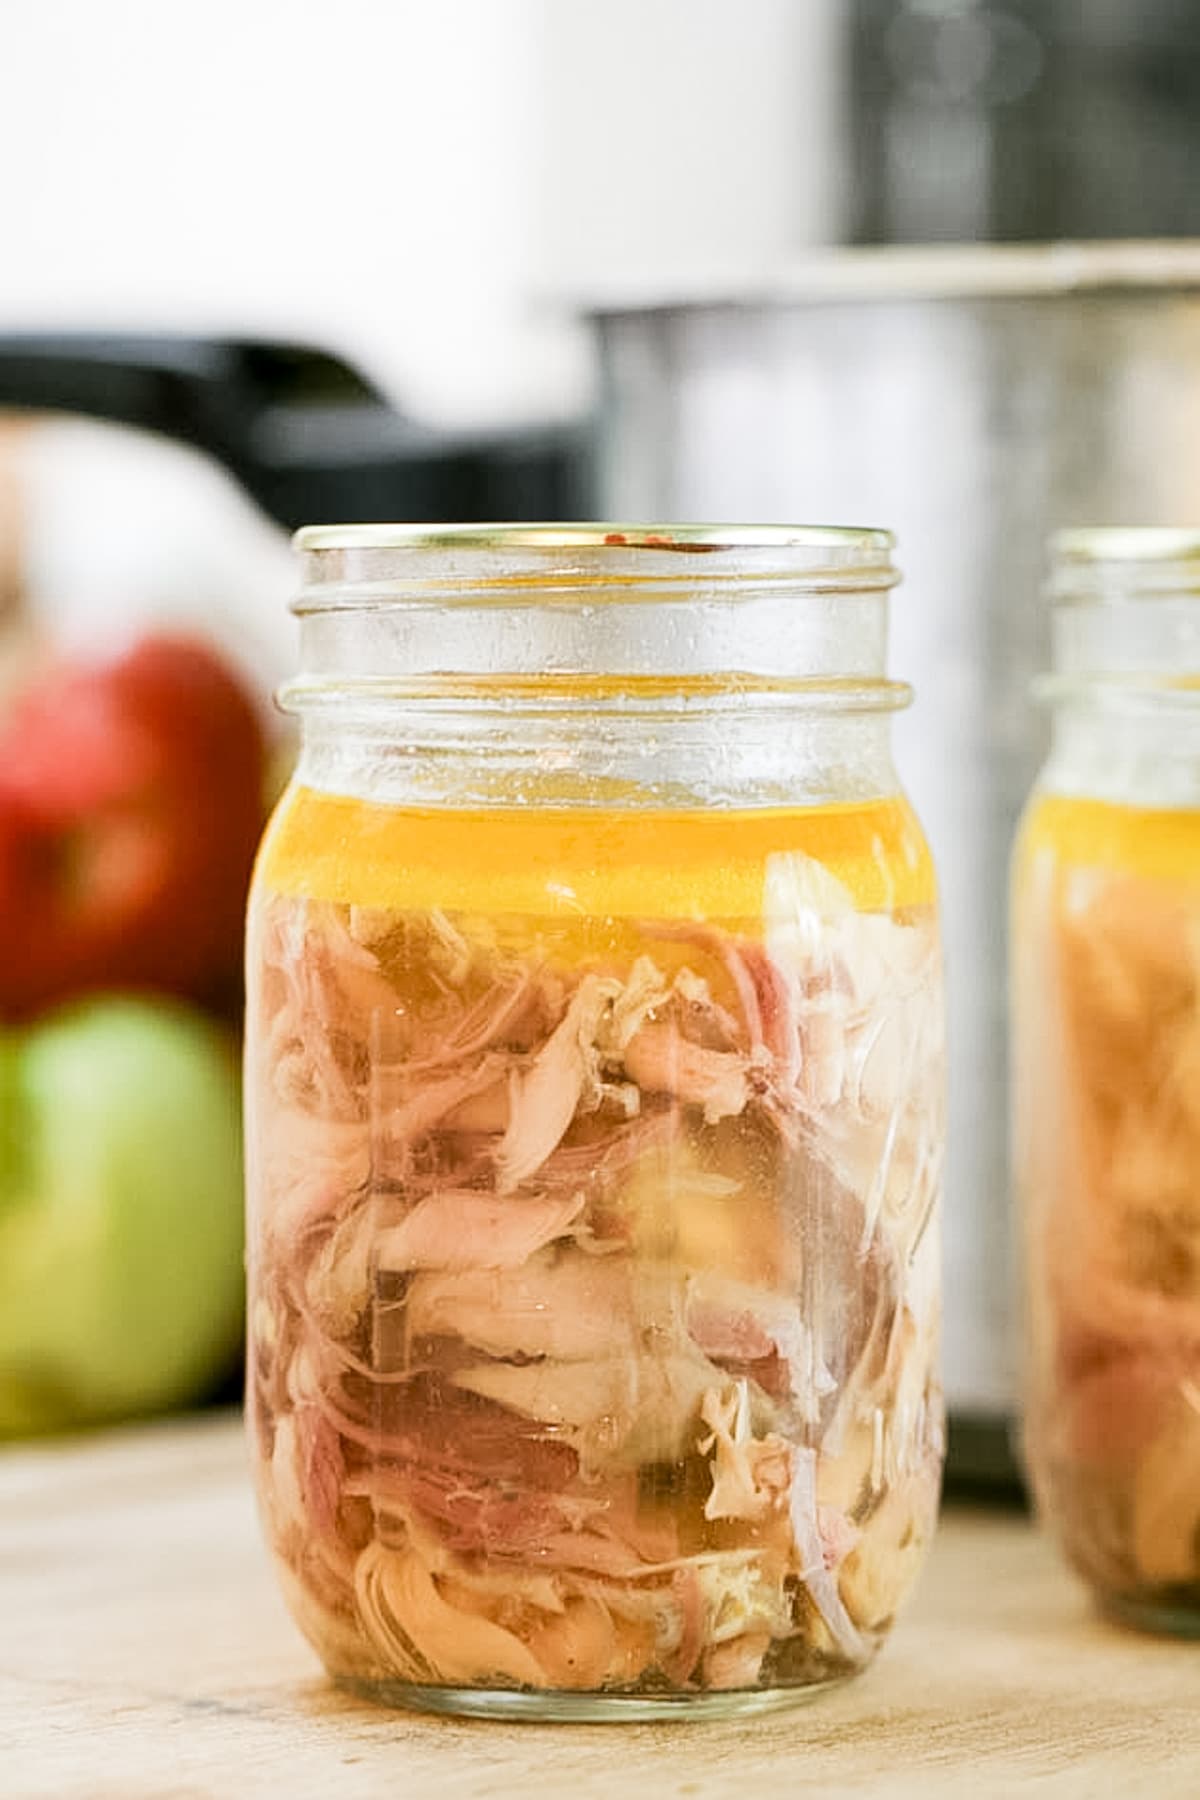
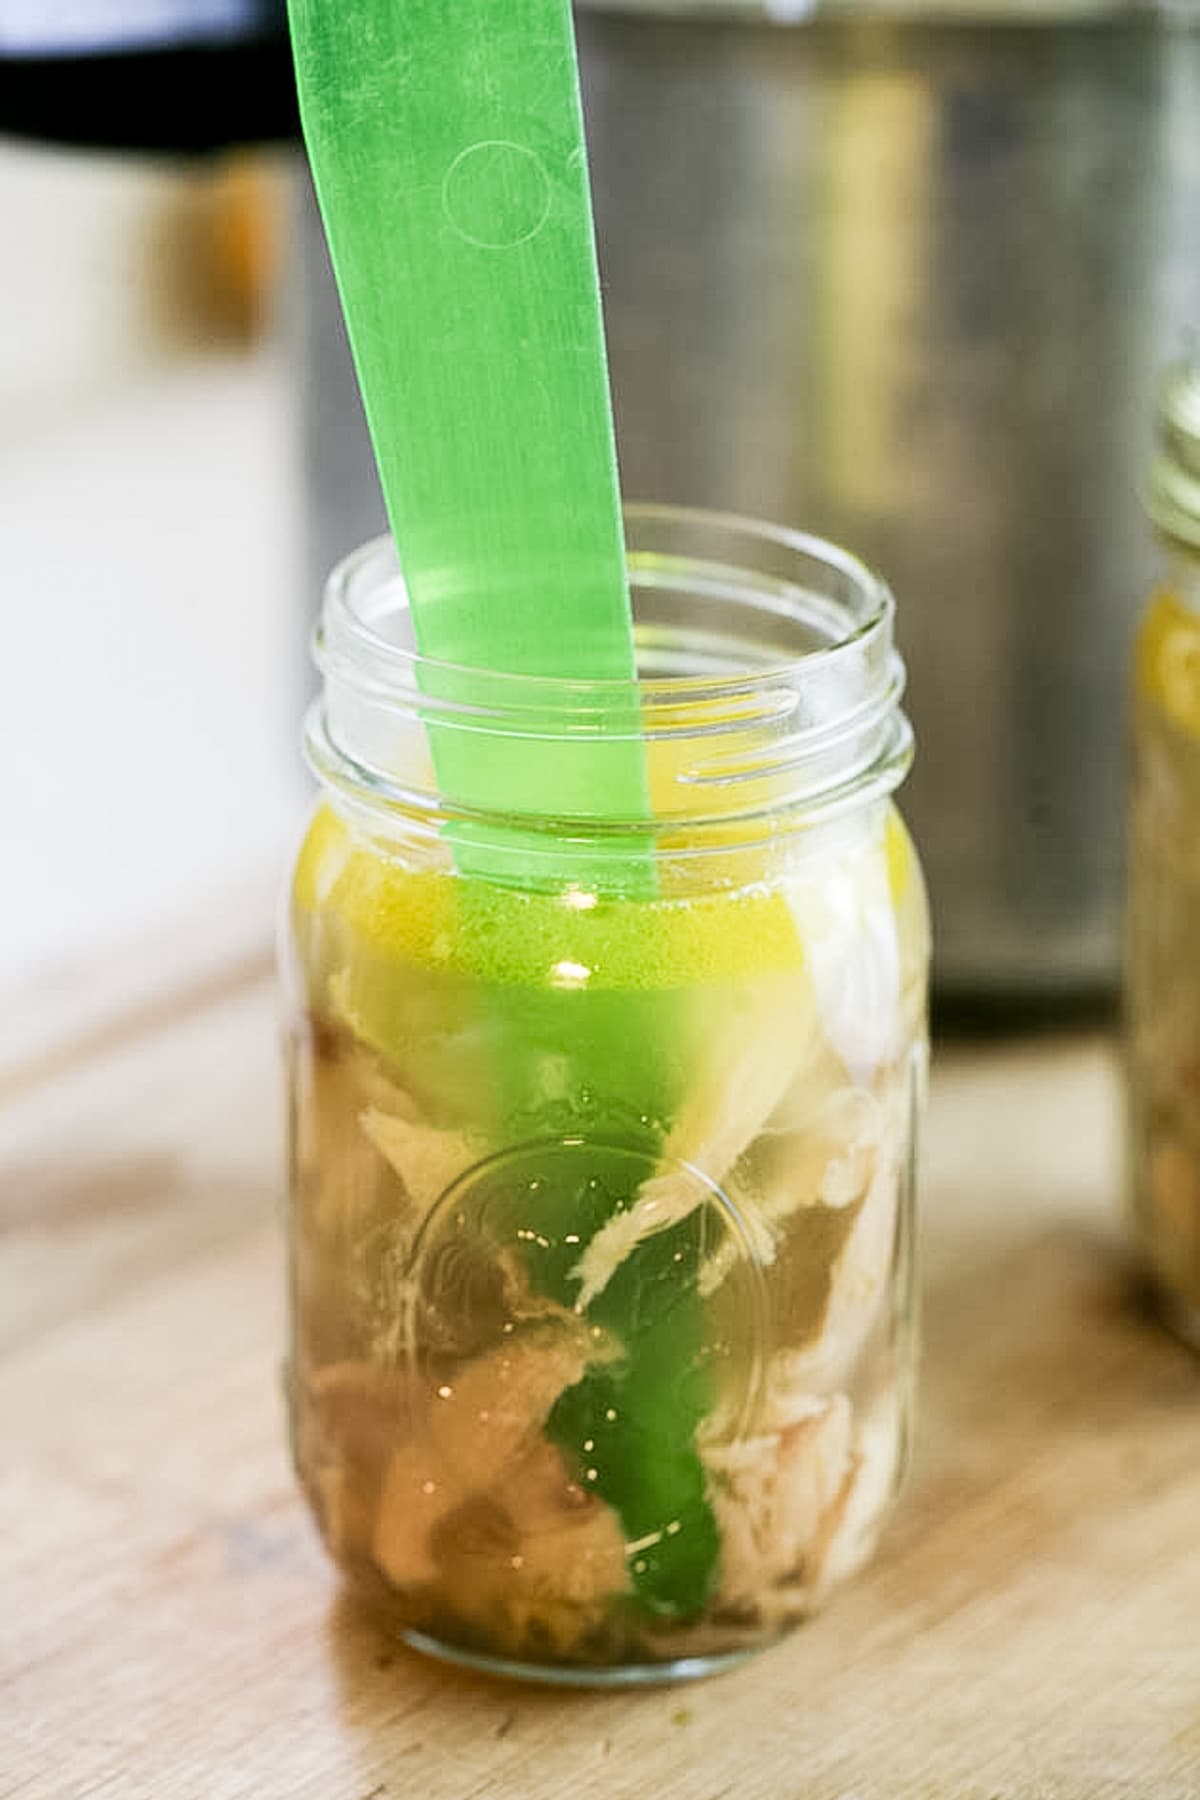
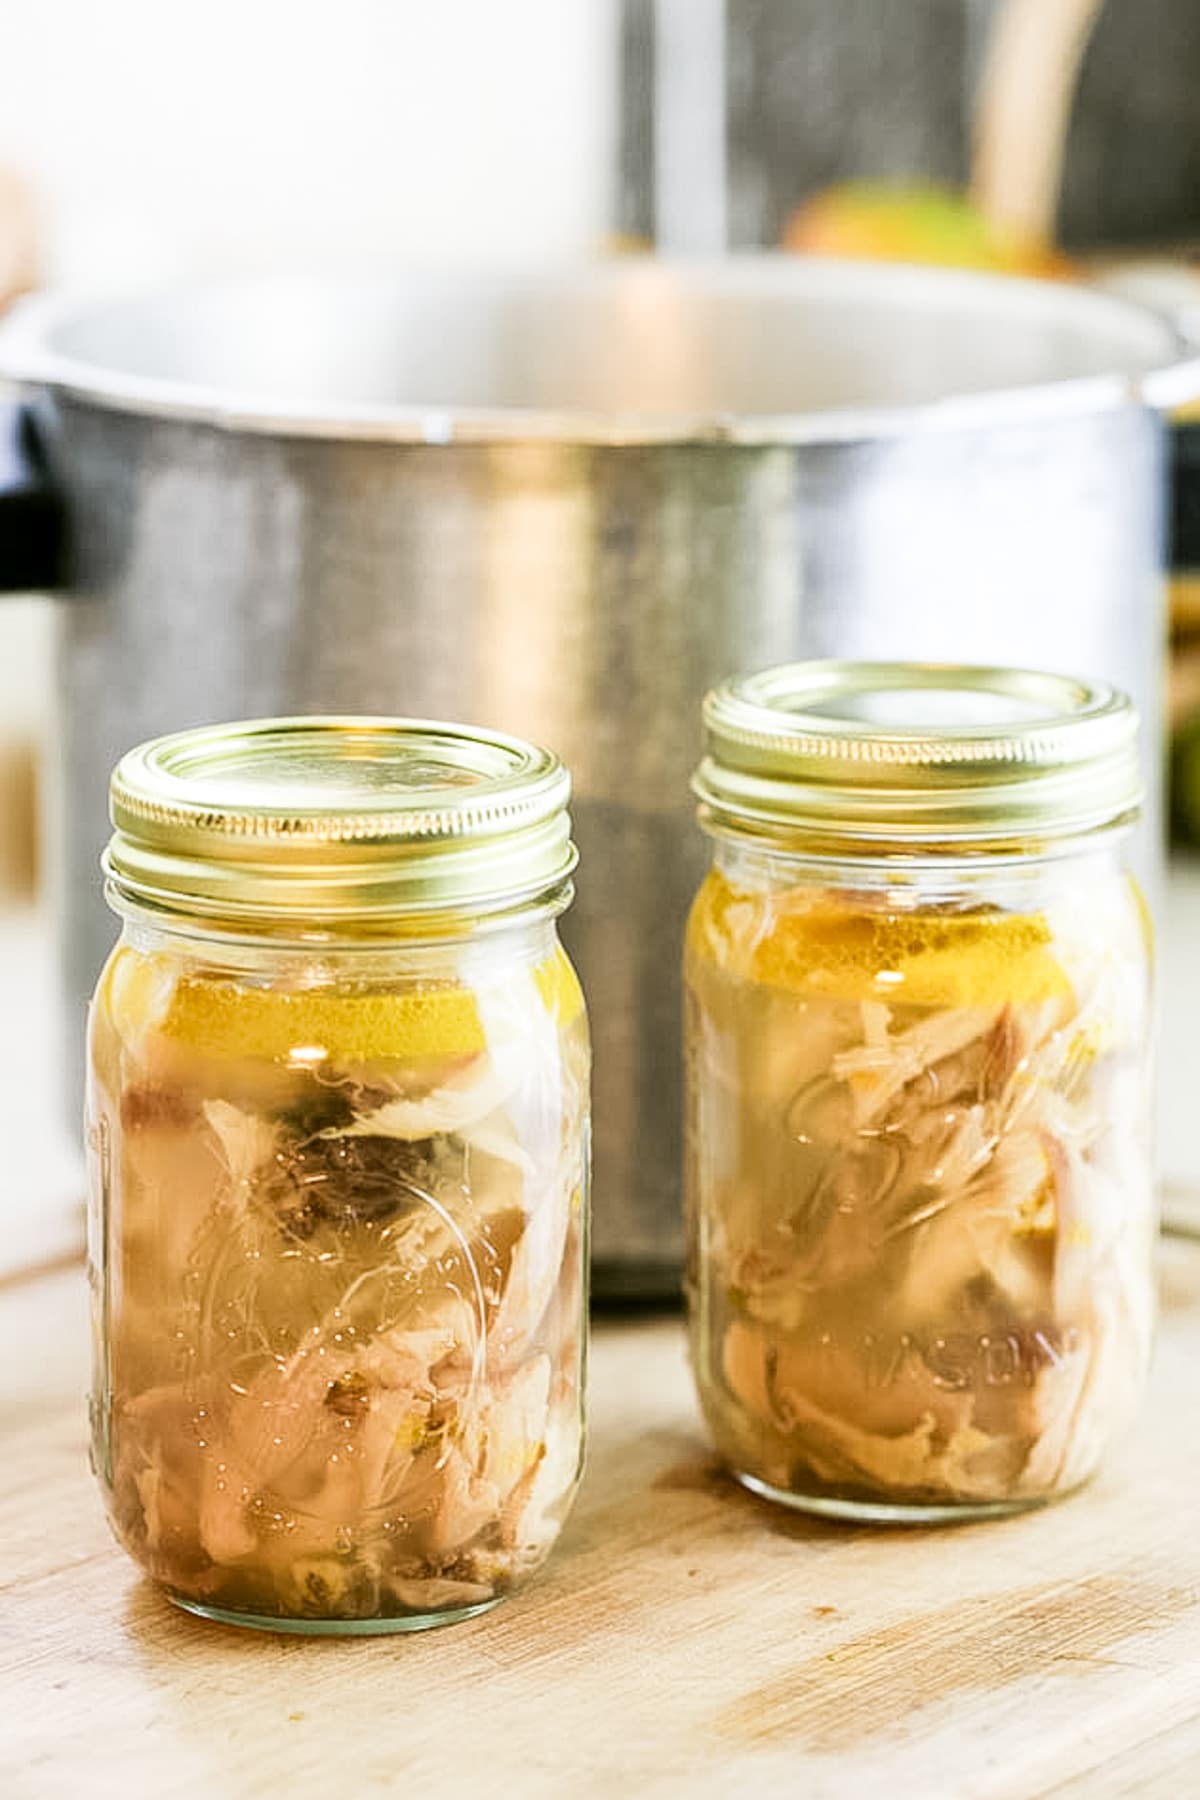
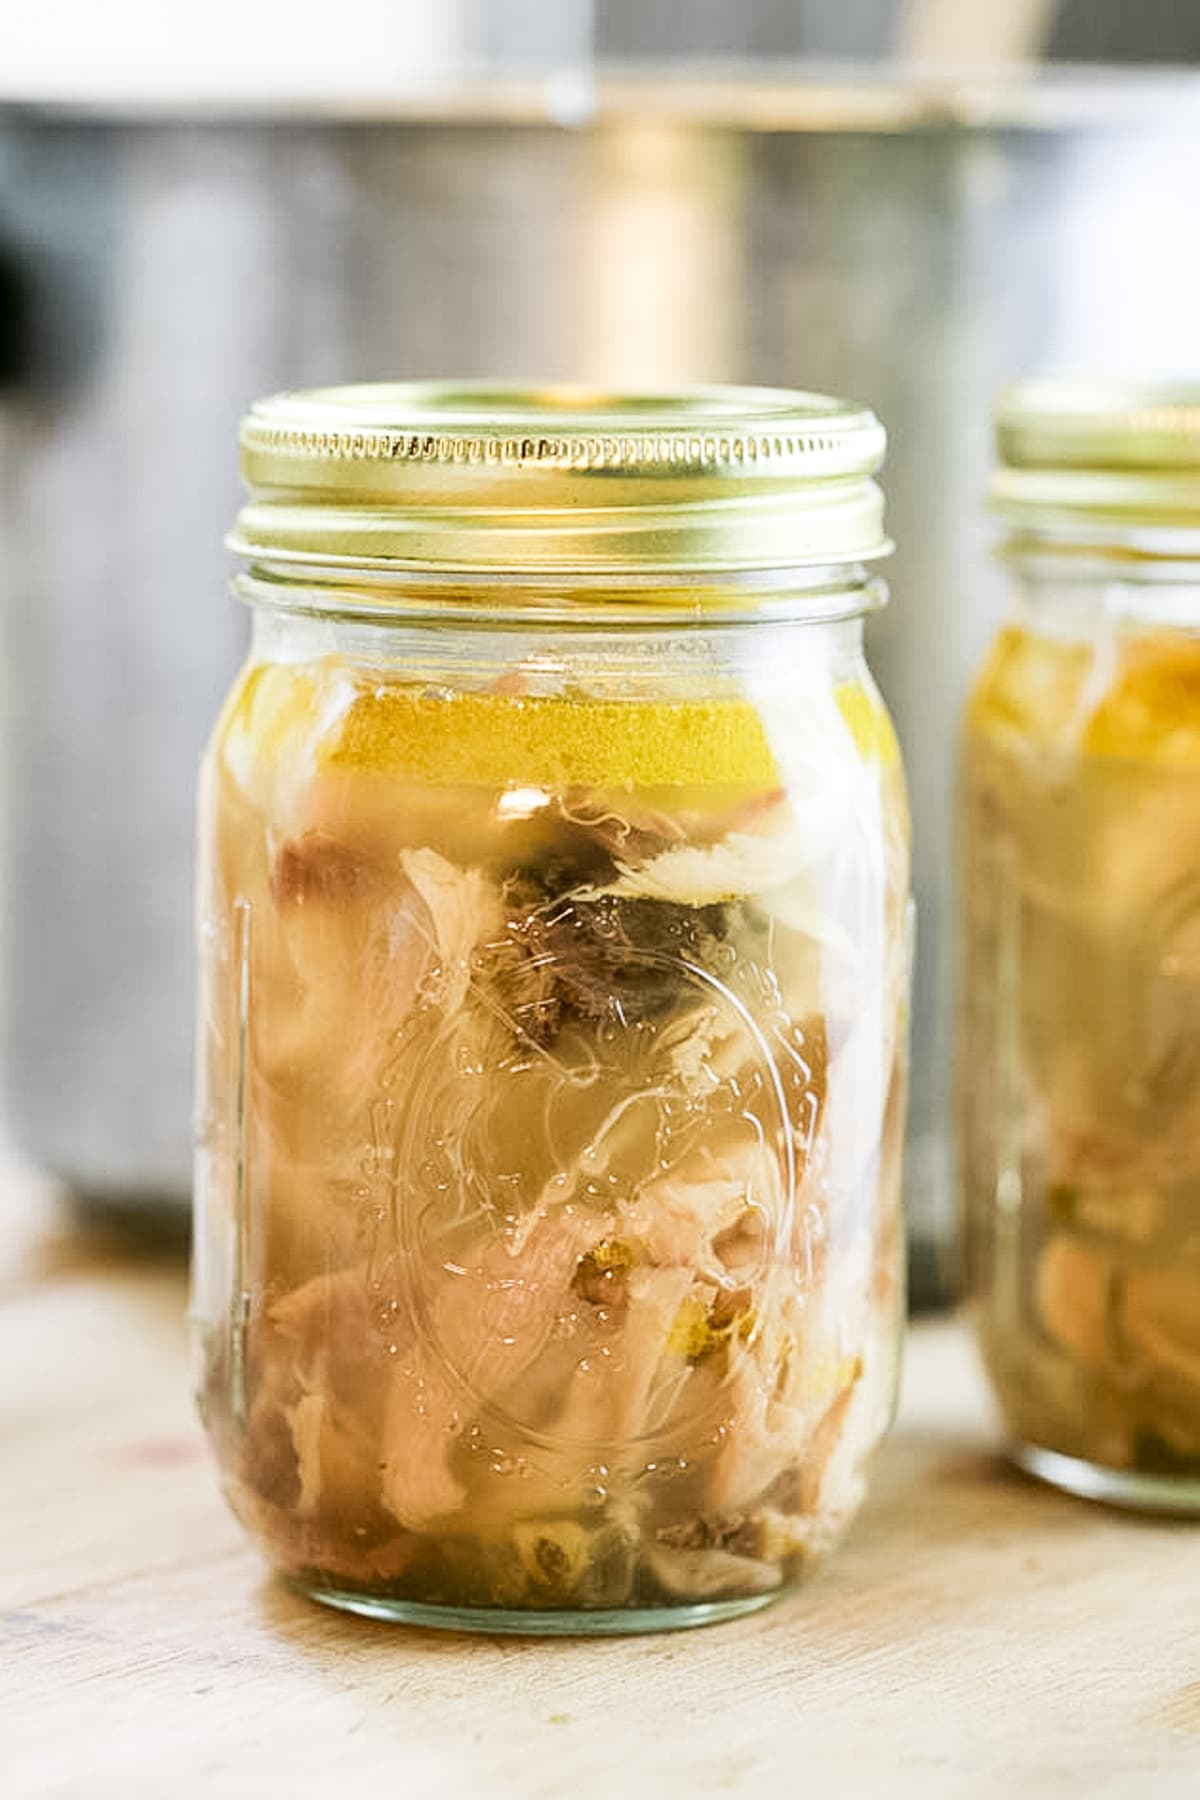
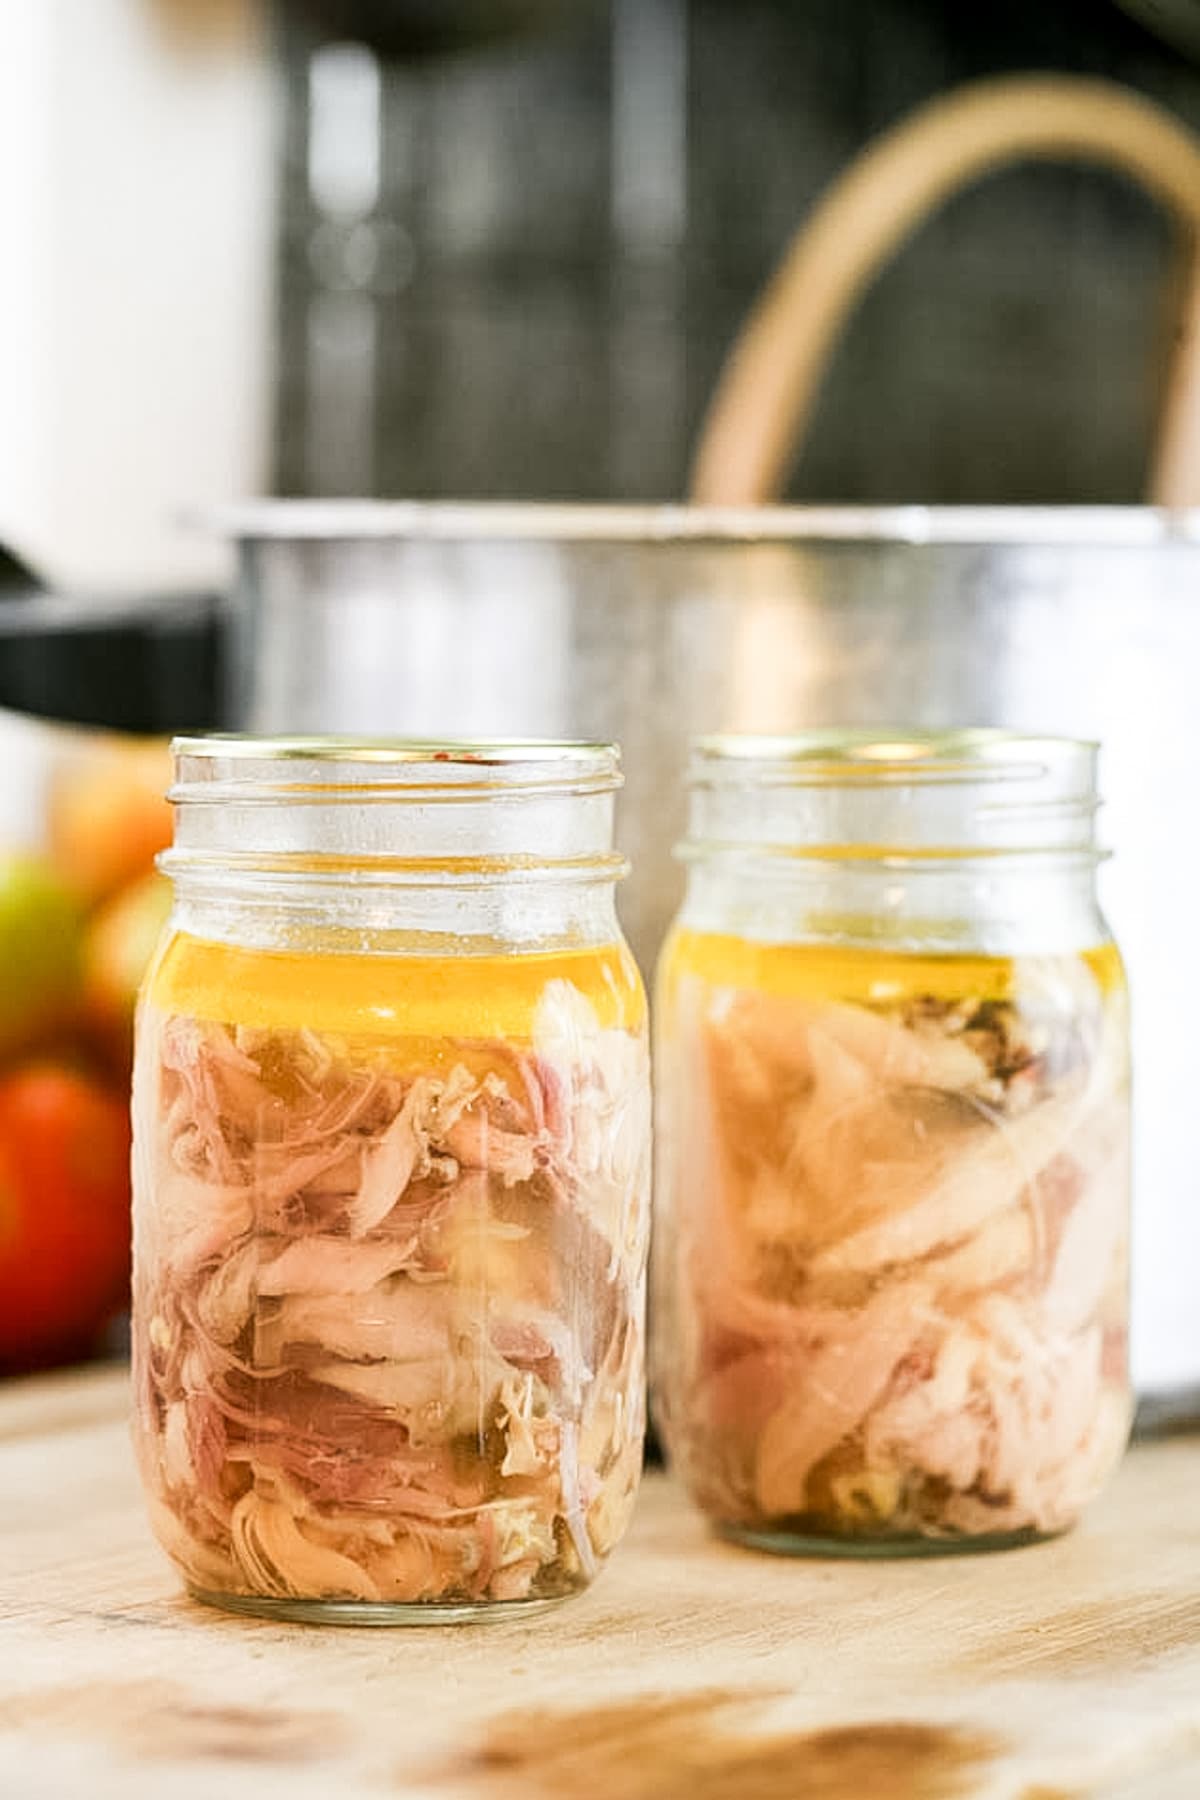
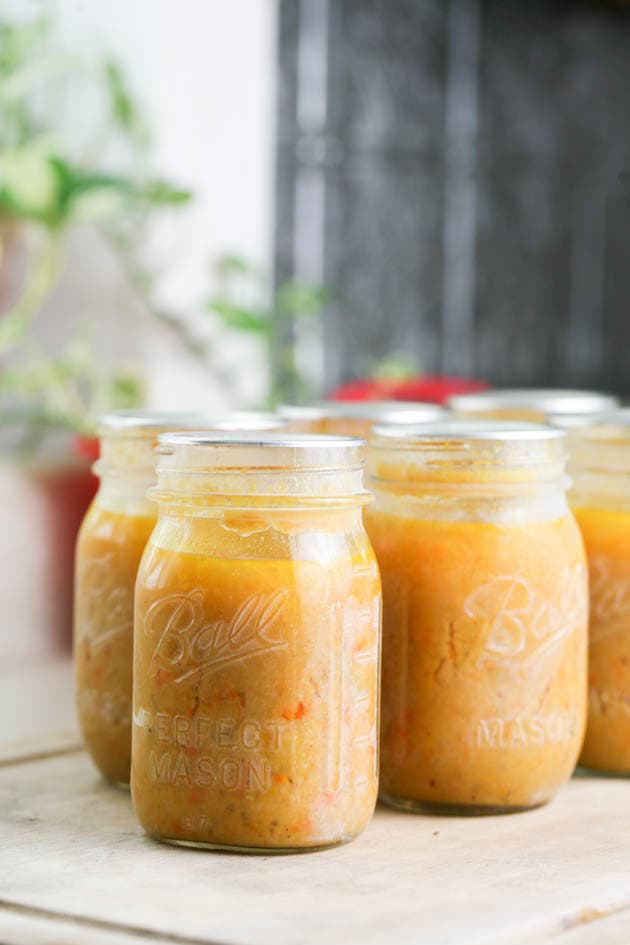
Pack the jars with the cooked chicken making sure to leave 1” headspace. Then add some liquid. There is no better liquid than what we used to cook the chicken in, it’s basically a fresh chicken stock. Use the canning funnel and fill the jars with the chicken stock making sure to still leave 1” headspace. If you choose to use salt or add seasonings, now is the time to add them to the jars.
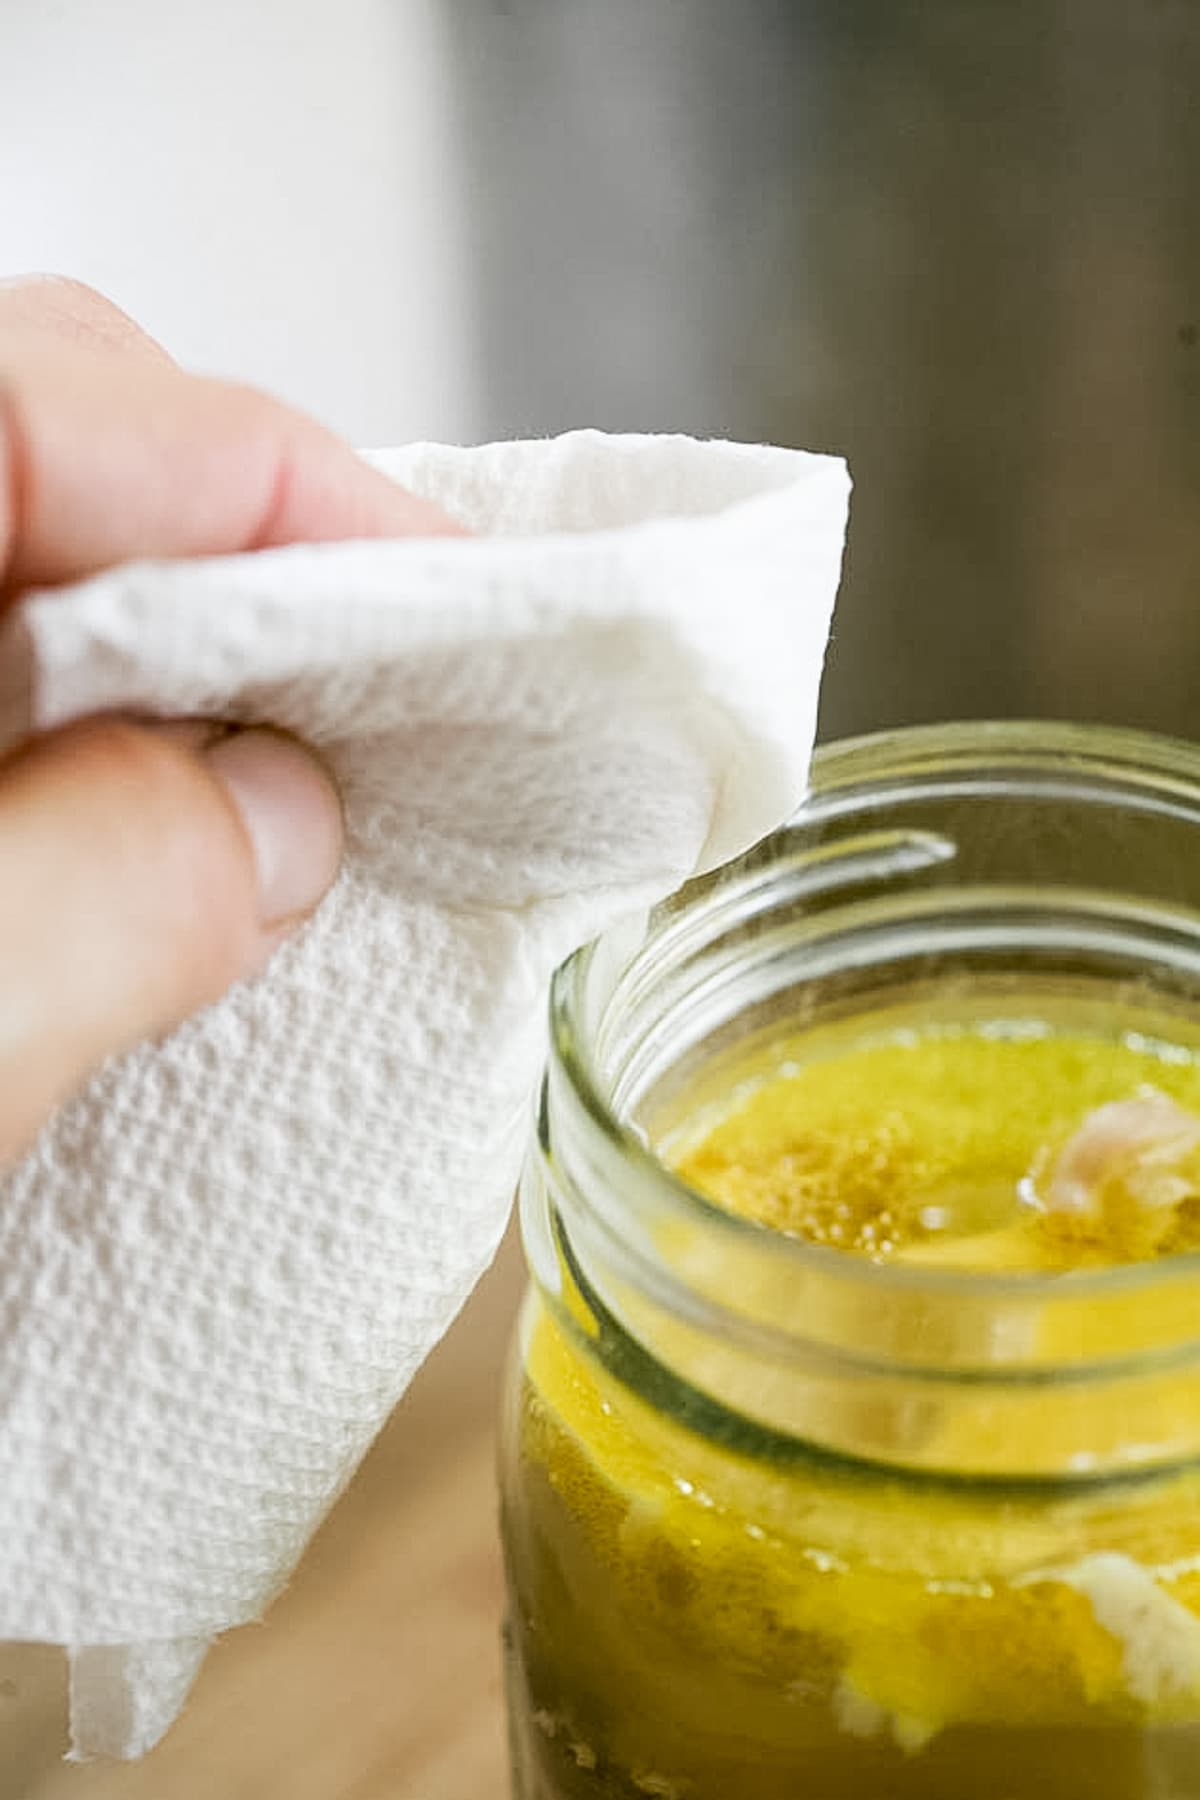
Next, remove air bubbles, clean the rim of the jars with a damp paper towel, center the lids, and close the jars with the bands fingertight.
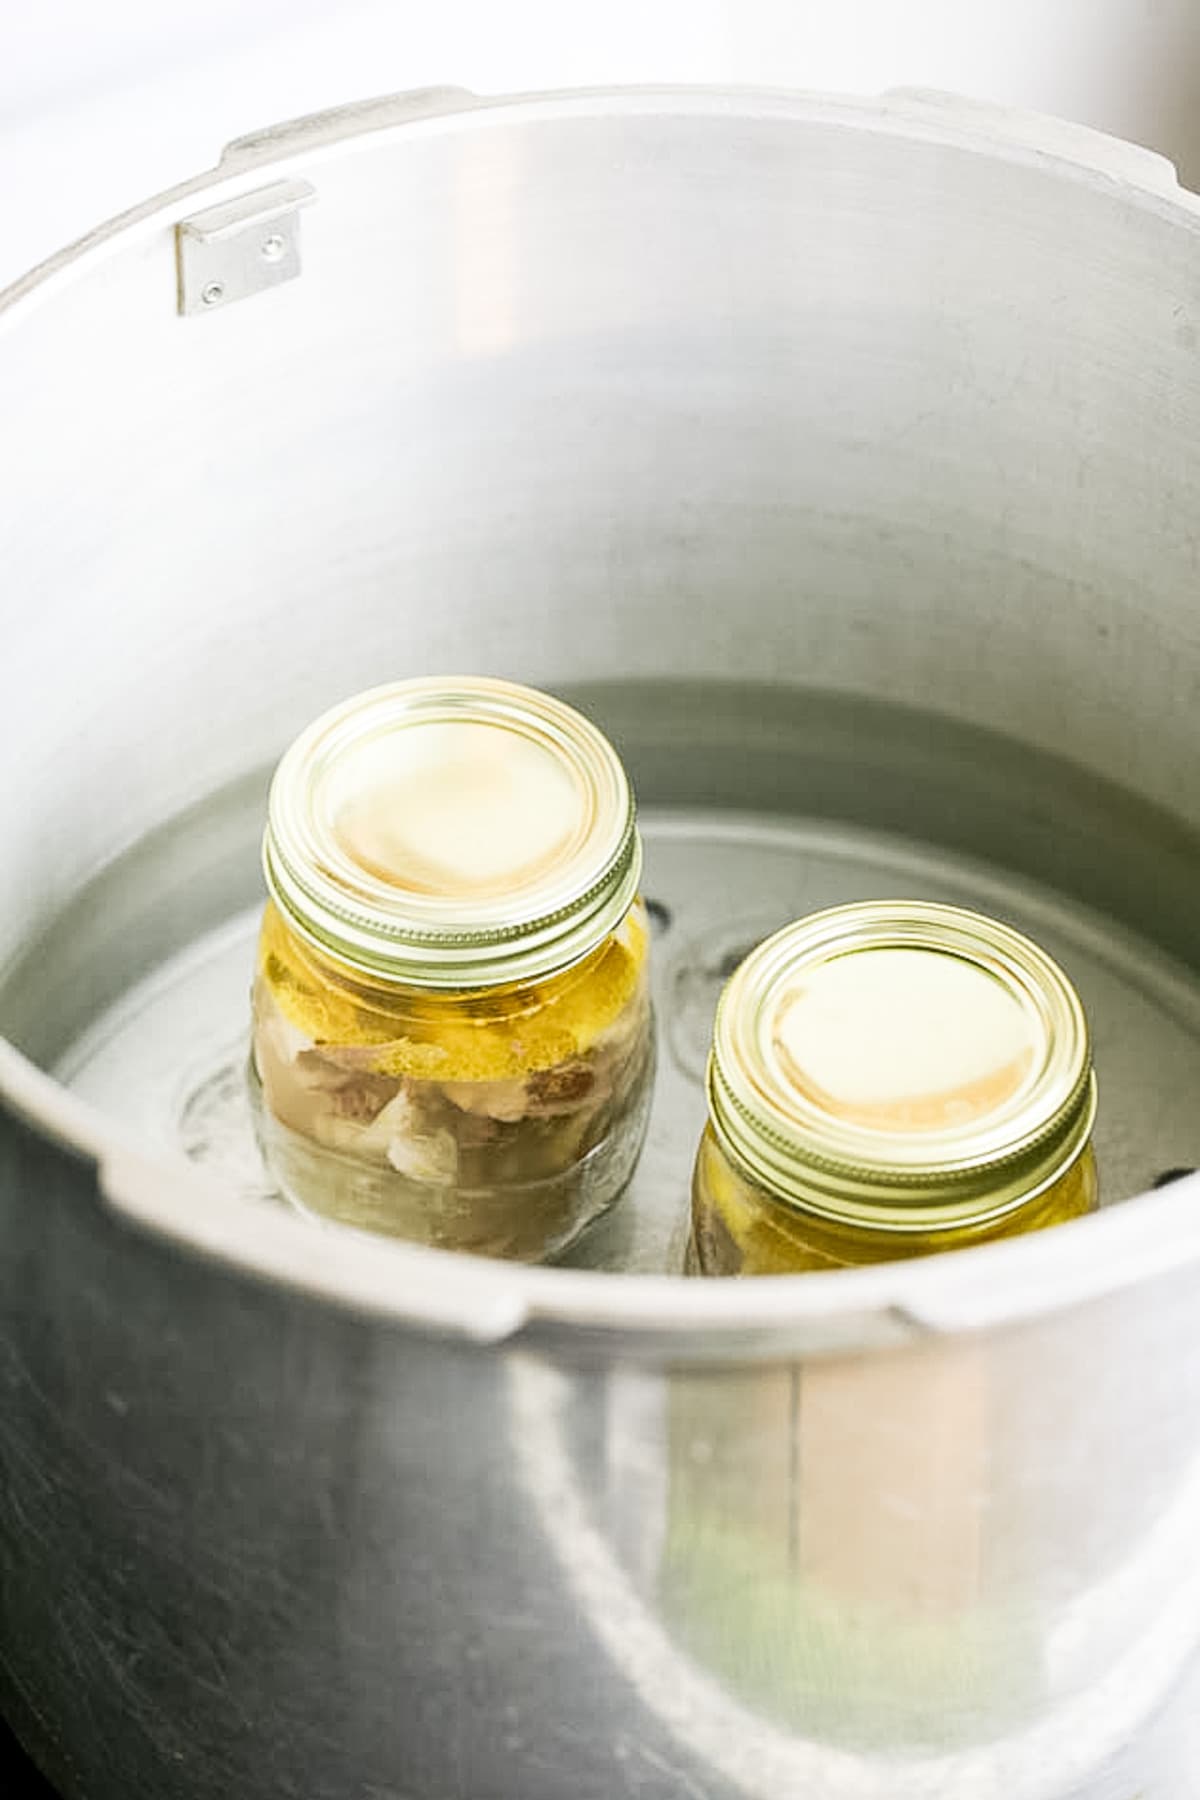
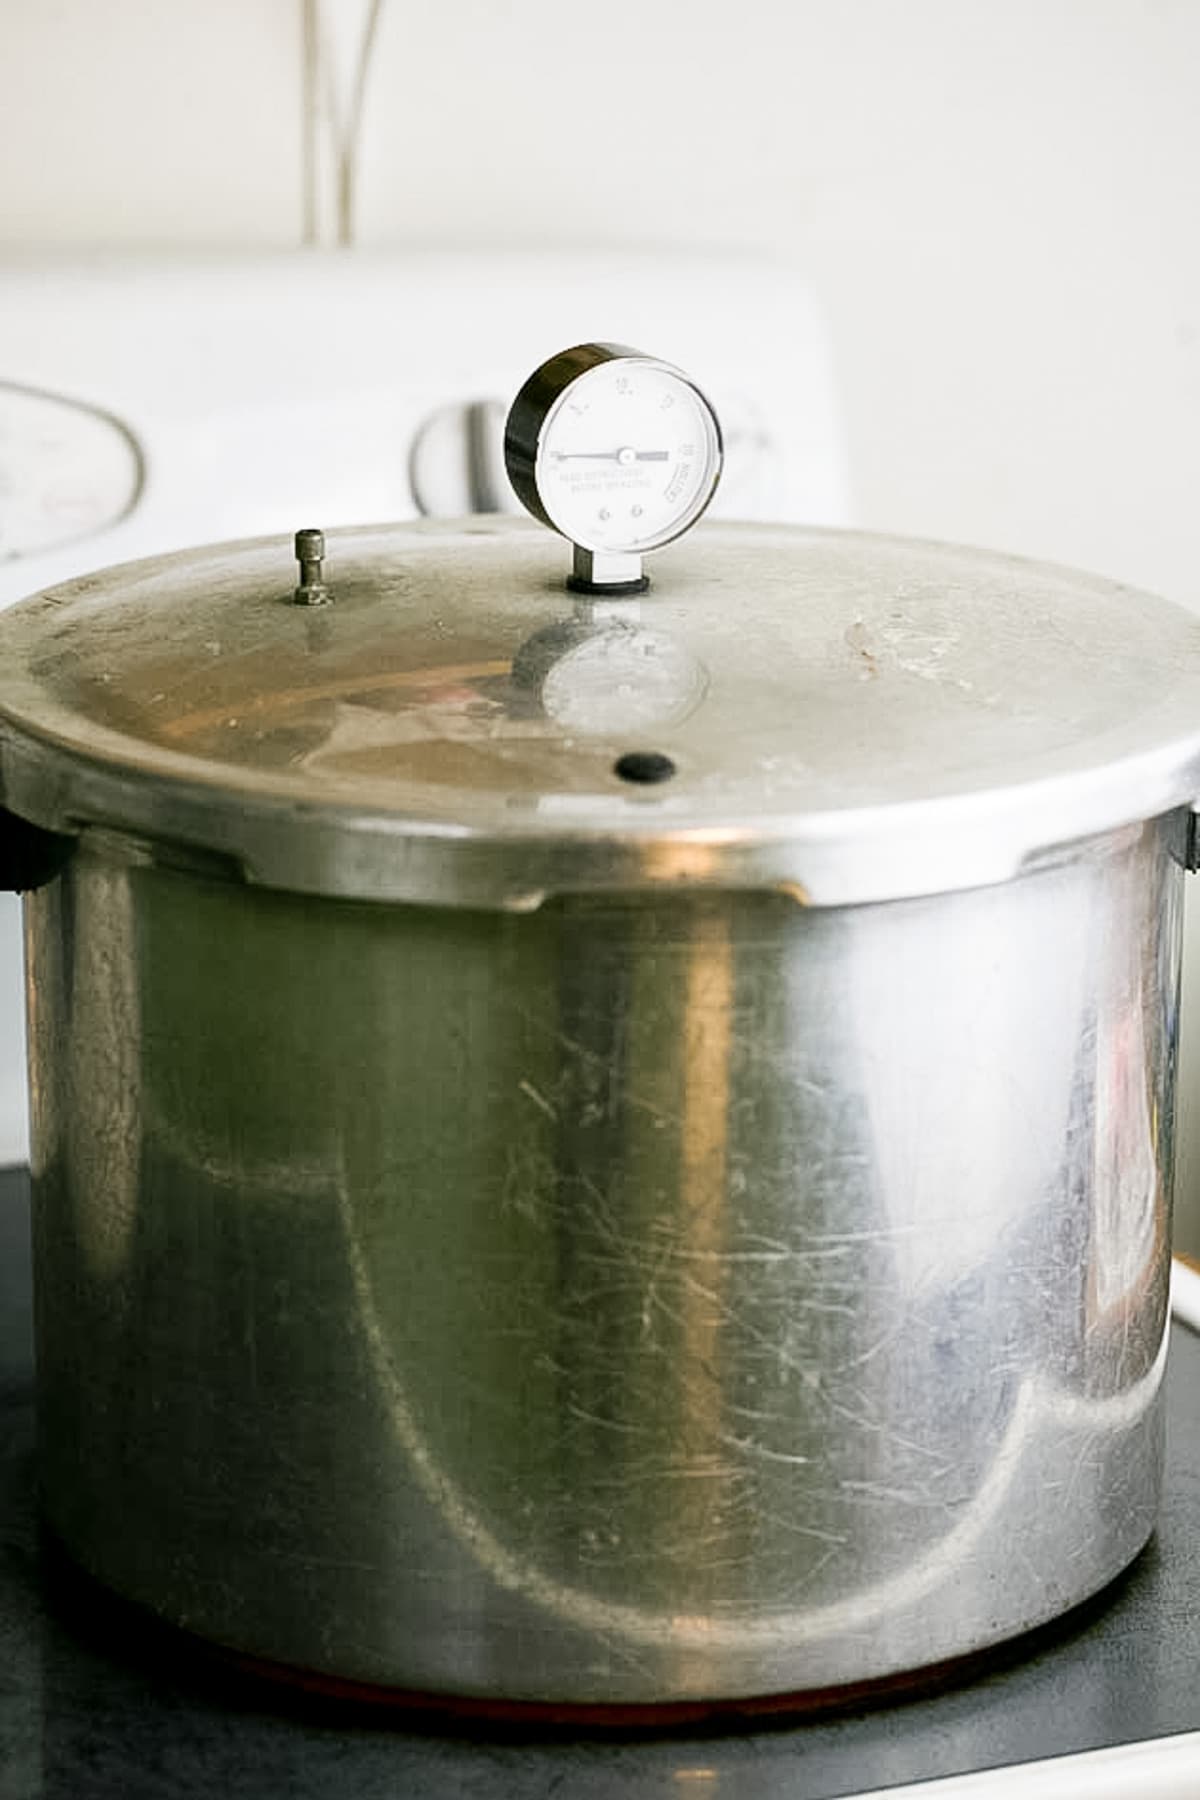
Step four – process the jars. Place the jars on the rack of the pressure canner, in the simmering water. Close the canner and turn the heat to high. At this point, the weight is off the vent. We want the temperature in the canner to rise to the point that steam starts to come out of the vent. Once the canner starts to vent steam, set the timer to 10 minutes and let the canner vent for that time. I usually lower the heat just a little bit at that point. After 10 minutes of venting, place the weight on the vent and watch the dial. Process pint jars for 75 minutes and quart jars for 90 minutes no matter what type of canner you are using.
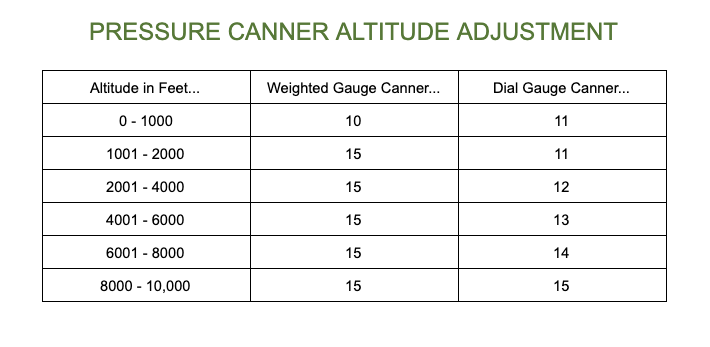
Depending on where you live, you might need to adjust the pressure according to the table above. I live under 2000 ft in elevation, processing pint jars, and using a dial-gauge canner. So for me, it was 75 minutes on 11 psi. If you are using a weighted-gauge canner, you can follow the table above for the correct pressure or find more information on the National Center for Home Food Preservation here.
Once the processing time is up, turn off the heat and let the canner cool slowly. Don’t try to open it, just let it cool for a couple of hours. When it has cooled completely, open the lid and remove it but don’t remove the jars just yet. Let the jars sit in the warm water for 10 more minutes. Then, use the jar lifters to remove the jars and set them on the counter to cool undisturbed overnight.
Storing Canned Chicken…
When my jars have cooled completely, I check to make sure that they sealed (by pressing on the center of the lid, there should be no movement there), then I remove the bands, wipe the jars, and store in a cool and dark place (like a root cellar or a pantry). Home canned chicken can last many months in storage. I’ll encurage you to use it within a year, however, if you come over right now, you’ll find a jar of chicken that has been sitting on my shelf for three year… Still in perfect condition.
I always store my sealed jars without the bands. The reason is that I am able to monitor what’s going on inside of the jar better that way. If anything funky is developing inside of the jar it’s usually above the food. Removing the band makes it easier for me to see that space. Another reason is simply that these bands rust over time and get stuck. I had to throw away a few jars in the past simply because I couldn’t open them!
How to Use Home Canned Chicken…
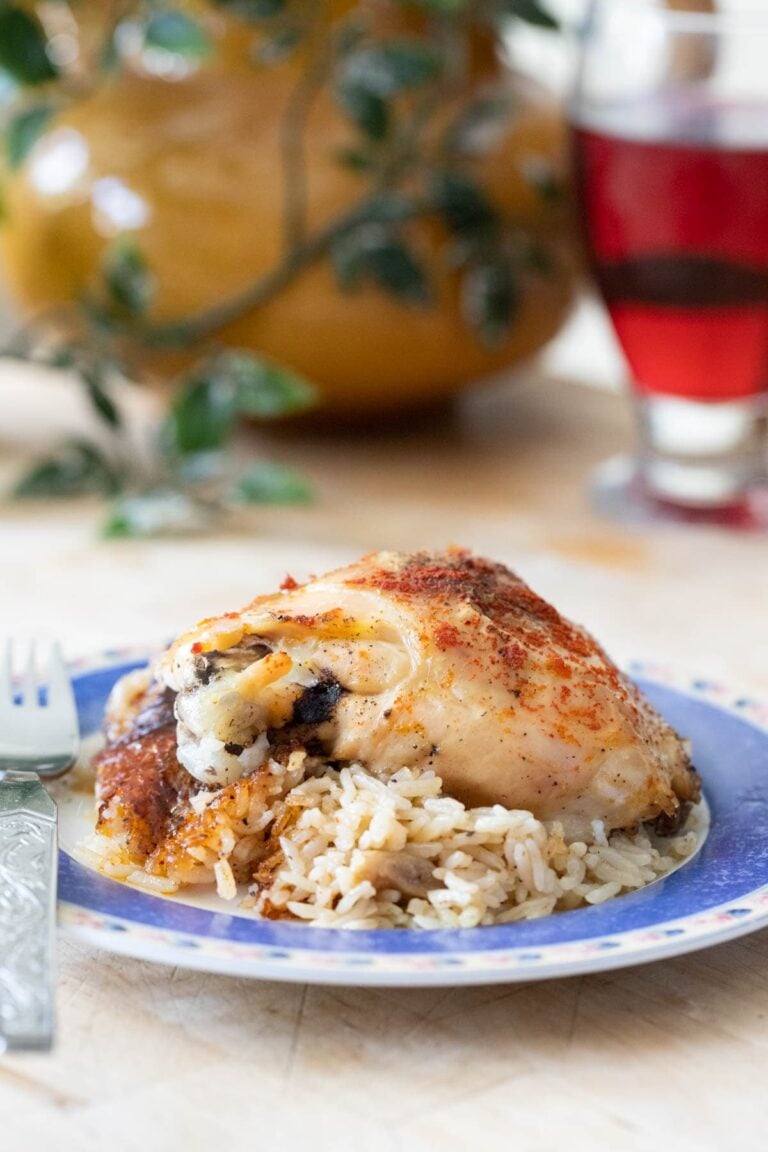
- Chicken tacos – the meat is ready for you, just open the jar and serve!
- Chicken chili – one of my favorite dishes!
- Chicken soup – you can use both the chicken and the stock that is in the jar.
- In cream sauce – check out this rabbit in cream sauce recipe. You can easily use the canned chicken and stock instead of the rabbit.
- In casseroles – add to any casserole recipe that calls for cooked chicken.
- Chicken salad – I love chicken salads! You can easily use this chicken, make sure to keep the stock in the jar in the ridge to use in other recipes.
What do you think? Canning chicken might sound like a complicated process but it’s really simple. Once you do it a time or two you’ll see that it’s really easy. Think about Thanksgiving… Can you can some of that leftover turkey? It might be a great way to preserve it.
More Canning Tutorials…
- How to Can Bone Broth
- How to Can Milk
- Canning Stewed Tomatoes
- How to Can Peppers
- Canning Beets
- How to Can Carrots
Canning Chicken
How to can chicken at home safely. You can use this process to can all poultry and also rabbit meat.
Ingredients
- 1 medium whole chicken
- Chicken stock or water
- Salt (optional)
- Seasonings (optional)
Instructions
- Place the chicken in a pressure cooker, add 4 cups of water, close the pot and set on the stovetop. Turn the heat to high, once the weight starts to rock, lower the heat a bit to keep it rocking gently. Cook your chicken for about 30 minutes (see notes below if you don't have a pressure cooker).
- Transfer your pressure cooker to the sink and rinse it with cold water to release the pressure and cool it quickly. Open the pot carefully and remove the chicken. Set the pot with the chicken stock that is in it aside, we'll use it in a minute.
- Take all the chicken meat off the bones.
- Fill your pressure canner (not cooker) with 2'' of water. Set on the stovetop and turn the heat on high to start heating the water in the canner.
- Wash your jars, lids, and bands with soapy, hot water.
- Pack the jars with the chicken meat. Make sure to leave 1'' headspace. Add the chicken stock from the pressure cooker to each jar making sure to leave 1'' headspace. If for some reason you don't want to use your fresh chicken stock you can use water or store-bought chicken stock.
- It is optional to add salt. If you choose to add salt, add 1/2 teaspoon of salt to each pint jar or 1 teaspoon of salt to each quart jar. If you choose to add additional seasonings (thyme, black pepper... Now is the time).
- Use the bubble remover to remove air bubbles. Use a clean paper towel to clean the rim of the jar. Center the lid and close the jar with the band not too tight.
- Place your jars inside the pressure canner on the rack. Make sure the jars don't touch each other. Close the canner and turn the heat on high (if it's not already on high). Make sure the weight is not on the vent.
- Once steam starts to vent, lower the heat just a bit and set your timer to 10 minutes. After 10 minutes, place the weight on the vent. Process pint jars for 75 minutes and quart jars for 90 minutes. See notes below for processing pressure depending on your altitude and the type of canner you are using.
- Once the time is up, turn off the heat and let the canner cool slowly (for a couple of hours). When the canner is cool, open it but don't remove the jars just yet. Let them stay in the warm water for an additional 10 minutes. After 10 minutes, use your jar lifters to remove the jars from the canner. Set them on the counter to cool completely overnight.
- Check that all the jars have sealed before removing the bands and storing them in the pantry or root cellar.
Notes
If you don't have a pressure cooker you can simply boil the chicken until the meat can be taken off the bone easily. You can also can poultry meat that is already cooked, for example, leftover turkey or roasted chicken.
Follow the table below to adjust the pressure depending on where you live and follow the weight guidelines for a weighted gauge canner...
Nutrition Information:
Yield: 2 Serving Size: 1 pint jarAmount Per Serving: Calories: 558Total Fat: 42gSaturated Fat: 12gTrans Fat: 0gUnsaturated Fat: 26gCholesterol: 267mgSodium: 712mgCarbohydrates: 4gFiber: 0gSugar: 2gProtein: 85g

Does the chicken need to be refrigerated after it’s sealed in the jar?
No. Once the jar has been processed and is sealed it is good to stay at room temperature for many months!
I am new to canning meat. I have just purchased a electric pressure canner and I have an Instant Pot. From reading your recipe it appears that I could pressure cook a whole chicken in the Instant Pot, then pressure can the chicken in the pressure canner, also I would then be able to use the bones to make bone broth. Does that seem correct to you?
thanks.
Yes. You can do that!
can you store canned chicken if you mistakenly processed it for 1 hour instead of 75 minutes? I only had an 1 hour timer and totally forgot to set for extra 15 minutes for the pint jars. the chicken was fully cooked prior to packing.
If the jars sealed properly, I’d definitely keep it.
I have to put much more water in my canner for that long of a processing time. Have run it dry a few times. Scary! I even turn my heat back to around 7 which keeps the rocker going, in other words, I don’t let it on high.
Yes, I find that I need to turn my heat down just a bit too. You might want to check the seal on your canner.
I am excited to have found you. I was raised in a gardening and canning family…. I am eager to familiarize myself with your content.
Welcome! So good to have you here!
If I wanted to do chicken noodle soup, couldn’t I put the noodles in raw just before canning? They would cook anyway and probably be more firm than getting cooked once, and then again in the pressure cooker.
I think that they’ll still turn into mash since you have a long processing time in the pressure canner.
Here is what I’ll do… You can can chicken soup the same way as I can chicken here. So make your soup and can it. Then, when you are ready to eat it, open the can, add it to a pot, bring to a boil, add the noodles, and cook until the noodles are done.
I hope this is helpful.
On the salt option
Are you using ordinary table salt or a canning salt ?
You can use regular table salt if you want. I usually do, but canning slat will work too, of course.
I’m new to canning and a little confused. How much water shod there be in the pressure cooker when adding the jars?
It depends on the manufacturer of your canner. I use the presto canner. I add 2-3 inches of water to my canner. Make sure to read the manual of your canner.
Lee,
I am wondering if you can help me. I pressure canned some raw chicken today. I used quart size jars – but I only cooked them for 75 minutes instead of 90 minutes. I am used to pressure canning with pint size jars and did not realize I needed to extend the cooking time for larger jars. Do I need to throw away this chicken? I’m sad about it. All the jars sealed really well. Thank you for any information you can give me.
If it were me, I’d keep them if they sealed. I’ll just make sure to smell the food and make sure it doesn’t have a funny taste when I open the jar to use it (I do this anyway). But this is me… You’d have to decide if you are comfortable with it.
Broke out my brand new pressure canner today (having never pressure canned before), to follow along with your instructions, and nervously waited an hour and a half for a single quart of chicken meat. I’m pretty sure it was successful. I put two quart bags of the stock in the freezer because it didn’t occur to me to can it too until it was too late. I have 3 more old birds to process, and I think I’m sold on canning it. Tysm.
That is awesome! Definitely can the stock too. I know it can be nerve-wracking and intimidating the first few times but once you get it and become familiar and comfortable with your canner you just fall in love and want to can everything! I even can some of my goat’s milk now. It’s so much easier when you don’t have to remember to thaw food.
really liked your article. need your help. wife and i precooked several chicken legs to the point they were falling of the bone. we added them to cooking vegetable soup, put them in 1/2 gal. jars and hot bathed them in boiling water for 40 minutes. we were told they had to be pressure cooked. the question is can we now replace rings and seals and pressure cook them after setting in jars for three days? thank you
As long as everything smells good and tastes ok, I think that you can definitely go ahead and do that. Any kind of meat always needs to be pressure canned.