This post may contain affiliate links, view our disclosure policy for details.
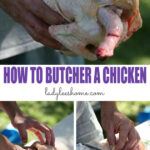
In this post, I’ll show you step by step how to butcher a chicken. This is the second part of my Raising Cornish Cross post, so if you want to learn how to raise meat chickens make sure you start there. But if you are here just to learn how to butcher a chicken read on! By the end of this tutorial, you’ll have all the knowledge you need in order to butcher chickens at home.
Again, this is the second part of my Raising Cornish Cross Chickens post. You can find all the information you need about raising meat birds over there including meat bird breed options, where to order your birds, how to prepare for them, and how to raise them.
Now that our meat birds are grown, it’s time to butcher them. Most likely, they are all ready for butchering at the same time (with Cornish Cross it’s at the 8-9 weeks mark or so).
Since butchering can get a bit messy and all the birds are ready it’s better to schedule a whole day for butchering and just be done with it (at least in my opinion).
How to Butcher a Chicken…
So schedule a butchering day. If you have many birds, invite some friends to help and to hang out with you. If you are up to it, check if there are any kids in the family, neighborhood, or friends’ kids that want to come and help and learn where their nuggets are coming from.
It’s important to teach the next generation this lost (but maybe coming back?) art of home butchering.
It’s also important to prepare for butchering day. I like setting up everything that I need a day before especially if I’m butchering a large number of birds and I need to get things out of the shed, like large coolers and such.
Let’s go over how we are going to set things up and what kind of equipment you want to make sure you have…
Butchering Stations and the Equipment You’ll Need…

I find it the easiest to work in stations when butchering chickens…
You grab a chicken, kill a chicken (killing station), dunk the chicken in hot water (hot water station), pluck the chicken (plucking station), process the chicken (processing station), store the chicken (the coolers station).
Here is what you have to make sure you have on hand for each station so butchering day goes by smoothly:
Killing Station – what you’ll need here are a killing cone, a five-gallon bucket, and a very sharp knife.
A killing cone can be homemade or you can purchase it online. We just used a piece of scrap metal that we had and bent it into a cone held by duct tape, fancy huh?
You’ll see it in the pictures below, it did what it was supposed to do and cost nothing so that was fine with us. You can use an orange plastic cone or come up with a different idea. But having a cone is very helpful.
You’ll hang the cone on a tree and under the cone, you want to have a five-gallon bucket to catch the blood. There will probably be less blood than you think but you want to collect this so you can bury it in the garden, it’s sooo good for your plants.
A very sharp butchering knife is a must. The sharper the knife the easier the killing and processing will be.

Hot Water Station – after you kill your chicken you want to dunk it in hot water so it’s easier to pluck the feathers.
If you choose to skin your chicken and be done with the feathers business than you can skip this step, but if you want your chicken with the skin you’ll have to use hot water so it will be easier to pluck by hand or machine. You can see how to skin instead of pluck in my How to Skin a Chicken.
What you need is a big pot that can fit the chicken, filled with water that is kept at 160F.
A turkey fryer works real good here. But again, we didn’t have one so we made an easy outdoor oven from bricks and placed my water bath canner on it. It was big enough to fit the chicken. You can have a fire going under or we used a propane flame torch to keep it at 160 – 165 F (it was easier to control the temperature since we could easily turn the torch on and off).
Make sure to have a thermometer around so you can check the temperature of the water.
Now that I raise Black Australorps instead of Cornish Cross chickens I butcher a few birds at a time whenever we need meat. Since I only do two to four birds at a time I bring the chickens inside to my kitchen after I kill them. I still use my water-bath canner but it’s much easier to control the temperature of the water when the pot is on my stove.
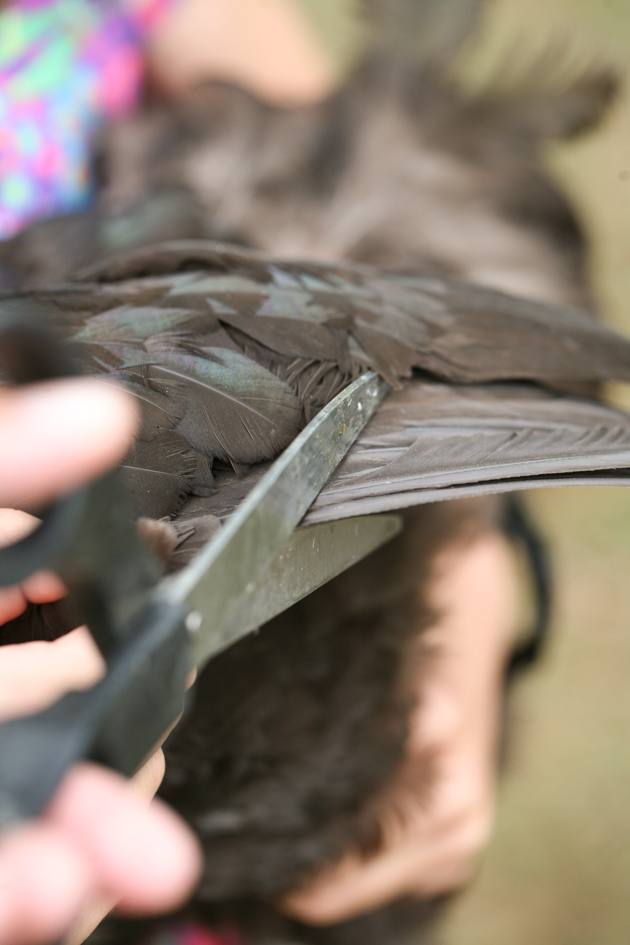
Plucking Station – Once you finished with the hot water, you want to have a way to control the feathery mess.
In my mind’s eye, I saw feathers all over the place before we started the butchering process and I wasn’t sure how I was going to control the mess, but remember that your chicken is wet, so the feathers are not going to fly all over the county.
You want to keep the feather! They are so food for your garden, so add them to the compost pile or bury them in the garden somewhere. Before you know it, they will disperse.
We used half a barrel that we had laying around. We simply put the chicken inside and plucked. You want to have it close to your garden hose so you can rinse the chicken once in a while.
If you did the water station right, plucking should be very easy. We will go over how to do it below.
If you are going to raise a lot of chickens or ducks for meat you might want to invest in a plucking machine. I personally don’t mind doing it by hand. The whole time I set there plucking I was thinking about my grandmother who did this as a job.

Processing Station – you have your naked chicken and you are ready for processing.
You will need a comfortable table to work on. Something that is easy to keep clean and gives you enough space (we used a folding table).
You must set your table next to a water source. We set it by our well house where the garden hose can reach it. We had to rinse things a few times so the hose came real handy because we could move around with it.
You’ll also need your butchering knife, a large cutting board (if you can’t cut directly on the table) and a few bowls to put the chicken legs heads and inner parts that you want to keep and the ones you don’t.
Cooler station– depending on how many chickens you are processing, you will need coolers with ice to place your chickens in (unless you have enough room in the fridge). The opinions vary here, but your chickens should stay on ice for at least 12 hours or so (we left them for 24 hours and I’ve heard of people that left them for 6 hours and they were just fine, so it’s up to you, a few hours will do).
Lastly, you will need butcher paper or heat shrink bags or something of the sort for packing.
Butchering Cornish Cross Chickens…

Ok, so you scheduled your butchering day, the chickens are fully grown and ready for the freezer and you gathered your equipment and set up a working place…
Before we start going through this process let me stop and tell you something…
Cutting an animal’s throat with a knife, an animal that you raised from day one, is hard. Super hard. I found that there is a huge difference between doing something like that and hunting. The first time I did it I was literally shaking. It was emotionally hard but I believe our food is our responsibility. I want to hold the knowledge of how to feed myself, I don’t want to depend on someone else.
I also want to teach my kids that when you face a task that is hard for you, you push through instead of letting someone else deal with it. So I pushed myself out of my comfort zone and did it. The first time was hard, the second a little less hard and by the third chicken I was much more relaxed.
It helped me to think about the poor chickens at the commercial chicken houses. I had the opportunity of working in one of those when I was younger. I lasted three days. I couldn’t handle seeing the horrible conditions. For me, every chicken I processed saved a chicken from those commercial operations.
But please don’t beat yourself down if you need some help here. Ask someone to help you with the killing, maybe a friend that did this before. Then, when you feel ready, take the responsibility and REALY connect to your food on a deeper, emotional level.
How to Butcher and Process A Chicken…
Around mid day of the day before butchering, take away to chickens’ feed. They can still have their water but make sure they don’t eat for 12-18 hours before butchering.

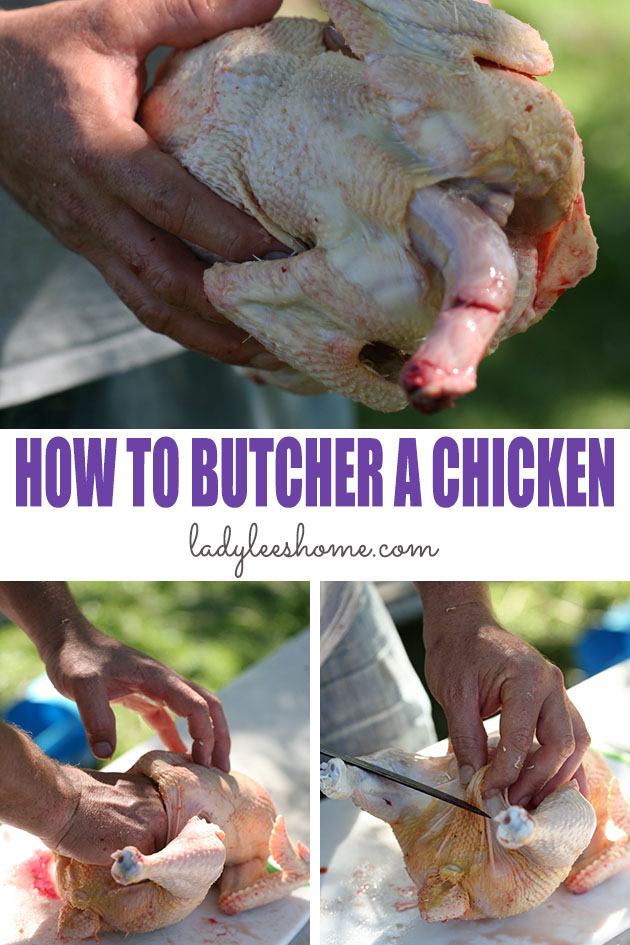
Grab your first chicken by its legs and place it head down in the killing cone…

Extend its throat, take a moment to thank the bird, and with your VERY sharp knife, make a cut on the side of the throat right under the jaw.
The bird will instantly lose blood pressure and go to sleep, even if you see it keep pulsing it doesn’t feel a thing. This is a Kosher kill, it has been done this way for many many years and is the most humane way to kill a bird.

While the bird is unconscious, the heart keeps working for a couple more minutes. The pulsing of the heart pushes all the blood out of the bird, leaving you with very clean meat.
Did you ever notice purple/black color around the bones of a chicken you got at the grocery store? Those are blood clots. This chicken was killed by gassing which is inaccurate and not the best way for the chicken to die.

Keep the chicken in the cone for two minutes or so until all the blood is out…

Next, you will take your chicken to the hot water pot. Hold it from its legs and keep it in the water for a few minutes.

Once in a while, take it out and try to remove a few feathers. If they come off easily, you are ready for plucking. If they don’t, leave the bird in the water for another minute or so and then check again.

Plucking is just, well… Plucking. Nothing much to it. Get all the feathers off the bird. If there are tiny tiny feathers that you can’t get, you can burn them with the blow torch. Simply run the flame over the chicken and it will burn all the tiny feathers off right away.
If you prefer skinning your chicken instead of plucking it, make sure you read my how to skin a chicken tutorial.

Go ahead and rinse your chicken to get rid of all the feathers and move to your cutting board.
Grab your butchering knife and remove the head (or pull it). Some people give it to their dogs, we buried it in the garden. You can also add it to your compost pile or burn it.

Next, remove the feet. It will be very easy and will keep your knife sharp if you find the valley between the bones and cut there. Don’t try to cut through a bone, find the place where the bones connect and cut there.
If you are up to it, you can save the feet for soups or for homemade chicken stock or bone broth. They have a lot of gelatine in them and are very healthy. You will need to clean them before you use them.

The next step is to cut off the oil gland that is on the top of the tail. We did that with a few birds and then just started to remove the tail altogether AFTER we got all the guts out because we don’t eat it usually anyway.
To remove it completely we made two small cuts on each side of the tail and bent it up to break the bone and disconnect it.

So now you want to flip your bird on its back again, pinch the chest skin between the breasts, lift it up a bit, and cut an opening. Be gentle, you don’t want to cut the meat, you just want to make a little hole in the skin.

Then insert your thumbs and pull up with one hand and down with the other to enlarge the opening a little bit…

This will expose the chicken’s crop (a part of the esophagus where food is stored after it’s swallowed).
Remember this chicken did not eat in the past 12 to 18 hours so the crop should be relatively empty.

So, what we want to do now is release the esophagus and wind pipe. To do that, insert your thumb under the crop and the pipes and wiggle around a bit…

Until you can hold both of them in your hand. You don’t want to pull them out or cut them, just loosen them so when we pull the guts of the chicken out they’ll be able to get out too.
I found this part to be the hardest because the crop and the pipes are so slippery and snooty feeling. It was hard to hold on to anything.

Now we flip the bird and make another small cut in the skin close to the vent.

Just a little opening…
You want to be super careful with your knife here so you don’t cut the intestines.

With both hands, enlarge the opening so you have access to all the inside of the bird.

Push your hand inside and what you are trying to do is to find this esophagus that you loosened before and kinda wrap it around your finger…

Then pull everything out.
This is easier said than done… It takes some practice but you’ll figure it out after a few birds.

So now you have the intestines and some other organs, like the heart and the liver, in your hand but they are still connected to the vent. So to release it, make one cut on one side of the vent or the tail…

Then another cut on the other side and a final cut under the vent to release it (this is where we choose to remove the tail completely).

Connected to the digestive system that we just pulled out are the heart and the liver which you can save and eat. Here is a delicious liver and onion recipe. You can also save the gizzard for this delicious chicken gizzard recipe.
The intestines go to the garden or the compost pile or sometimes we throw them in the woods and let nature take care of them.

You will have to go in one more time…

To grab the lungs and the wind pipe before your chicken is clean.

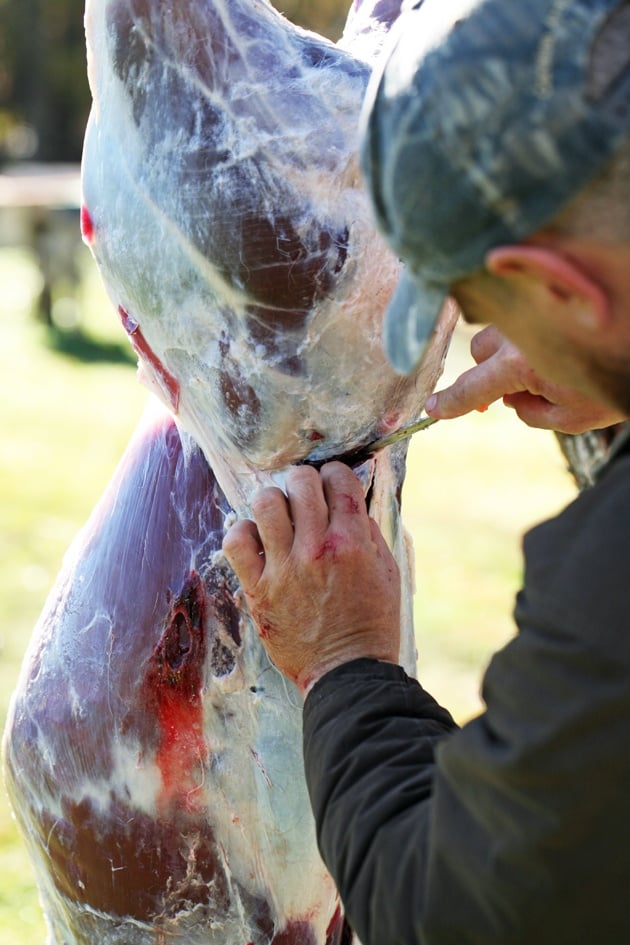
Rinse your chicken and place it in the cooler with ice. It will have to stay in the cooler for at least a few hours up to 24 hours before you wrap it and place it in the freezer.
To package your meat, you can use freezer paper or heat shrink bags. We didn’t have either so we just used regular plastic food wrap but I don’t recommend it. It will not protect from freezer burns.
Or maybe you prefer to save some freezer space and can your chicken instead. If that’s the case make sure to check my tutorial on canning chicken.

We later removed the necks and saved them in a separate bag for soup.
That’s it! You now have a freezer full of homegrown chickens! What an accomplishment.
If you would like to see the process of butchering a chicken done in a video, watch the amazing Joel Salatin do it here.
You will cook your homegrown chicken just as you will with a chicken you buy at the store. I found that our chicken meat, probably because the birds were actually moving around, had a bit more structure to it. It wasn’t tough or hard to cook but I did need to cook it a little bit longer than the store-bought chicken (sometimes I process it in a pressure cooker before I use it).
It was a lot of work, to raise our own chickens, and you are probably wondering if it was financially worth it. I am not a mathematical person at all, and I usually do things mainly because I love doing them even if they don’t make sense financially, but I tried to calculate it and in the 9 weeks that I had those 13 Cornish Cross chickens, they ate 3.5 bags of organic feed.
Each bag (40lb) cost me $25 for a total of $87.50.
We made it to butchering day with 12 chickens (one died, completely my fault! The 24 chicks I started with weren’t all Cornich Cross, some were laying hens), so this comes down to $7.30 per bird.
If I went to the farmer’s market at the closest city to buy an organic bird I’ll probably pay around $25 a bird (they sell for about $6 a pound).
I did have a few more equipment expenses (feeders and such) but they are an investment and not something I’ll have to spend money on again. And of course, we worked hard to get those birds in the freezer.
Money aside, in my eyes, this whole thing was worth it just because I know that the birds had a great, clean life, free of antibiotic, and full of sunshine and good food before they were butchered.
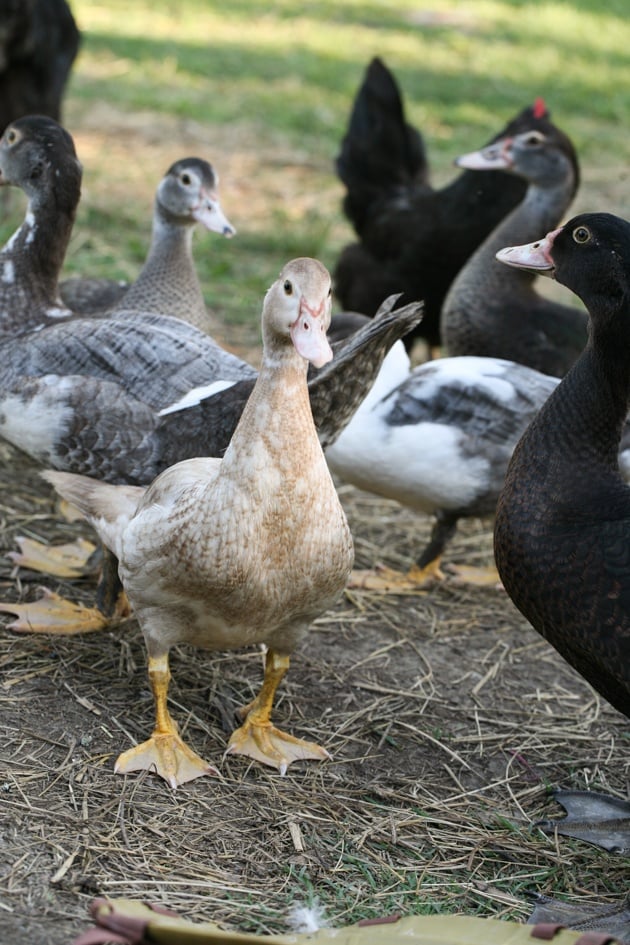
Since that experience with Cornish Cross chickens, I set up my little sustainable Black Australorps chicken operation (and I am also raising Muscovy ducks for meat and butcher them here on the homestead). I don’t need to order chicks anymore because the Australurps are great mothers and they go broody easily. I butcher them as we need meat.
This sounds great however you have to take into consideration that the meat from a heritage breed chicken who actually moved like a normal anomal is tougher than the meat of a Cornish Cross and it takes much longer for the Australorps to reach butchering size.
This is fine with me but it doesn’t work for many. The Cornish Cross chickens allow you to put a whole lot of meat in the freezer in a very short time. This is the main reason those birds are so popular.
I hope that you have a better understanding of the whole process of raising chickens for meat and how to butcher a chicken. If you have any questions or if you’d like to share your experience please comment below!
And if you are interested in other butchering posts, make sure to check my how to butcher a rabbit post, my turkey butchering post, my deer processing post, and my pig processing post.
I grew up raising our own meat animals and butchering them ourselves. We always had a ceremony first, speaking to the animal / bird and telling them how much we appreciated their life and that we would make their death as quick as possible. The killing cone is the kindest way- we make them out of 5 gallon buckets, some narrow (for regular chickens) some wide (for Cornish Cross) and some longer (for heritage turkeys). It allows the blood to drain completely while being “cuddled” inside the cone.
Our children grew up doing this. They are very respectful of the animal and the idea that it lived to provide us with meat and that when it opened its eyes again, it would be in the presence of God.
Once our chickens are 3-4 wks old (depending on temp), they are allowed to free-range within a large, mesh-covered area. They eat bugs, worms, vegetation. Grain is given only once a day, with constant fresh water. When they’re big enough so the birds & cats aren’t interested, they run with the goats. They zip outside every morning to scratch in the compost pile and eat any kitchen scraps. Our chickens are full-flavored and healthy.
Confined animal feeding operations are immoral. We would be vegan if we were unable to grow our own meat.
This it trully the best way for an animal to live and to die and for us to eat! thanks for sharing.
We beginners are going to be butchering 3 roosters today and your tutorial makes us a whole lot surer about doing this!
Thanks very much!!
I’m so glad this was helpful! I hope everything worked well.
I am going to be butchering some chickens soon. I did it once years ago with my mama, but I had forgotten the process.Your tutorial was great! very detailed and lots of pictures.Thank you so much for sharing and the idea of setting up stations is sorta what I had in mind to do.You helped bring that vision much clearer.
So happy it helped! You got this. After a couple of times, it’s not as intimidating anymore.