This post may contain affiliate links, view our disclosure policy for details.

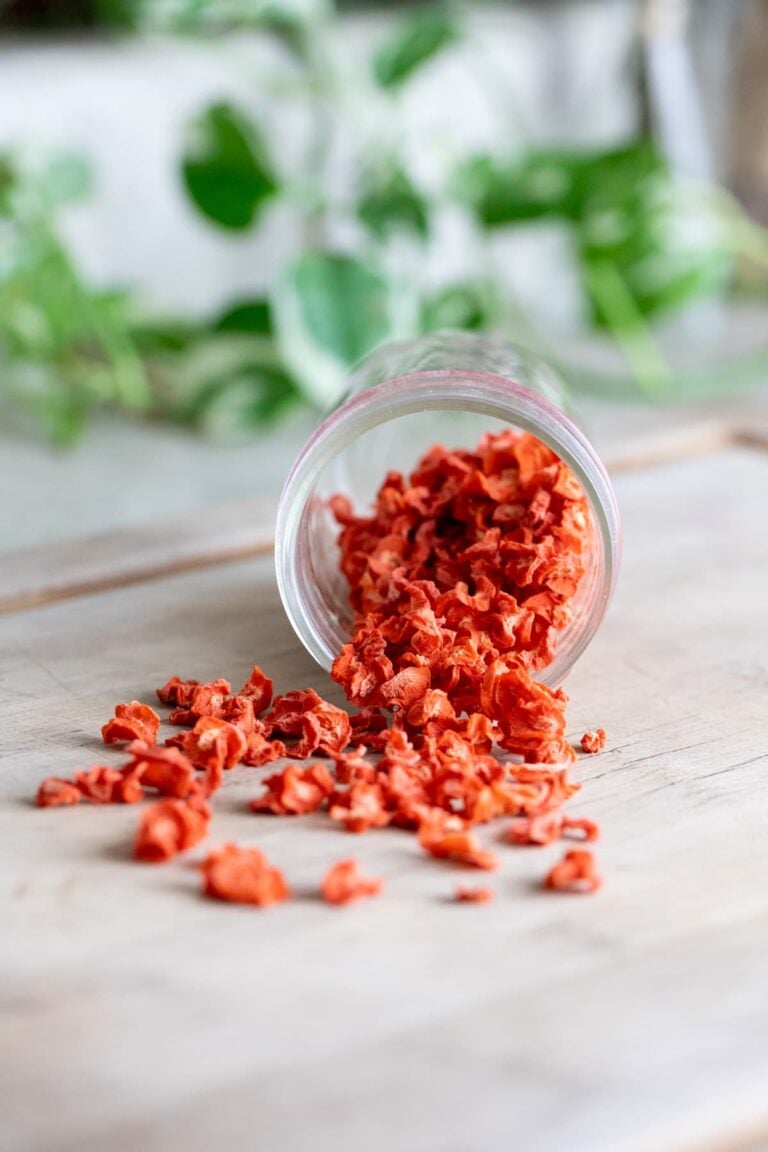
In this post, we are going to learn how to freeze shredded carrots. After harvesting a huge amount of carrots, I decided to freeze some of them shredded for future carrot cake. Let me show you how I blanch and freeze shredded carrots.
I’ve been doing a bit of carrot preserving the past couple of weeks since I harvested 300 (or so) carrots from the garden.
There are many ways to preserve carrots. You can can them, dry them, freeze carrot soup, store them in a root cellar, leave them in the ground if the weather is cool enough, or freeze them diced or shredded.
I made some carrot soup to freeze. I left some carrots for us to eat fresh or cook with, and the rest I shredded, blanched and froze because I make a carrot cake almost every month.
How to Freeze Shredded Carrots…

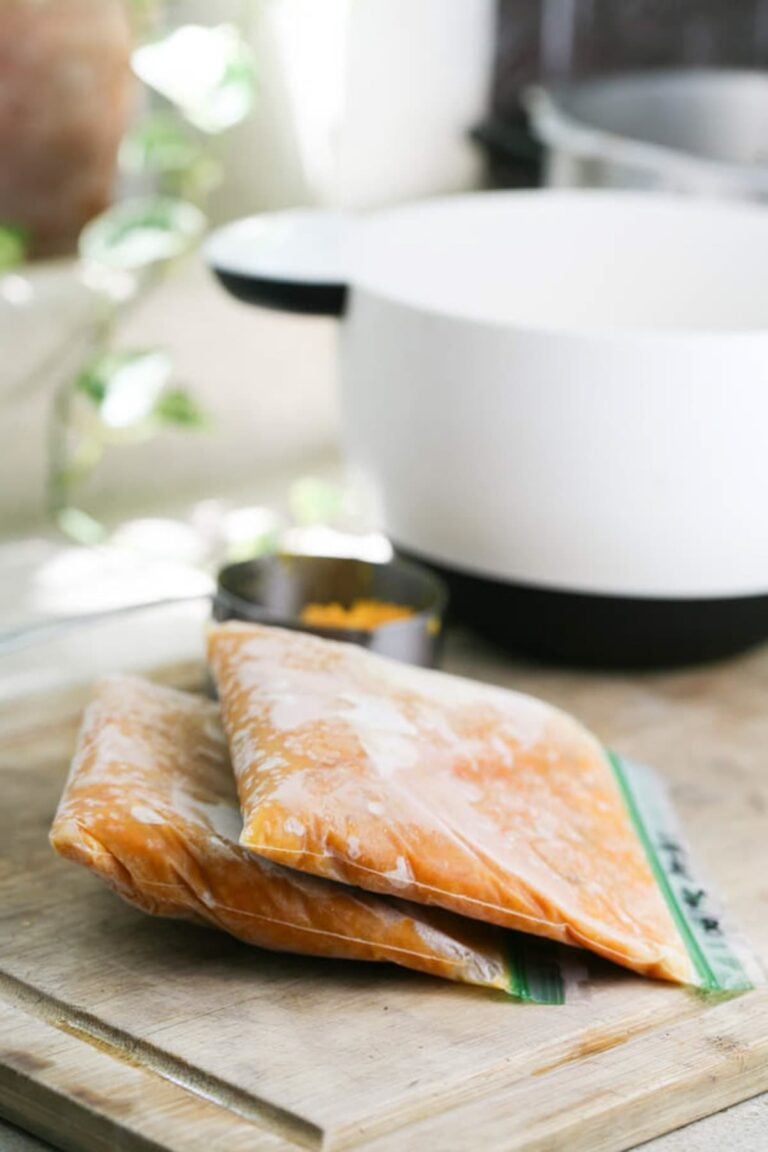
I made sure to divide the shredded carrots into portions according to the recipe I am using for the carrot cake, so next time I make a carrot cake I only need to defrost a bag, and I am good to go.
If carrot cake is not your thing, or if you don’t specifically need shredded carrots for a certain dish but still want to freeze your harvest I actually suggest you dice the carrots and freeze them diced. The process will be the same as below but much easier with diced carrots.
But since you are here, I assume you want to freeze your carrots shredded so let’s do this!

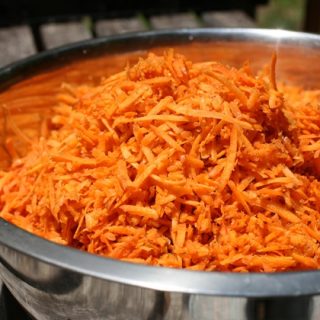
First, shred your carrots. I did that in my food processor since it was a large amount. It only took a few minutes.

If you’re going to use your shredded carrots within three months, you don’t have to blanch them.
However, if you’re going to leave your carrots in the freezer for a longer period, you will have to blanch them to stop the enzyme action and prevent food poisoning.
So… Bring a large pot of water to a boil.

While the pot of water is on the stovetop you have two things to do…
First, set a colander in the sink, and second, make an ice water bath in another big bowl and set it next to the sink (just a large bowl with water and ice cubes in it).
When everything is ready, place 6 cups of shredded carrots in a smaller bowl so you can dump the whole amount into the boiling water at the same time. You can do more than six cups or less, depending on your pot size.

Once the water is boiling, add the carrots into the pot and set your timer to two minutes. Stir the carrots around a bit.

When the two minutes are up, dump the whole pot of boiling water and shredded carrots into the colander.
Yes, you can try to fish out all the carrots with a slotted spoon but it will take you 15 minutes and by the time you fish out the last pieces your shredded carrots will be fully cooked.
Yes, you’ll have to reheat water for the next batch, but I think it’s easier than standing next to the pot and trying to fish out all the little carrots shreds before they turn into mush.

Next, they go into the ice water bath. Move them around a little bit, so they all cool quickly. This will stop the cooking process.

Next, you’ll need to dry the carrots. I used a big bath towel instead of a small kitchen towel. Just move the carrots around and pat them dry.

From here they go into a clean bowl…

And the only thing left to do is divide the carrots into zip lock bags. I placed 4 cups in each bag and flattened them inside the bag, so it’s easier to defrost them later.
Try to get as much air as you can out of the bag (if you are using ZipLock bags) before you close the bag. I read somewhere that if you use a ZipLock bag you can place a straw in the corner of the bag and suck the air out before you seal it. This didn’t work for me so I just did my best to get as much air out as I could.
I now have a Nesco vacuum sealer that I use with these bags and it works wonderfully to keep the food from getting freezer burnt. You can see how I use it in my freezing leeks post.
Don’t forget to label and date the bag before you put it in the freezer. Sometimes frozen things are hard to recognize…
It took a couple of hours to process all the shredded carrots, but I ended up with 10 Zip Lock bags in the freezer and for the next year, making a carrot cake will be the simplest thing!
Here are some more freezing posts for you…
Blanching Potatoes For Freezing
How to Freeze Shredded Carrots
Blanching and freezing shredded carrots.
Ingredients
- Carrots
- Water
- Ice
Instructions
- Shred your carrots in a food processor.
- Put water into a large pot to boil.
- Set a colander in the sink.
- Add ice cubes to a large bowl and add cold water.
- When the water is boiling, add your batch of shredded carrots all at once. Blanch for 2 minutes while stirring.
- Once the two minutes are up, dump the carrots and water into the colander and drain the carrots.
- Transfer the drained, hot carrots into the ice water and let them cool for a few minutes.
- Transfer the shredded carrots onto a large towel to dry.
- measure cups of shredded carrots into a ziplock or freezer bags. Divide into portions according to the recipe you plan to use the shredded carrots for and flatten the shredded carrots inside the bag so it's easier to defrost them later. Lable your bag and freeze.
i like learning about how to blanch carrots. i like to make chicken and or tuna salad with carrots and celery, but would rather use the processor less often. there’s nothing about blanching that helps with poison. the purpose for blanching is that “It stops enzyme actions which can cause loss of flavor, color and texture.”
Do you defrost your shredded carrots when you bake with them or do you use them in a frozen state?
I defrost them and squeeze as much of the liquid as I can before adding them to the batter.
What is your carrot cake recipe
It’s on my to-do list to make my own but for now, I just use a basic one. I just Google carrot cake and use whatever comes up (usually I cut the sugar back tho). Hopefully, I’ll have a carrot cake recipe on the blog soon.
Great info I’d really like your recipe possible
Yes, a carrot cake recipe will come to the blog eventually, that’s the plan but I didn’t get to write it yet. But you can use the shredded carrots with any recipe of course.
https://www.hiddenspringshomestead.com/how-to-can-carrots/ Here’s a post I wrote on it. Totally up to you if you want to share….
Thanks for sharing this. I always grow lots of carrots, but can them. Never crossed my mind to be freezing some. I buy shredded carrots at times, why don’t I just make my own?
You know, I’ve never canned carrots before! My problem with canning vegetables is that they are too soft for me. I don’t like them a mush so I usually freeze or just eat fresh. Although I know there must be a way to pickle them and keep them crunchy. How do you can your carrots?
You could put the colander on top of an empty pot so you don’t lose your hot water. This could be a huge time saver if you are preserving a lot of carrots.
Great idea. Thanks.
Thanks for the great tip! I wonder if this would work for potatoes too?
Yes Karla, exactly the same process for freezing shredded potatoes (for hash browns for example..). Just biol a minute longer, so 3 minutes instead of 2. Thanks for visiting!
I use the zipper bags sometimes. If I am going to leave my food in the freezer for a long period of time I use the Food Saver. Now to get to my point I wanted to share with you and your readers. The straw method works, but I had to put it in the middle of the opening of the bag and start “zipping” from each side as I suck the air out. You might give this a try.
Thanks Ronda. I’ll try this next time.
Thanks for this! I was wondering what to do with all the carrots – some will be frozen carrot-ginger soup, but shredded carrots is more versatile (carrot cake! carrot muffins!) and takes less room in the freezer.
Have a great week!
Yes, and I think they can even be used for soups later, right? The soup might even cook faster since the pieces are small.