Learning how to plan a vegetable garden is just as important for the success and productivity of your garden as it is to learn how to grow the vegetables that you plant. With a solid garden plan, you are setting yourself for a much easier and more productive season.
You can clean the drool off of your chin now. No shame, it’s OK. I know what you’re going through. I’m going through the same thing every January.
They are stronger than us. They have special powers. They take over your mind, your soul, your body. They make you think of sunny days and moist soil. You flip the pages and feel the warm breeze kissing your skin. You hear the chirping of birds and the buzzing of bees.
They stare right back at you. The crisp, orange carrot. The round, smooth, pink radish. The crunchy, long, bright green cucumber. The tomatoes… Oh God, the tomatoes. Purple, yellow, red, green… You want them all. You have to have them all!
And they make you buy them all. The vicious seed catalogs!
How to Plan a Vegetable Garden in 7 Simple Steps…
Then Spring arrives. You stand there in the middle of your garden, swatting at the extra-large mosquitoes, thinking, where the hell am I going to stick all these seeds that I impulse bought?
Yep, I’ve been there too. Giant mosquitoes and all… So let’s hold the thoroughbreds for a minute, close the catalog, and take a moment to plan the garden. I mean, really plan the garden, calculations, maps, and so on.
It sounds scary, I know, but it’s not that bad. After a little bit of work, you’ll be ready to order what your garden can grow, and grow well.
You won’t waste seeds or your money, and your harvest will be bountiful, beautiful, and much tastier since each plant will have the right amount of room to grow.
Note – throughout this post I will use my garden as an example. It doesn’t matter if your garden is made of 3 pots or 7 raised beds, or 2 acres of rows and beds, the process of planning will still be the same.
Step 1 – Map Your Garden…
I am sure there are a million software programs and apps you can use to draw a map of your garden, but I am an old school kinda girl, so pencil and paper are it for me.
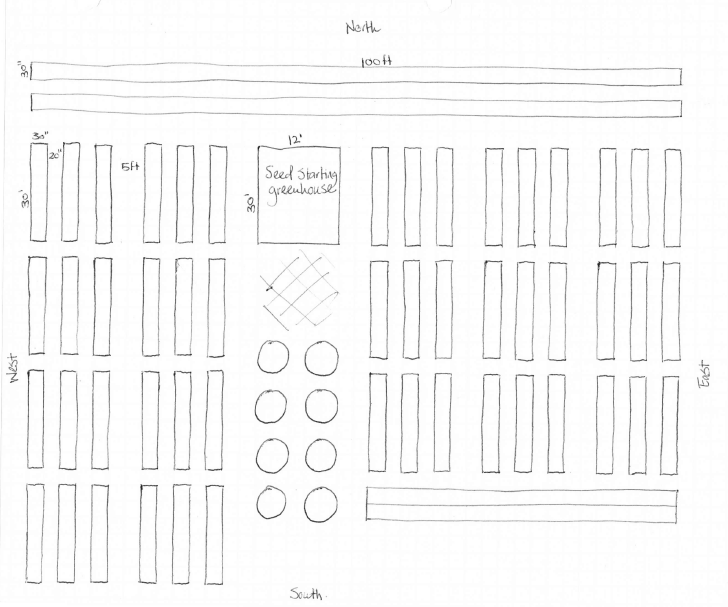
If you are not using the computer to draw your garden map, use graph paper and a pencil. If you already have a garden, draw your beds and pots. If you want to add a bed or a pot somewhere add those to the map even if you didn’t make or buy them yet.
If you are starting a new garden, decide on your setup and draw it (make sure to read about where to plant a vegetable garden). Do you want rows of vegetables? Do you want raised beds? How wide is the walkway between those beds?
Do you want to be able to access parts of the garden with a tractor? Or a lawnmower? Maybe someone in your family is in a wheelchair and likes to spend time in the garden with you? Make it possible for them to move around.
Your map should show you…
- Your rows or beds,
- Measurements of beds, rows and walkways,
- Cardinal directions so you know where the sun is coming up from.
- Buildings, trees or other things that affect the amount of sun a certain area in your garden gets.
- Greenhouse or cold frames location.
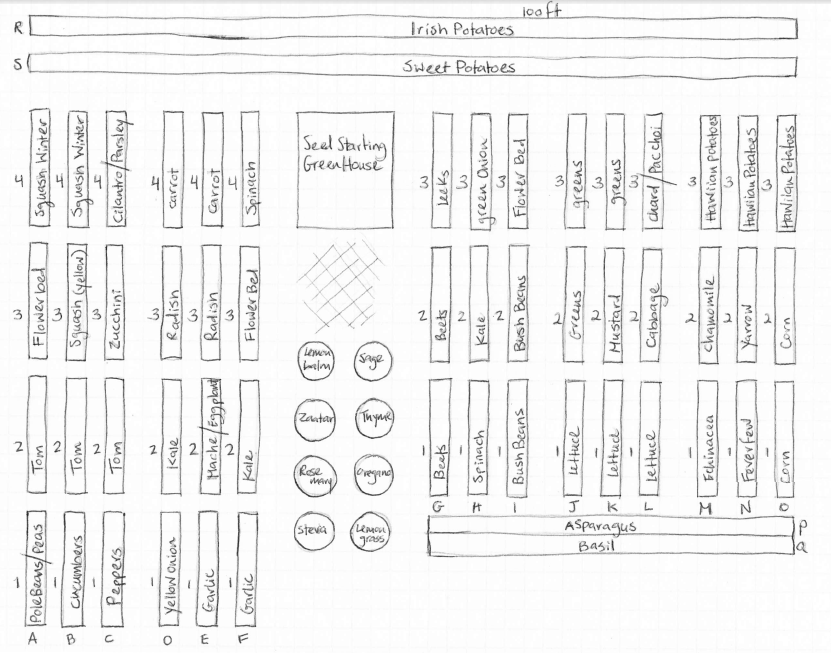
My 2015 garden was made of beds 30” wide by 30′ long (30’=360”) with a walkway of 20” between beds and 5′ between sections.
We had one 30′ x 12′ hoop house for seed starting and storage. Things have changed since then but we will use this as an example. This is a big garden for the market, but again, no matter how big or small your garden is, the process is the same.
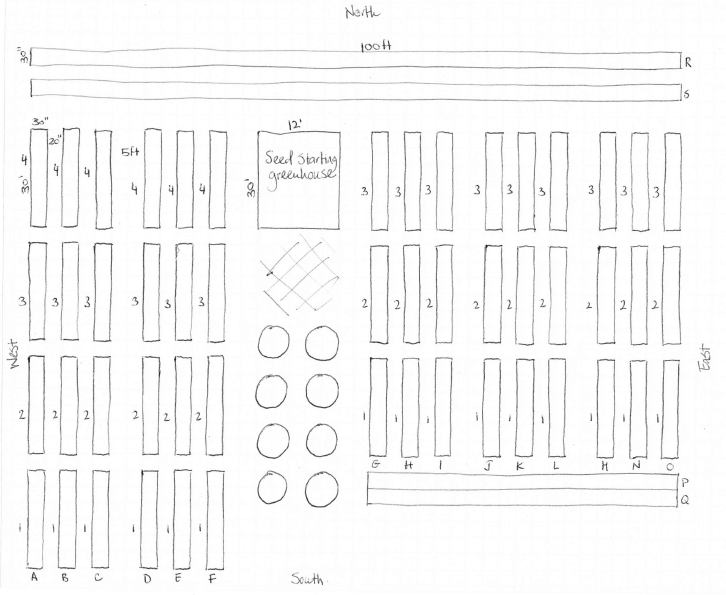
Step 2 -Name Your Rows, Beds or Pots…
You can use numbers, letters or whatever else. Just make it easy for you to remember. I used letters for the rows and numbers for each bed in the row.
I start everything from the left because this is where my neighbor’s house is. What does this have to do with my neighbor you’re asking?
First, we bought our land from him, so really, it all started with him. And second, his name starts with A.
After birthing four children, you don’t have many memory cells left. And I didn’t have many before, so just imagine… When I’m in the field, it’s just so easy to make sure I hold the map right since A is where Mr. Alvin is.
Anyway, naming your garden sections will help you create a garden log. You can record where you planted each crop so next year you know not to plant it again in the same spot (crop rotation and all that…).
Also, you can follow the growth of each variety you chose and make notes, maybe next year you’ll decide to choose another or go with the same variety. A garden log has many benefits; it will help you improve your garden from one year to another.
Step 3 – Make a List of Vegetables That You Want to Grow…
Or in other words, what do you like to eat? No reason to grow rutabagas if no one in the family is going to eat them. Unless you are growing for someone else or market, then grow what others like.
This might be a good time to revisit the seed catalogs. But don’t linger there, just make a list of the vegetables and herbs you want to grow. Don’t look at the varieties just yet.
If you need some ideas, you are welcome to check my 22 crops for a small vegetable garden post, and my post about the best varieties to grow in a kid-friendly garden.
Step 4 – Place Your Veggies on the Map…
We are going back to the map now. Take your list of chosen vegetables and place each one on the map. Do you want two beds of tomatoes? Three? Maybe half a row?
Use a pencil and play around with it. You might find that there is not enough room for everything and that you need to give something up (or build another bed, if you are like me…).
If you have areas with a bit of shade, place chard, or lettuce there. Consider where the sun is coming from and place tall plants, like pole beans or peas, in an area where they don’t block the sun for other crops. Also, make sure to place them where you can comfortably build a trellis for them.
Maybe you want some of your beds to be planted with flowers like zinnias? They can attract beneficial insects and add beauty to your garden.
Also, consider where you plant perennials like asparagus or strawberries, for example, since they are going to stay in the same spot for years (read: Planting Strawberries and Caring For Your Plants, and: How to Grow and Cook Asparagus).
Step 5 – Calculate How Many Seeds You Need…
So you know where your lettuce is going to spend the Spring, but how many lettuce seeds do you need?
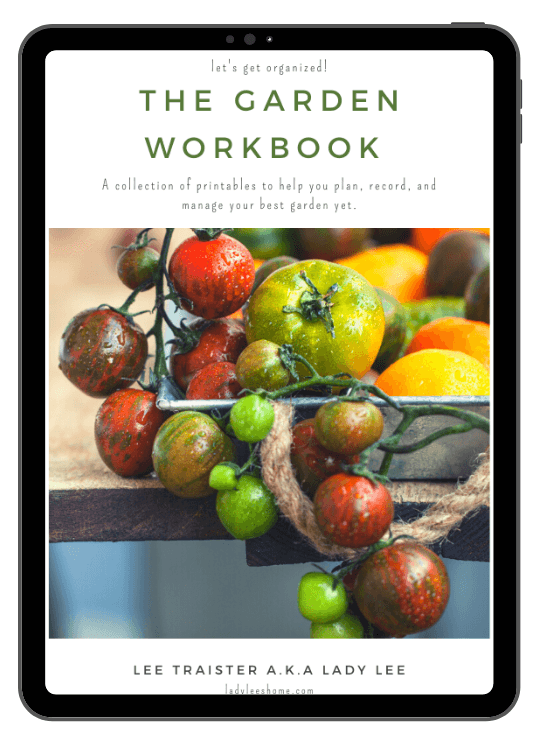
The Garden Workbook is Here!
In part one of this book, we’ll go over how to set up and grow your best garden yet.
Part two consists of 16 garden printables to help you plan, record, and manage your garden properly!
In The Garden Workbook, there is a sheet that lists recommended vegetable spacing along with many other printables that will help you plan, manage, and record your garden. I use this sheet all the time even though I remember most of it by now just to make sure I plant things the right way.
Let’s keep going with the example of the lettuce. Let’s say you have a 10′ long by 3′ wide garden bed that you are going to plant lettuce in.
First, let’s convert to inches (multiply by 12 because there are 12” in one foot). 10 x 12 = 120” and 3 x 12 = 36”. So your bed is 120” by 36”. Lettuce needs to be planted 10” apart in rows 8-10” apart. So in a bed that is 36” wide you can fit three rows of lettuce since you have to make sure you don’t plant on the edge of the bed.
I started by drawing one row in the center of the bed at 18”. Then, another row 10” to the left and another one 10” to the right. This will leave 8” between both outside rows to the edge of the bed. Now, each row is 120” long, dived 120” / 10” (space you need between lettuces) = 12.
Now, to make room for the first and last lettuce in each row we need to take off the first and last lettuces (since we don’t want to plant right on the edge of the bed). So 12-2 =10. This means that you can fit 10 lettuces in each row. You have 3 rows x 10 lettuces per row = 30 lettuces in a bed.
After calculating how many seeds you need of each veggie to fill the spot you have for it in your garden, you will have a much better idea of how many seeds you need to order. Just remember, the calculation we made above is for one bed. If, for example, you have three lettuce beds in your garden plan for the year, you will have to order three times the number of seeds.
Also, if you are going to have a Fall garden and prefer to make one seed order for the year, you might need to double the number of seeds for the cool weather plants. So if you are going to plant the same bed in the example above again at the end of summer for fall/winter harvest, you need to order at least 60 lettuce seeds (30 x 2).
Step 6 – Order Your Seeds…
Now that you know how many seeds you need for each crop, you can start putting your order together. Based on your numbers, decide if you want one variety of lettuce or 3 (the number of seeds in each packet will be listed so make sure to pay attention to this information).
You can go over your seed catalog with a red pen and mark the varieties you want to order, or you can use my seed ordering sheet that you will find in The Garden Workbook.
I strongly recommend one thing, put your order together but don’t buy the seeds right away. Let it rest for a few days. You’ll change your mind about something or remember another. After a couple of days, when you’re sure you’re ready to order, go check out.
I purchase most of my seeds from Johnny’s Selected Seeds, Southern Exposure Seed Exchange, or locally.
Step 7 – Make a Planting Schedule…
You have all those wonderful seeds on their way to you. When are you going to plant them?
If you plant all your 30 lettuces at the same time, you are most likely going to have 30 lettuces ready for harvest at the same time. However, if you plant a few lettuces every two weeks, you will have a continuous supply of garden fresh lettuce to last you a while.
If you are planning to start seeds indoors, a planting schedule will not only help you figure out when it’s time for planting, it will also help you figure out what supplies you need to have on hand before planting time comes.
I actually like to make the planting schedule before I place my order of seeds because usually, I can buy the seed starting supplies from the seed company. I make one big order that includes everything I need (and it usually saves me the shipping cost).
I wrote a detailed post that will teach you how to create a seed planting schedule. Make sure to read it and create your schedule! It’s not hard and you can reuse it next year and the next.
So there you have it. I like doing this every year during the month of December (if you are busy with the holidays, January is good too).
This way everything is planned out, and I am ready for spring to arrive. I have enough time to gather all of the needed supplies, build trellises, get my indoor seed starting unit ready, and so on…
Here are a few other posts that will help you improve your gardening…
What to Consider Before Planning a Vegetable Garden
How to Start a Raised Garden Over Grass
Easy Garden Preparation the No Till Way
How to Transplant Seedlings to the Garden

Hi! I’m Lady Lee. I help homesteaders simplify their homesteading journey while still producing a ton of food! I am a single mother of four, I was born in Israel and raised in an agricultural commune called a Kibbutz. Now I homestead in central NC.
Wonderful post
Thanks. I’m glad you liked it!
I’ve found your post just like my thinking. I’m going through everything in my head. On paper. Rethinking everything. Planning more and more.
I moved my fiance to northern New York a couple years ago. Having gardens is very new to her and the kids. We struggled last year with a late start because of weather, but we are hoping for a better start and better gardens this year .
Thank you for your post . At least now I’m not the only one going vegazy. Veggie crazy.
Thanks again and happy growing.
Vegazy! I like it 🙂
I hope that this year we’ll have a great growing season!
Thanks very much. my name is Boat from Ghana and a student teacher with the goal to make big farm of organic vegetables and fruits and i really appreciate you with kinda knowledge you are posting here on farming .
You are welcome! I am glad you like it!
What a great blog! Even if I wasn’t a “Garden Junkie”, I would read it just for the good-for-me belly laughs! I especially love the info on starting a garden in your yard and this article on planning your garden–thanks so much Lady Lee!
You are welcome Linda! I am happy you liked it and thanks for stopping by.
I hand write my garden maps every year too! The only thing I use on the computer are my companion planting graphs…..I can’t keep track of what goes by what otherwise!
Thanks again for linking up with Green Thumb Thursday! I’d love it if you’d stop by and link up a few more posts this week!
~Lisa
Great posts, great information for planning your garden. So glad you shared you post on the HomeAcre Hop, as one of the co-hosts I’m going to feature your post tomorrow! Hope to see you again.
– Nancy
Great tips. You garden dwarfs mine, and your greenhouse is half as big as my whole cabin. But you are right, doesn’t matter how big or small your garden is. Some items I grow are even two much for the two of us to eat without waste using four 4X10 foot raised beds and about ten pots on the deck. I can’t plant until late March or April, and even a second planting in July doesn’t always finish growing before the season ends. But I love gardening in my floating garden up the lake. – Margy
Margy, thanks for stopping by! It sounds like you are living in a beautiful place up North somewhere (?). You can still extend your season by building simple PVC hoops over your raised beds and covering the beds with plastic so your plants can finish growing in the Fall. Check out my post “preparing the garden bed for Winter.”
Thanks Lee. Our strong winds begin in the fall and anything exposed is in danger of getting torn off to float away on the lake that surrounds our home and garden. I usually put the garden to bed by the end of October. The only things that make it through the winter are kale, chard and carrots left in the soil. – Margy
What a great post! I have made a map of mine for several years… and it is fun to look back and see where we put new beds in and so on. Our garden is in the city and MUCH smaller than yours, but it is amazing all that we can get out of it. 🙂 Thank you for sharing this information.
Thanks for this detailed post Lady Lees Home. You are an inspiration to me. I have a small 5×6′ garden space all tilled and raring to go. I need help with a plan for irrigation as I live in the southwest. I want to use enough water to have my crops grow, but don’t want to waste water. Can you offer any tips? I’ve put up this post on Google and will pin it too. By the way, I saw this at the Natural Family Link Up. My post is there too. 3 Secrets to Help Clutter Proof Your Home. Be well. Live well. Lead a colorful life. Nancy Andres@ obloggernewbie.blogspot.com
I’ve been using drip irrigation. It takes a bit of money and time to set it up but saves you a lot of time. One thing I would say for sure: mulch. You don’t have a huge space so just go to your local Lowe’s in the Spring, buy a bale of hey for $6 and mulch around your plants. You won’t believe how much weeding and water it will save you! Thanks for visiting and good luck!
Hi, Lee! I give a hearty thumbs-up on mulching, but need to clarify a detail on buying ‘hay’ at your local big-box or farm supply outlets. What many gardeners mulch with is straw – not hay. (That’s probably what you meant, Lee.) Straw is what is left standing in the fields after the combine has harvested the grain. This, then, is cut and baled on a second pass with seed-count of weeds much lower. Hay, on the other hand, is the result when the entire plant (e.g. grass, alfalfa, clover) is cut down, dried and baled. It is intended for feeding animals. I did use clover hay once – never again – in the veggie garden to boost nitrogen levels. As it turned out, the clover was cut so late the flower heads were full of mature seeds….and every single one viable. :^( I fought that clover for years. Thanks for the great planning tool!
Yes! You are right, I meant straw, I’ll change it.
I used to purchase bales of straw and just use them right away, but many of them also have seed in them… I am not sure how since the seed is attached to the hay part but it germinated in my garden and I too had to battle it for a long time, so I know first hand what you are talking about!
I still use straw, but I open the bales and let it stand in the elements for a couple of weeks before I use it. The seeds germinate and I am able to remove the clumps of them before using the straw in the garden.
Just the other day I learned about a local place to pick up free wood chips. I might end up using this next year.
Thanks for stopping by!
Thanks for this post! I need as much help as I can get in the garden. It’s tough being a homesteader with a black thumb. I’m pinning for later.