This post may contain affiliate links, view our disclosure policy for details.

Preparing the vegetable garden for winter can be done rather quickly. Winter is an important time. The garden gets to rest and the soil can improve. Preparing your vegetable garden for winter will not only help improve the soil but will also save you a ton of work in the spring.
When I started gardening years ago, I was trying to somehow find a way to grow everything all the time.
I was fascinated with season extension techniques, tried to build different structures, tried to cover my garden, build little hoop houses over my raised beds and so on…
It can work… There are great tricks out there to help you extend your growing season and maybe even grow vegetables year-round (read the book The Winter Harvest Handbook if you are interested in growing year-round)…
But after a couple of years of growing as much as I could, I realized that the break from the garden that we get during the winter was necessary for a better growing season the next year.
For the gardener and the garden…
Preparing The Vegetable Garden For Winter…

Here in the South (zone 7b) we have a long growing season. I guess that if you live in an area with a short growing season you might want to find a way to extend the season a bit, I would, too.
But here, we can start planting around Valentine’s day (we can plant a few crops even earlier than that like onions, for example) and keep growing until Thanksgiving.
Add to that the fact that many of us start seeds indoors at the end of January, and the result is that really, we only have a couple of months break from the garden.
Now, I wouldn’t want it any other way! I can’t imagine waiting until May for planting but I’ve decided that it would be a good idea to take a couple of months during the winter and spend it away from the garden so I can come back eager and refreshed in the spring.
Another reason that I think it’s a good idea for a winter break is that it gives the soil time to rest too.
You’ll see below that the way I prepare my garden for winter is also very beneficial to the soil itself and, of course, that in the end, this results in better crops and a larger harvest.
Take the Time to do it Right…
I used to just let it go. I was tired after the long growing season and I didn’t want to do one more thing. I figured I’d just prepare the garden for planting in the spring right before I plant.
But over the years I noticed that if I take the time to prepare my garden for winter right (and it doesn’t take long at all) spring is so much easier.
I’ve noticed that the soil warms up much faster in the spring.
I’ve noticed that I don’t need to till my soil to break it up. It’s already nice and soft.
I’ve noticed that my soil is richer because the mulch had more time to decompose.
I’ve noticed that my garden is full of beautiful worms in the spring. Apparently, it was nice and cozy for them in the garden all winter so they made it their home.
And I’ve noticed the difference in “spring overwhelm” when I have one less thing to do.
How to Prepare Your Garden for Winter…
Aside from the way I do it here, the other way that I know of to prepare your garden for winter is planting cover crops or green manure crops.
I’ve learned a lot about cover crops and green manure crops over the years, but I’ve never tried planting them in my raised bed garden. I’ve always left the use of them for the field.
For my raised bed garden I use what the animals give me and what nature gives me. It’s so good and costs me nothing…
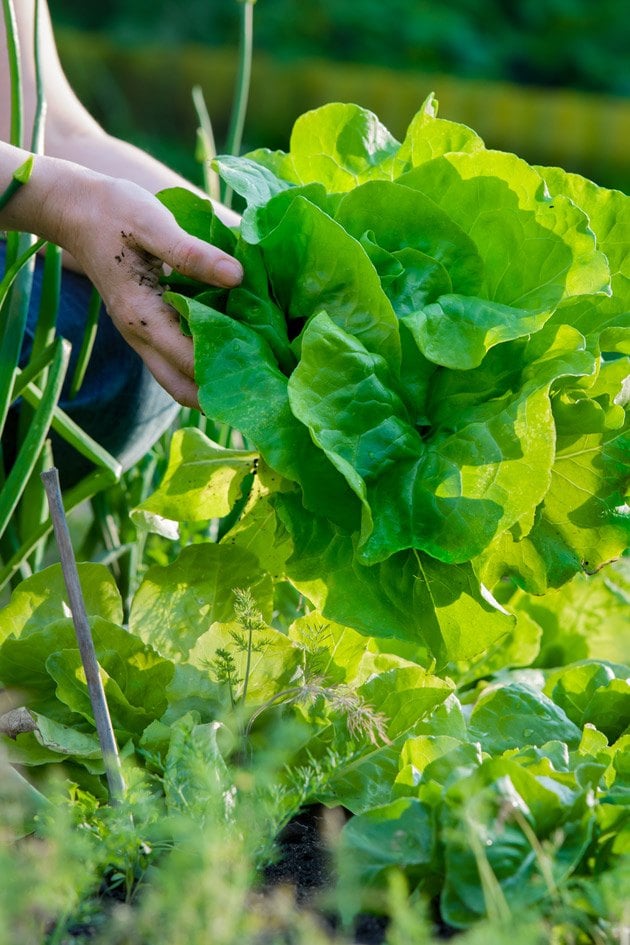
Step One: Harvest Fall Crops…
I start by cleaning the beds from all of the fall vegetables that are still there. I do this right after Thanksgiving. Usually, I have a few lettuces and carrots and kale left.
Step Two: Weed and Clean the Beds…

Once I have all the vegetables pulled, I clean the garden beds of any weeds.
Step Three: Rake the Soil…

The next step is to rake the beds. If there are any large clumps of soil I break them apart or bury them (they will break apart later).
Step Four: Add a Layer of Compost…
After you rake the soil it’s time to throw on a layer of three inches or so of compost (or more if you have more!).
I used to use cow’s manure from my neighbor. He used to raise cows and every few months I’d come by with the tractor and scoop some manure from their feeding area.
It helped him by keeping the area clean and it helped me because I have had compost!
I no longer have the tractor and he no longer has the cows… So for now, I purchase compost locally. Hopefully I’ll be able to find another solution soon.
I simply spread the compost on top of the soil in the bed. I don’t mix it in, I don’t disturb the bottom layer… I just add it on top of the soil that is in the bed.
Step Five: Pile-Up Mulch…

This is the most important step! pile up whatever soft mulch (not wood chips) nature gives you.
Do you have old straw sitting around somewhere? Animal bedding? Old hay? Dry leaves?
Whatever you have, pile it up. Most of us (unless you live in the desert…) have dry leaves. They are gold for the garden!
You can read more about using dry leaves in the garden in this post.
They will literally change the way you garden and improve your soil immensely. If you have a leaf shredder you can collect dry leaves, shred them and pile them up on your garden beds but you don’t have to shred them.
I simply pile them up on the beds, the more the better.
It’s a really great job to give the kids! They enjoy raking and jumping in a huge pile of leaves and it’s a simple enough job for any child, even a very young one, to throw leaves on an empty vegetable bed.

Aside from the leaves, my goats’ houses and yards needed a clean (I raise Lamancha goats).
I have to admit that I still don’t have enough hay feeders. I have one that my neighbor built for me and it’s working great but I need two more and I just didn’t get to building them yet so I throw the hay on the ground for some of the goats.
It’s an awful waste! The goats eat maybe half of it and step, poo, and pee on the rest.
I’ll get to building a couple more hay feeders, I promise, but meanwhile, all this hay that is left behind can be used in the garden.
It’s wet, it’s full of goat poop and pee… I know it doesn’t sound very appealing for a human but you ask any vegetable and it’ll tell you how much it loves it!

So I piled up about four inches or so of this old hay on the soil in the garden beds.
Of course, you can do the same if you have cows and horses or sheep for example. You can do this with old bedding or leftover old hay, it’s all great garden food.
Before we move on to the last step, let’s recap…
We harvested the last of the vegetables, we removed any weeds, we raked the soil, we added about 3 inches (or more) of compost, and then covered with soft mulch.
The next step is not mandatory but I like doing it…
Step Six: Cover the Garden…

I love covering my garden. First, I have a few Muscovy ducks that are still free-ranging. They usually don’t bother the garden but just in case.
If you have free ranging chickens you’d really want to consider this step. My Black Australorp chickens are no longer free-ranging since they make a huge mess in the garden!
But, if you cover your garden this way there is a little less of a chance that free-ranging chickens will mess with it.
Also, my dog loves the garden! During hunting season, I’ll give her deer bones to play with.
For some reason, she decided that the garden is the best place to hide them so she digs. I have no problem with deer bones in my garden, I actually bury animal parts in there all the time (like leftover chicken parts and feathers after chicken butchering, for example), it’s great garden food…
It’s the mess I have a problem with. If she just cleaned after herself and put everything back the way she found it we’d be golden…but she doesn’t.
Another great reason to cover the garden is that it helps keep temperatures higher and therefore helps the mulch decompose faster. And it also helps to keep the soil warm so you can plant a little earlier in the spring.
If you live in a cold climate with a short growing season it might be beneficial for you to cover the garden with black plastic, it will help even more when it comes to warming the soil quickly in the spring.

I use this white row cover (in other words agri-fabric) that I bought at Johnny’s Selected Seeds (I got the 83” x 250′).
I love this cover! I use it to cover the beds in early spring to give the seedlings some warmth, to cover the beds at the end of the season to help what’s already growing there stay in good shape even if we have cold nights.
And I use it sometimes the whole season as a bed cover to keep animals (like… you guessed it, chickens!) from eating the plants, and so on. It’s useful to have a roll of this stuff in the shed.

I use these landscape staples…

To hold the fabric down. You can use them if you use black plastic as well, I just recommend folding the fabric or plastic a few times before you stick the staple in it to prevent it from tearing easily.
Step Seven: Mulch in Between Beds…

Once the beds were done I moved on to the mulch in between them.
This step is also not mandatory, however if you do have mulch between your beds I strongly recommend that you deal with it before the spring. Don’t leave this job for the spring. You can definitely do it in early winter.
I have another amazing neighbor who cuts trees for a living. He dumps his wood chips at the farm (my 20 acres which are across the road from the house I live in).
When I had the tractor, I’d scoop up some wood chips to add to the wood chips that are already around the garden beds (this small garden is right by the house).

I simply use a shovel and spread the mulch all around…

I made sure to rake around the bricks that separate the garden from the lawn (here is how to start a garden where grass is growing).
I spray around those bricks to keep the grass from crawling into the garden. I try to use 30% vinegar.
And that’s it! As long as creatures don’t mess it up I am set for spring!
When spring comes, I’ll uncover the beds and plant my plants right in the compost that is under the mulch.
I’ll move the mulch aside, plant, and put the mulch back in its place.
It really doesn’t take long. This way of preparing the vegetable garden for winter is beneficial to the soil. It has a couple of months to rest and a couple of months for the compost to break down.
In the spring, you’ll see that your soil is dark and soft and full of worms.
I hope that you’ll give this a try!
Do you prepare your garden for winter? Do you do it the same way that I described or not? I’d love to hear your thoughts in the comments below!
Check out my other fall gardening posts…


Lee! I just found you, and now I’m on a rampage reading through your wonderful articles! Not only are you an engaging writer, but a brilliant wealth of knowledge! This coming Spring won’t be a scramble because of you! When I wind down my crops this year, I’ll tuck the garden bed in for the winter with all the wonderful free amendments we have here on our little homestead! You know, this was very similar to how I prepared my garden beds last Fall when I tucked the garlic in for the Missouri Winter. Indeed that was the best soil amongst all of our beds. So I already have proof, and your pre Winter action plan is exactly the kick in the pants that I needed to do it in the Fall vs Spring! That’s a hustle nobody wants in their life. Thanks Lee! Excited to read more of your articles!
I’m so glad you find it helpful! God knows I put a lot of love and hard work into this blog and it’s the best feeling in the world when it really is helpful for someone! I learned through the years that the more I can do in Fall the better my garden is the next year and the easiest it is for me to keep my sanity! Fall weather is so much easier to work in and there are many things that you can do. Then I usually take a couple of months break and then we start another growing season. It’s a beautiful cycle to get used to!
Lee,…why is some of the Text in your posts,…like Above,… All “Chopped up?”. Finding it in quite a few of your posts. Bummer,… Sometime whole paragraphs, sometimes only a few (crutial ones),….
Sorry,…Skip this post,….for whatever reason, it “fixed” itself. Must have finished downloading,… MA
Well, I’m so glad to know it fixed itself! There is a whole lot of technical stuff behind keeping a blog running and sometimes we (on the other side of the screen) don’t know that there is an issue! So thanks for taking the time to let me know, but I am glad it’s all good. Thanks for stopping by!
Hey hope vacation was great. I beat you. I planted my garlic yesterday. And a row of spinach. N. Cen. Pa.
Ha! I am planting my garlic tomorrow. We finally had rain so the ground is not as hard as a rock anymore.
Vacation was wonderful! Thanks.