This post may contain affiliate links, view our disclosure policy for details.
This challah bun recipe is very easy to make! I’ll show you how to make the dough (which you can use to make buns or loaves). We’ll make a simple challah bun and then, if you want to get a bit more creative, we’ll show you how to make different designs of challah buns.
A couple of weeks ago, my aunt was here from Israel for a visit. She is a baker… You put me and a baker in the same house for a week and I can tell you for sure this is going to be a problem.
So I made sure to schedule ahead of time a whole bunch of activities away from the kitchen or, in other words, far away from the house. Yet somehow I still managed to gain about 17lb that shall stick to my mid-section from now till the end of times. I blame it all on the Challah Bread.
Simple Challah Bun Recipe…

This recipe is simple. A Challah recipe is one of those basic bread recipes that everyone should have memorized (just like this amazing Artisan bread). However, aside from the simple recipe, I thought it would be fun to take it to the next level and not just give you the recipe but also show you how you can make really beautiful challah buns that will make everyone’s jaw drop!
Ingredients…
- All-purpose flour
- Dry yeast
- Eggs
- Canola oil
- Salt
- Sugar
- Warm water
Kitchen Tools…
- A large mixing bowl
- A stand mixer with a dough hook – you can mix the dough in the mixer or by hand using the mixing bowl. Even if you aren’t using a stand mixer, you’ll still have to have a bowl to let the dough rise in it.
- Measuring spoons
- Measuring cups
- Flour sifter
- A plastic bag and a kitchen towel – to cover the bowl when the dough is rising.
- Dough scraper/cutter – makes it easier to cut the dough but if you don’t have it you can just use a knife.
- Kitchen scale
- Kitchen brush
- Baking sheet and cooling rack
- Parchment paper
A Couple of Notes…
- In Israel, most of the recipes list quantities in grams. My aunt doesn’t use a single measuring spoon or cup. Instead, she places the large bowl on a kitchen scale, then zeroes the scale. She adds the right amount of flour; let’s say 1 kg, then zeroes the scale again. She adds 20g yeast, then zeroes the scale. She adds 80g of canola oil, then zeroes the scale. And so on and so on.
This trick is so useful. If she caters to 100 people and prepares many kinds of different baked goods, she never needs to wash measuring cups and spoons over and over again. It saves her so much time!
I wrote the recipe below like most recipes in America (measurements in cups and teaspoons), but also in grams if you want to try and work this way. - You’ll also notice that she likes to knead the dough by hand. It’s just her personal preference, you can definitely use a stand mixer with a dough hook. That’s what I do when I make this bread for the farmer’s market every week.
How to Make Challah Dough…

Step one – add ingredients to a bowl. Sift your flour into a large bowl (or the bowl of the stand mixer). Then, add the rest of the ingredients: yeast, eggs, canola oil, salt, and sugar.
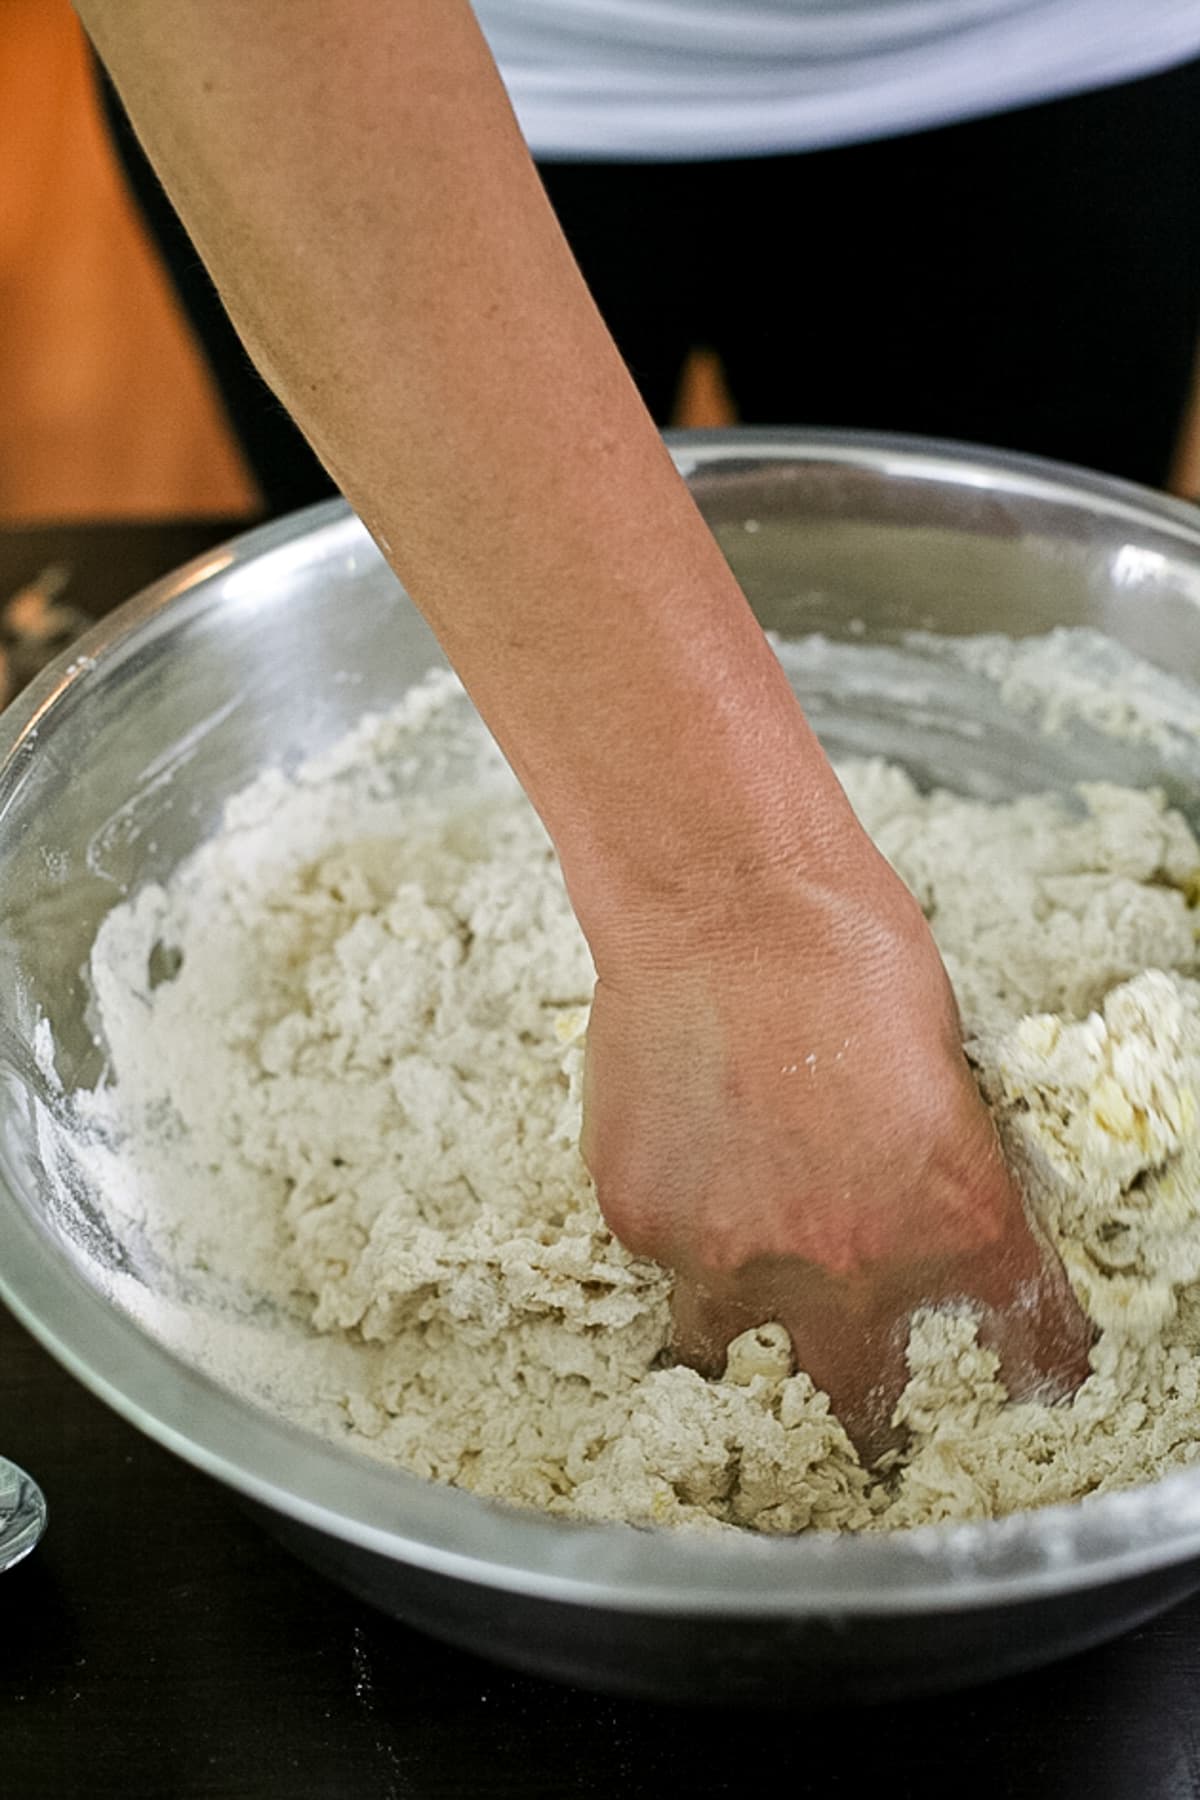
Step two – work the dough. After you add all the ingredients to the bowl, start adding the water. The recipe calls for 2.5 cups, but the professionals never just add the whole amount. Instead, add a little bit at a time while working the dough with one hand until all the ingredients are incorporated into a ball of dough.
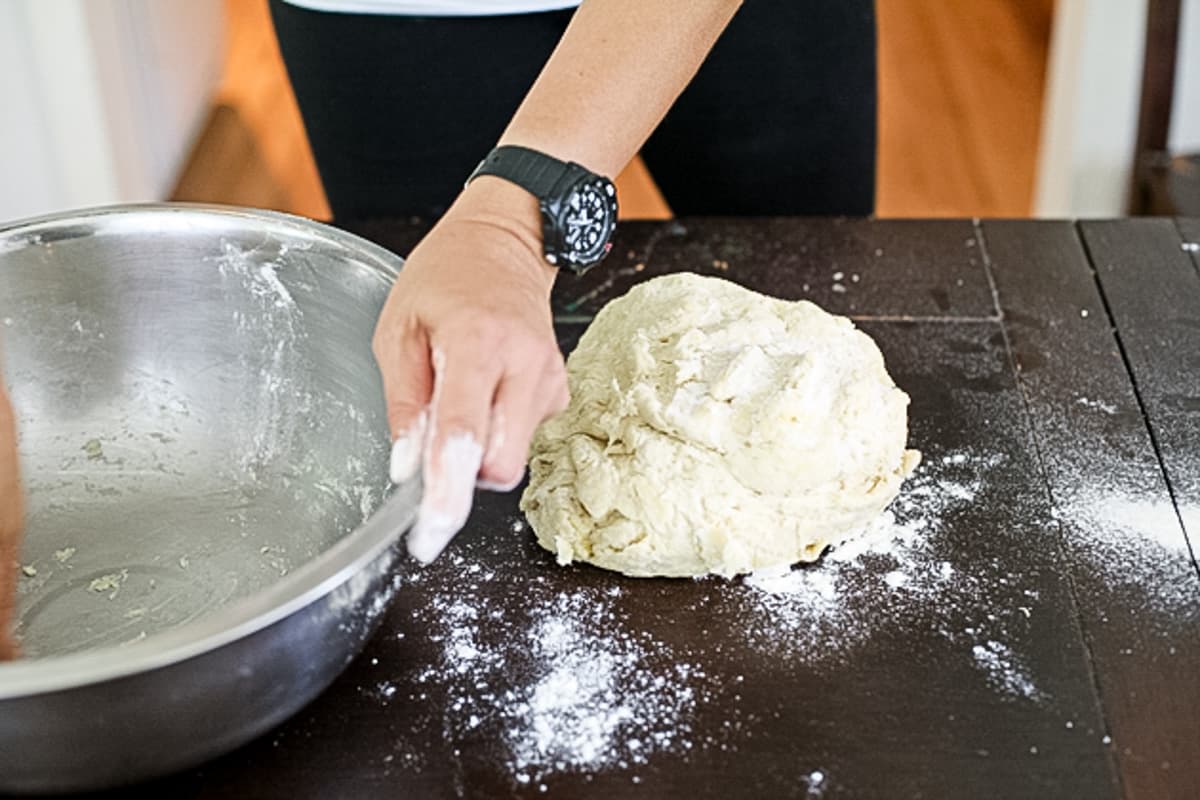
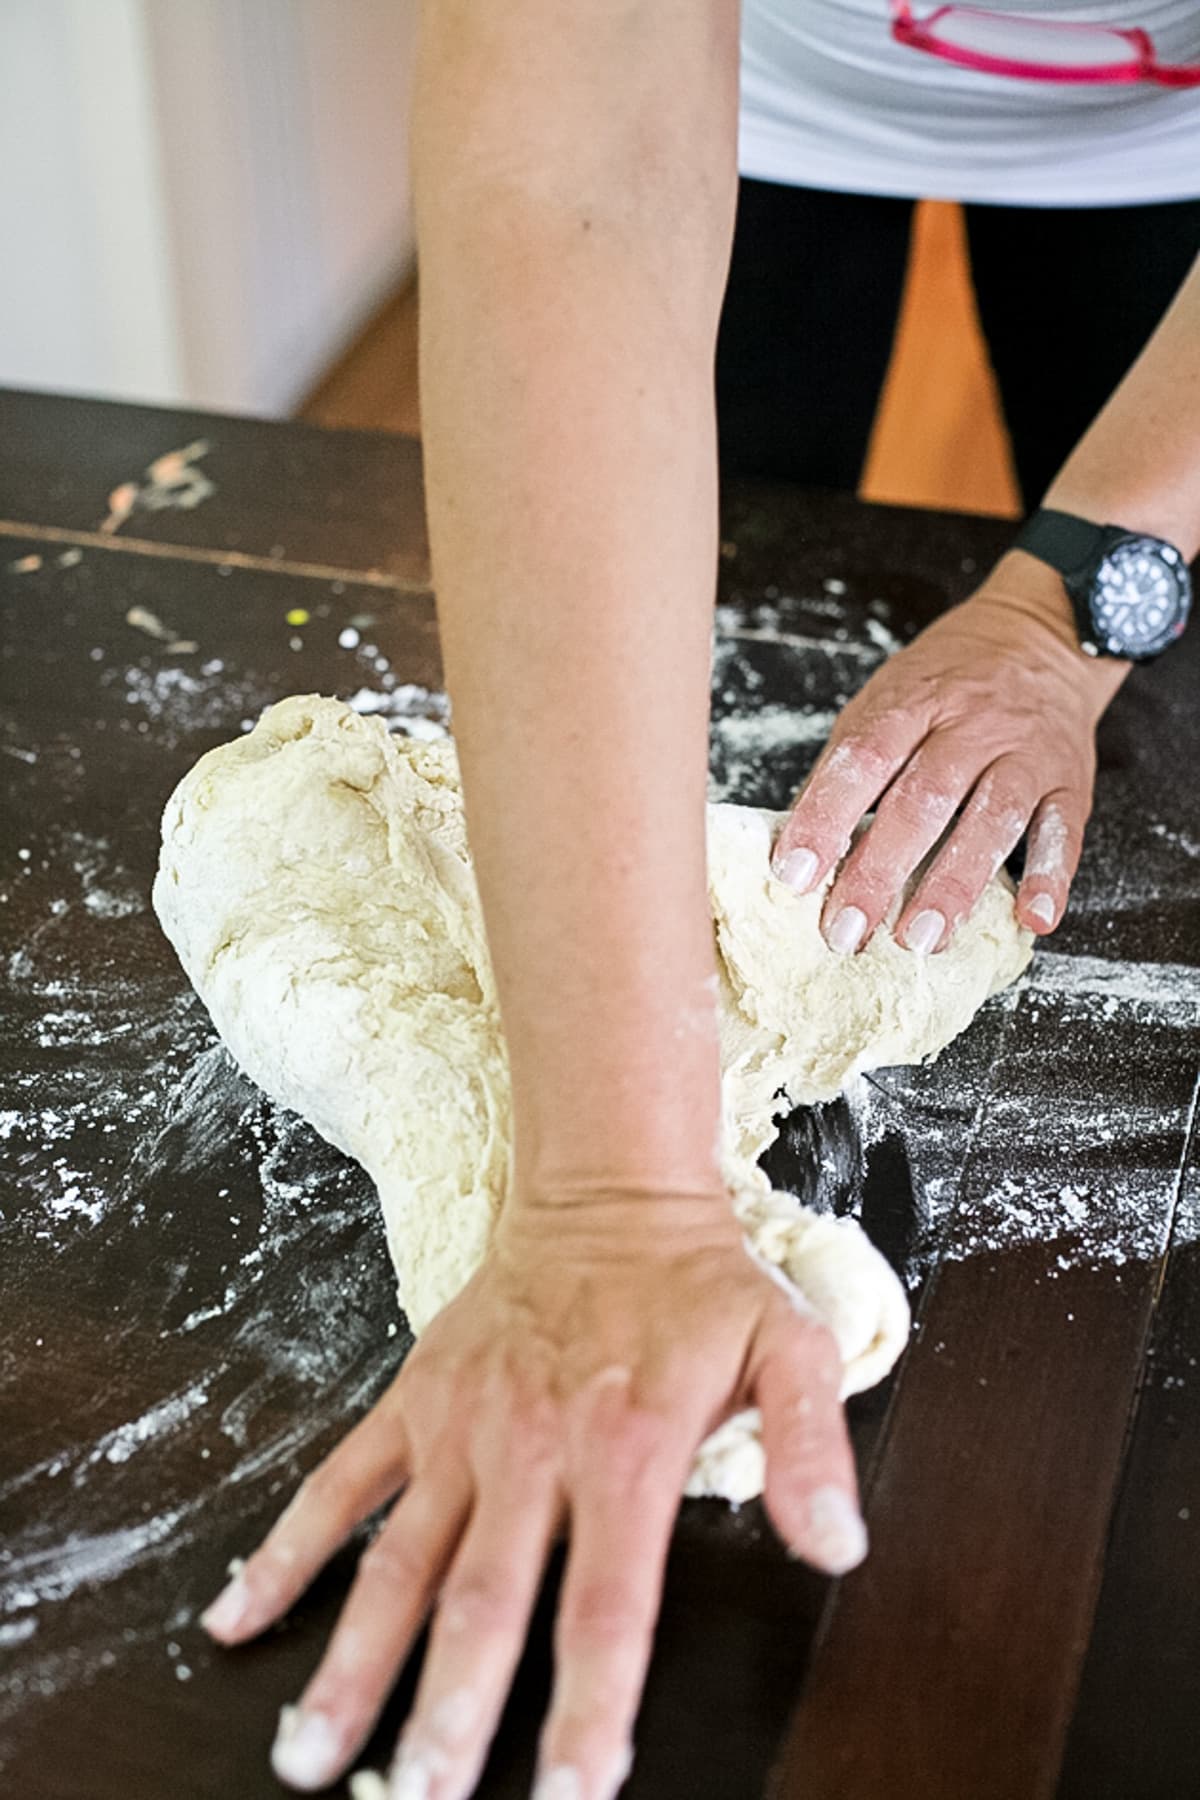
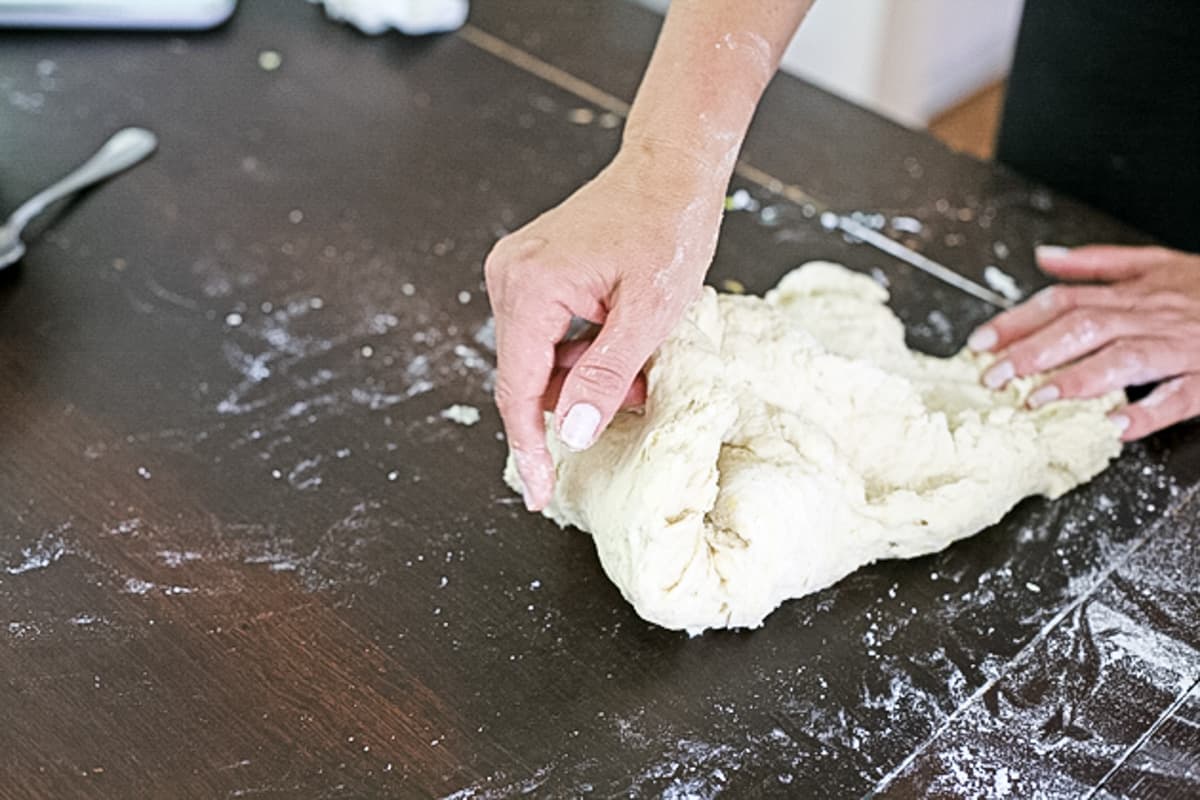
If you are using a stand mixer, let the mixer work the dough for about 10 minutes. If you are kneading the dough by hand, transfer it to a floured surface. Hold the part of the dough that is closer to you with one hand and with the other stretch the dough forward, practically tearing it apart. No mercy here. Then, roll the dough back towards you and stretch it forward again. Roll it back in, and forward again. If the dough is too sticky, add a bit of flour, but not too much, so it doesn’t get too dry. After 8-10 minutes, the dough will become smooth and soft to the touch.
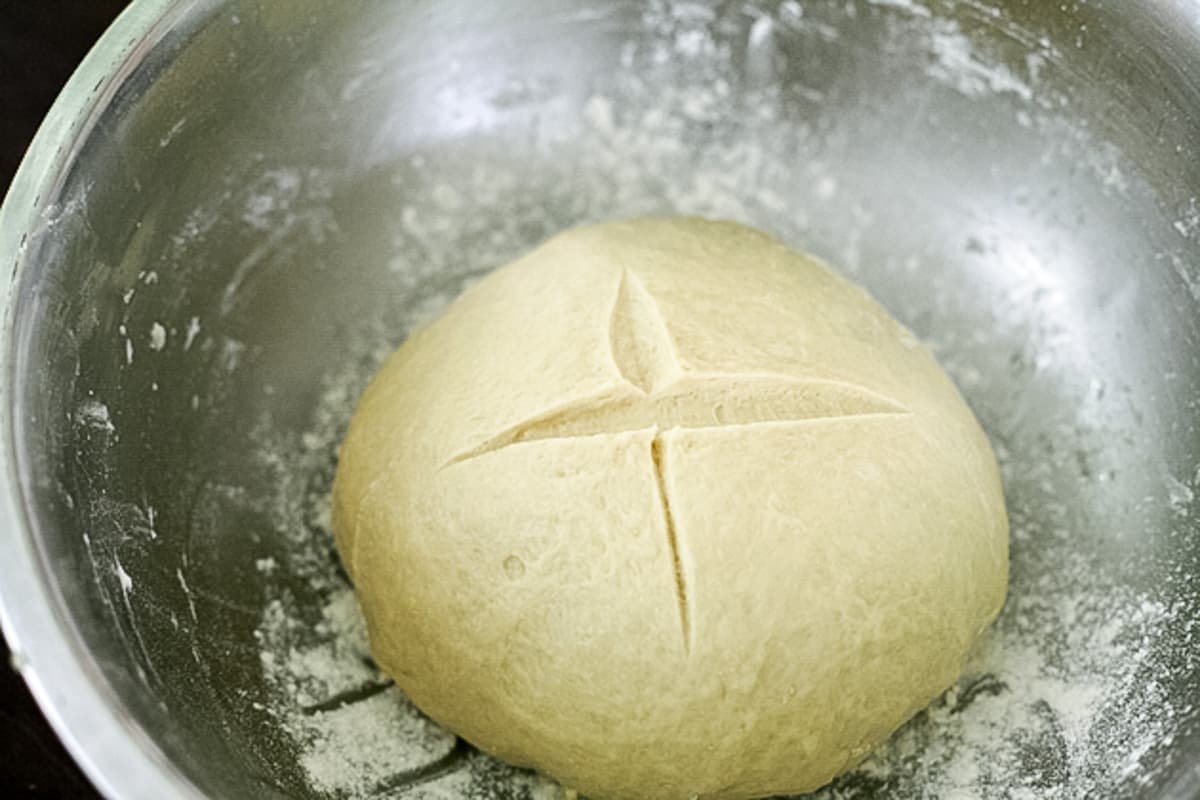
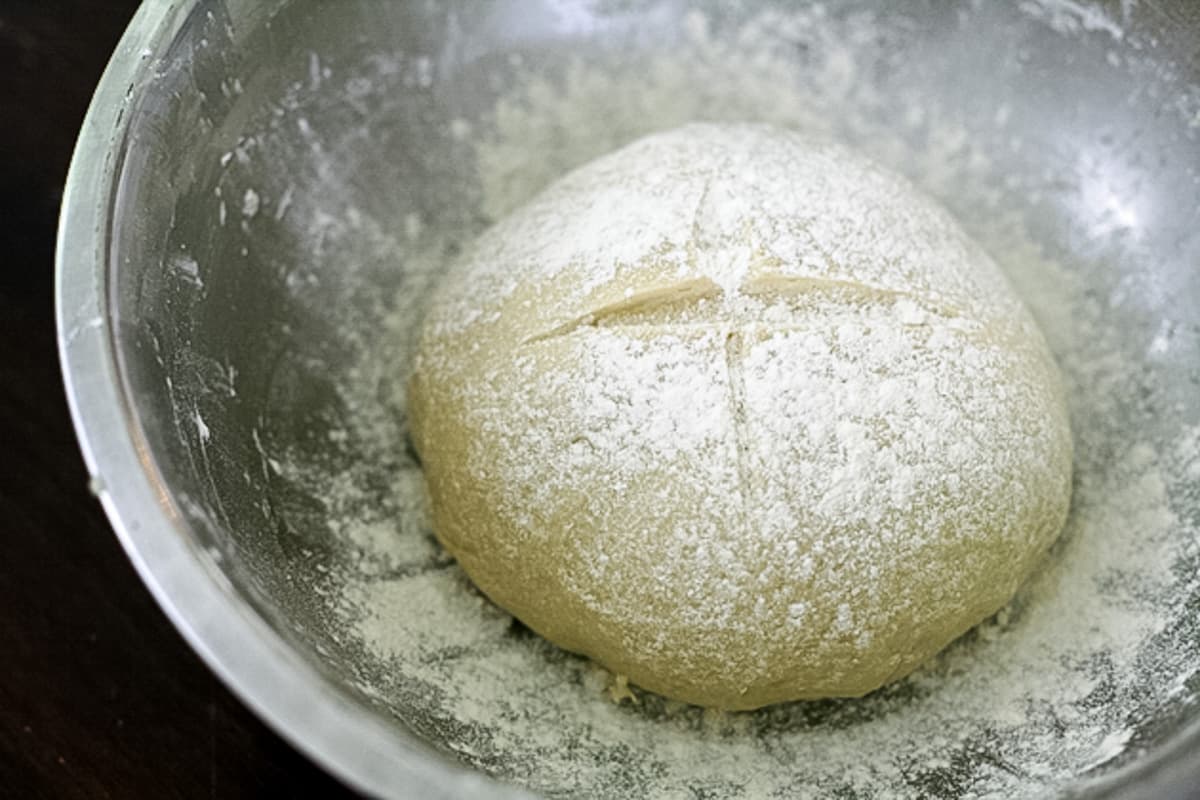
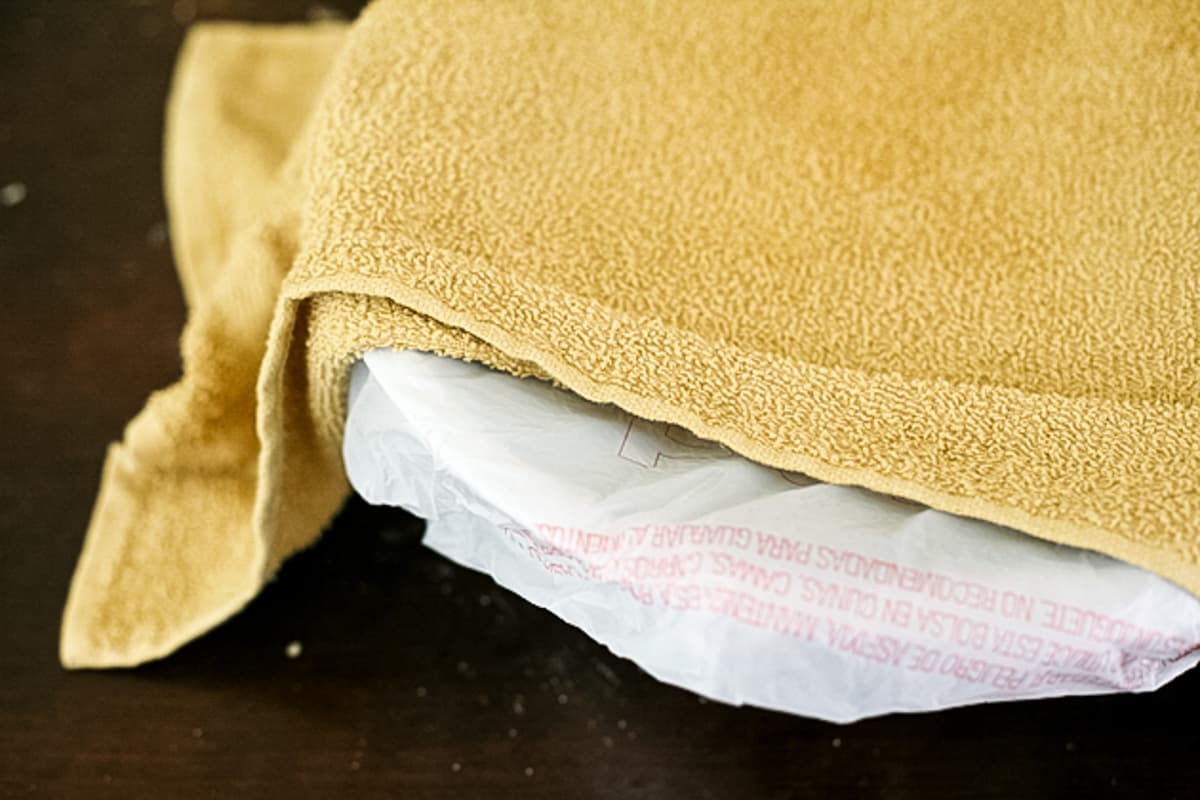
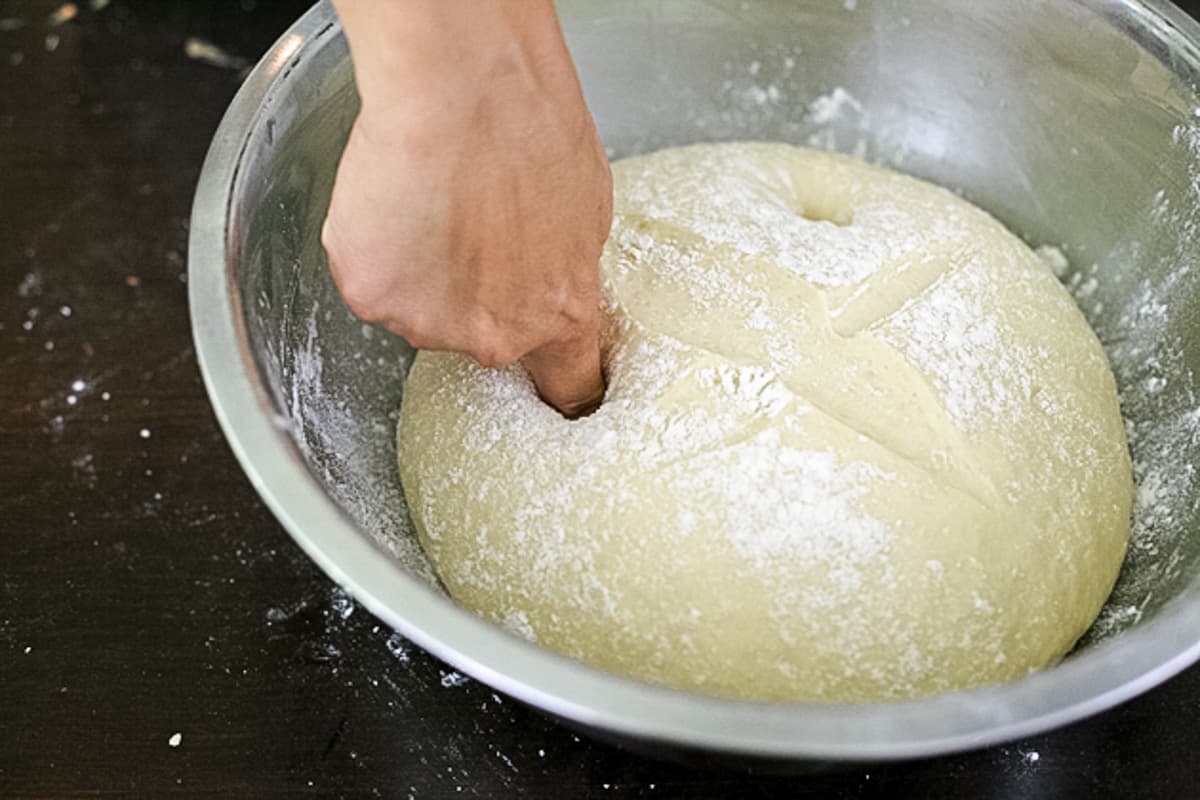
Step three – let the dough rise. Add some flour to the bottom of a large mixing bowl and place the ball of dough in the bowl. Then, with a sharp knife cut an X on the top. This will allow the dough to rise easily. Dust the dough with a bit of flour, cover with a plastic bag and a kitchen towel and set in a warm place to rise for 40 minutes.
Here is how to check if your dough has risen enough (you can do this with any yeast dough). Stick your finger in the dough, pull it out, and if the dough doesn’t bounce back, you are good to go.
How to Make Simple Challah Buns…
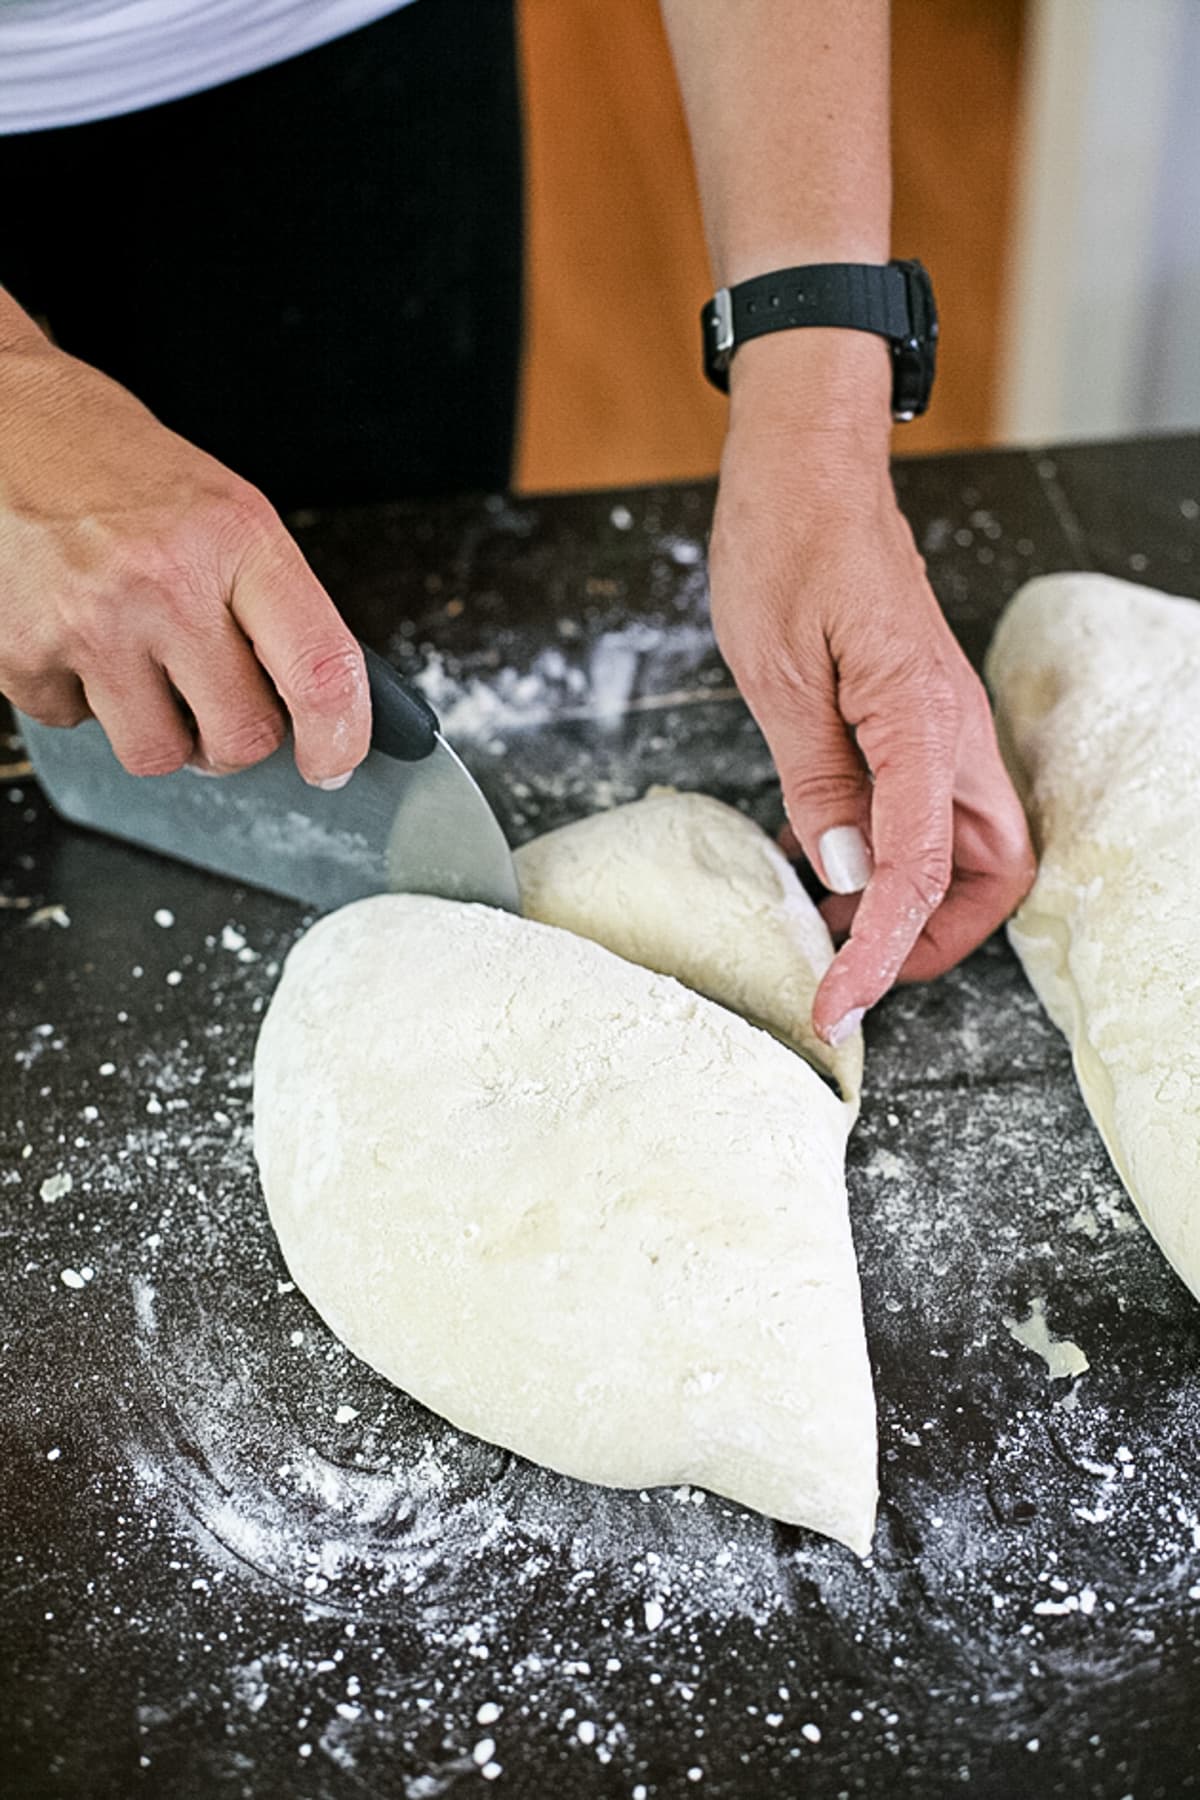
Step four – make challah buns. Transfer the dough back onto a work surface dusted with flour and flatten the dough. Now, start dividing it. The easiest thing to do is divide the dough into three or four equal parts and make large loaves. However, you can divide the dough any way you want depending on the size of the loaves or buns you want to make.
If you want to make buns, you have a couple of options… You can go ahead and make simple round challah buns or you can get a bit fancier and learn how to make some cool designs (skip over to the “Setting Up For Fancy Challah Buns” section below).
If you are going to make simple, small challah buns, divide the dough into two equal parts (make sure to weight the parts of dough so you know that they are equal), then each half to two again, then each part to three. From each of those pieces (should be about 50-80 grams or so) you can make a challah bun.
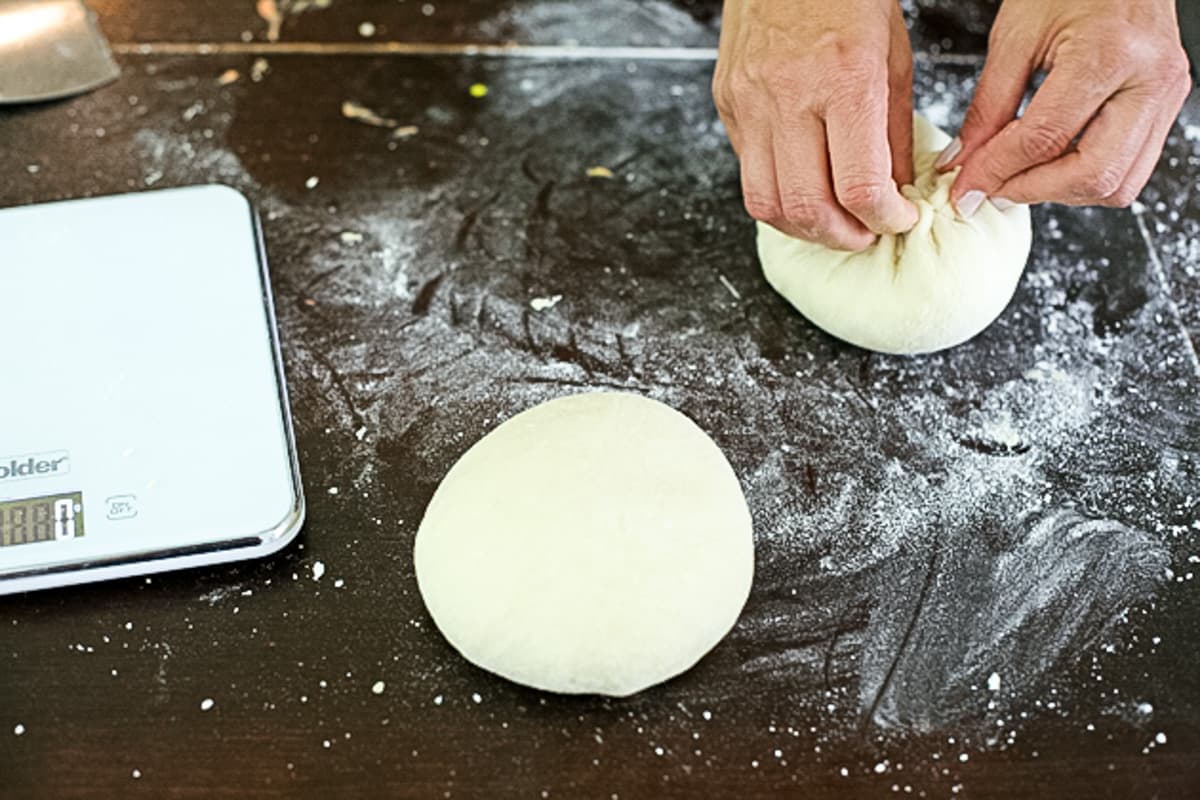
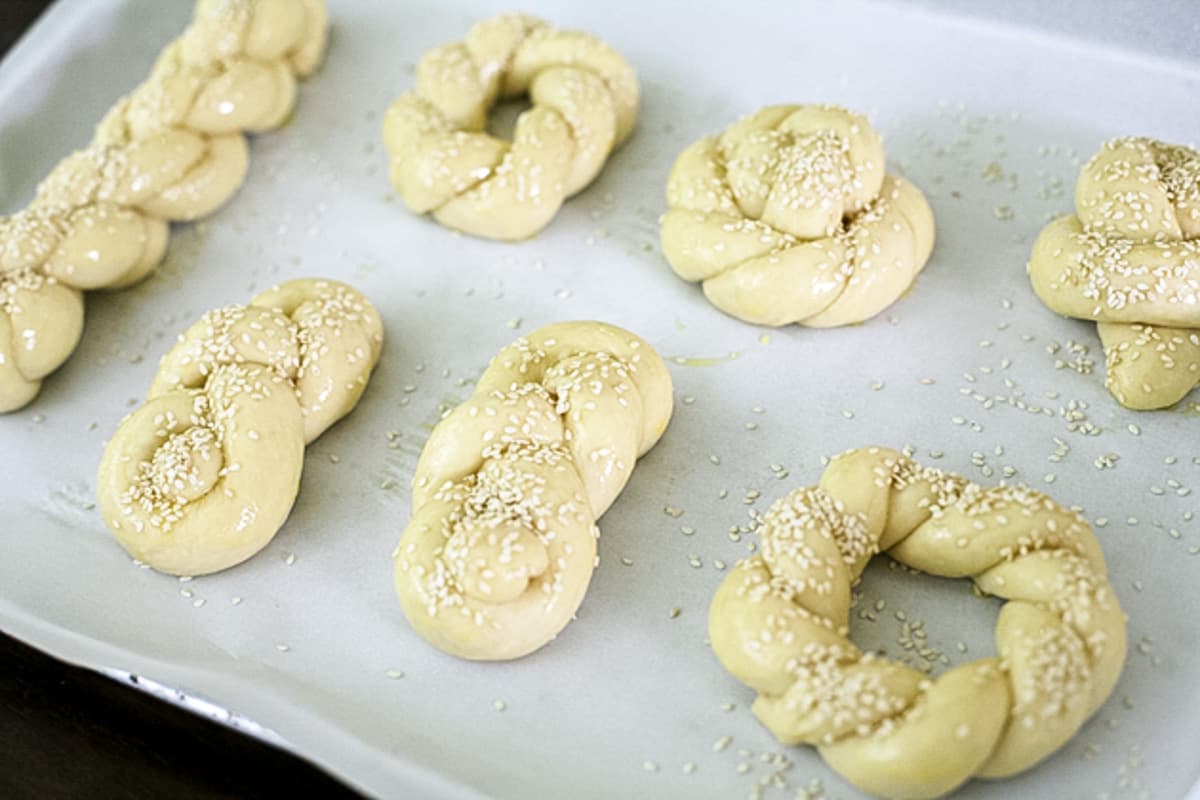
Roll each piece into a ball like you see Nava doing in the image above, close the ball at its bottom, and place it on a baking sheet lined with parchment paper. Make sure to leave some space between the buns. Cover with a towel and let the buns rise for 30 minutes in a warm place.
Setting Up For Fancy Challah Buns…
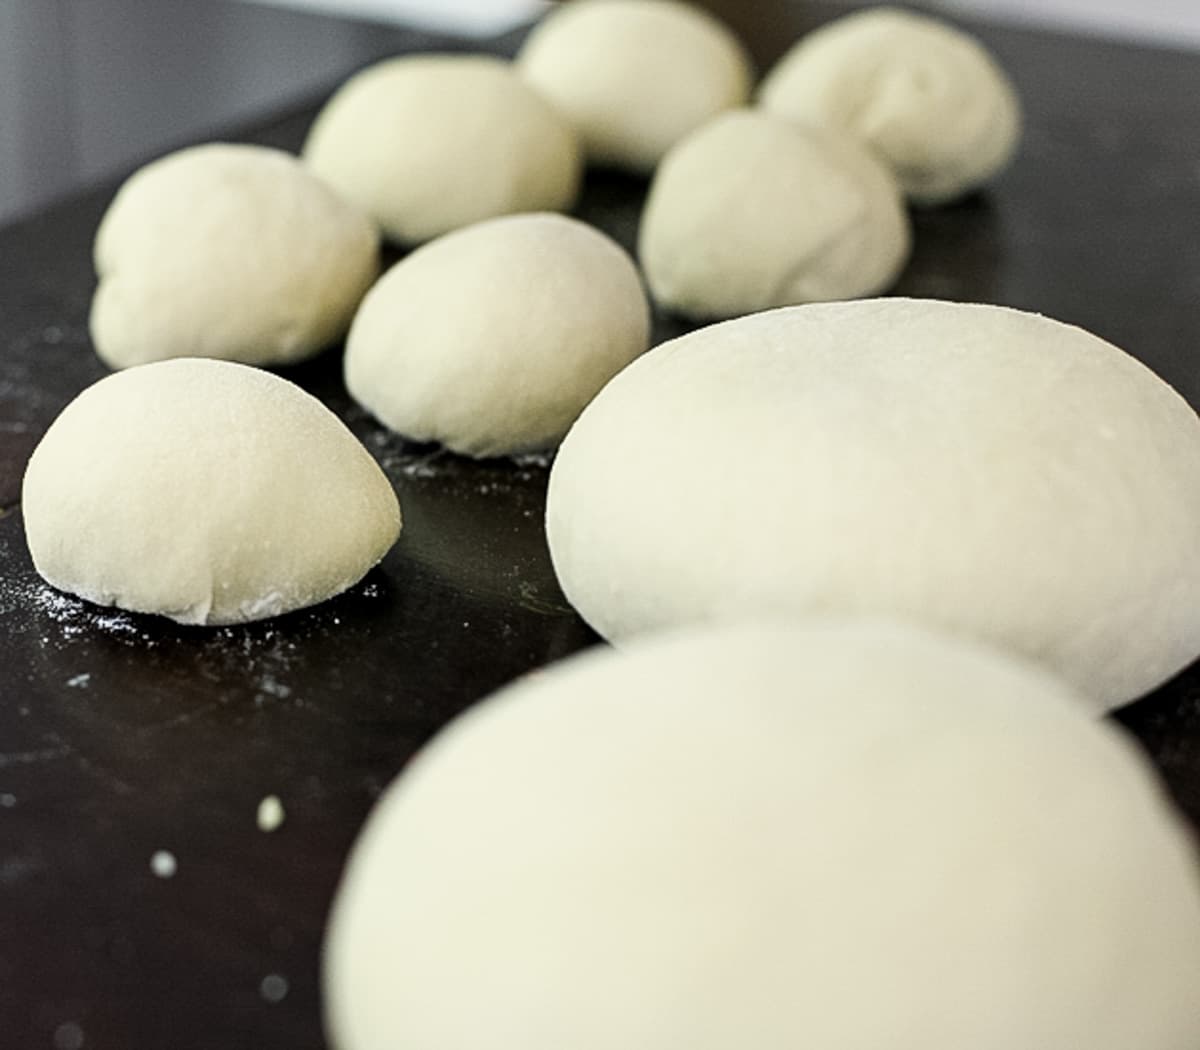
Now if you decide to make some fancy challah buns, it’s time for the fun part! You can make these buns as big or small as you want. We divided the dough into 100-gram pieces. Make a ball from each piece and set it aside.
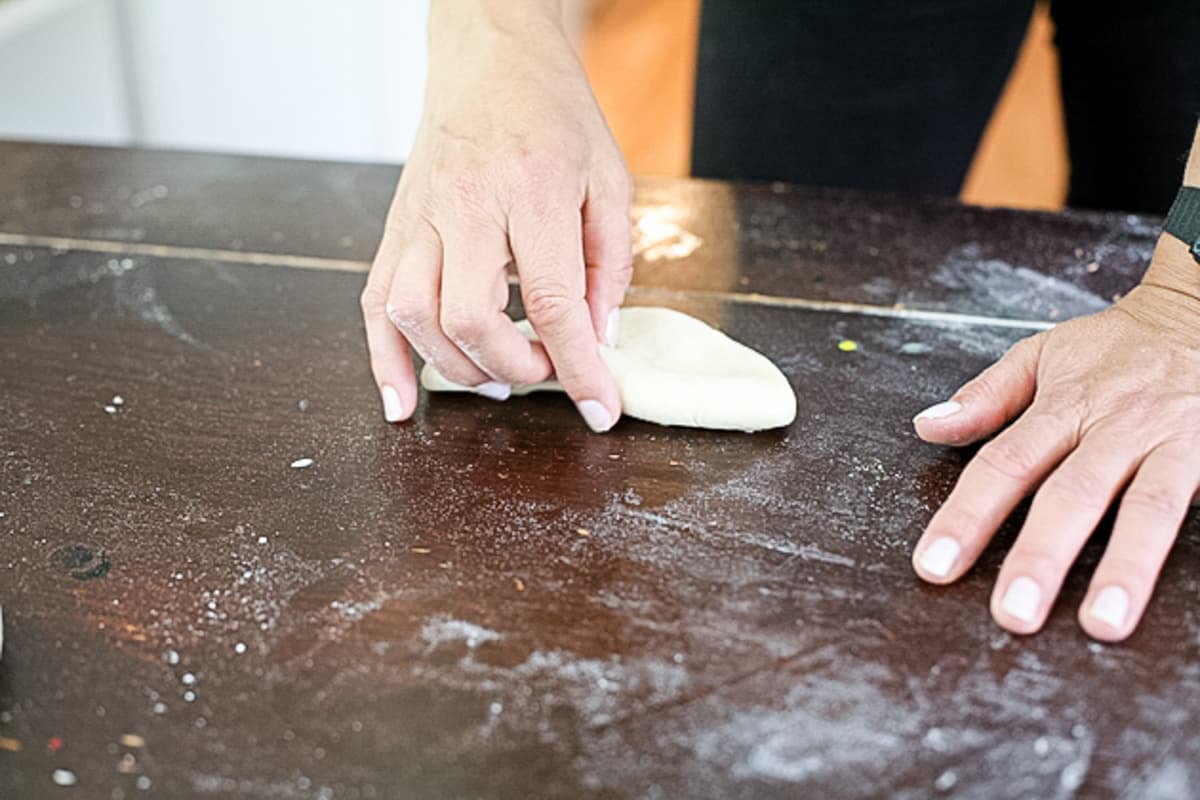
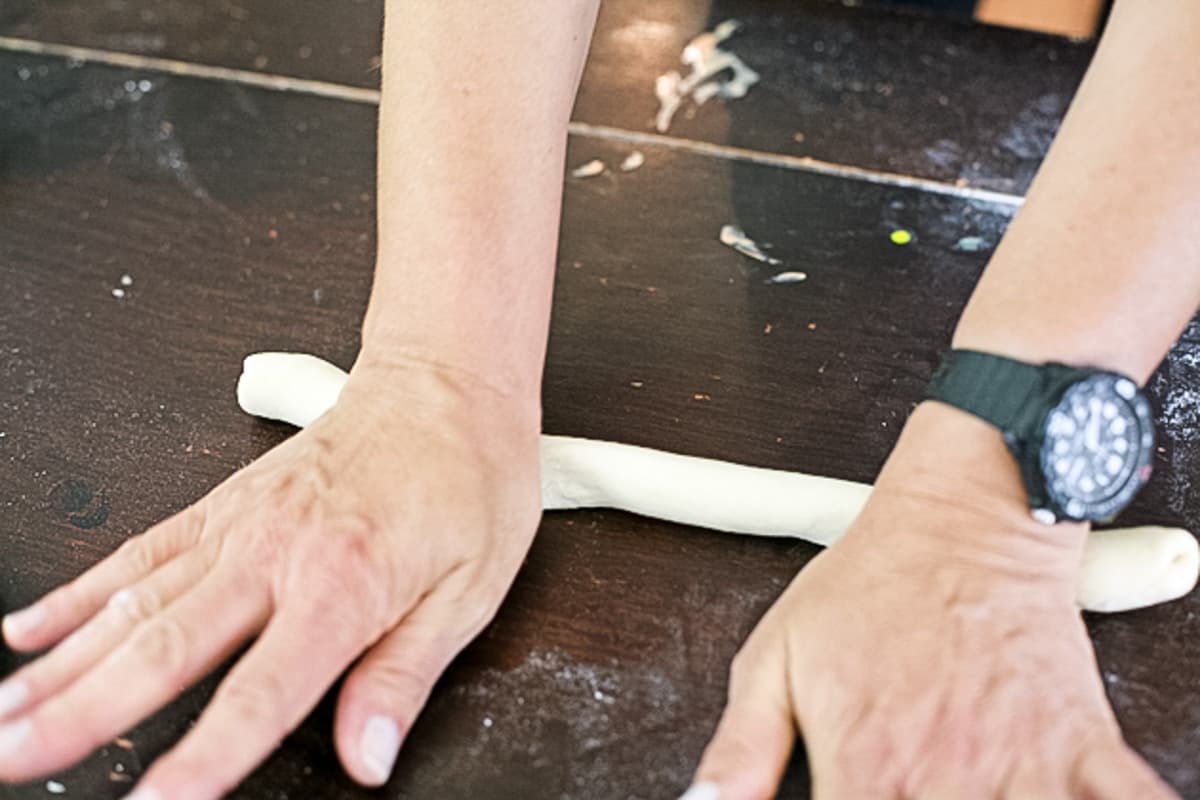
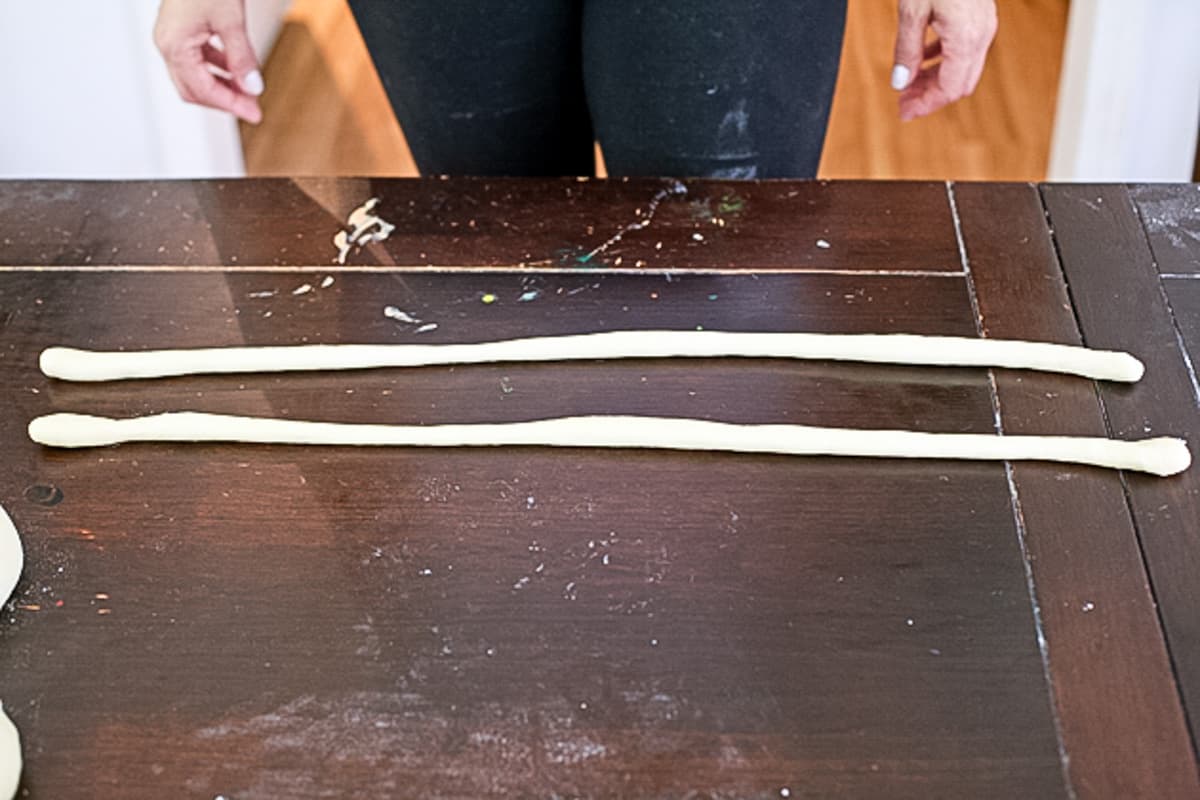
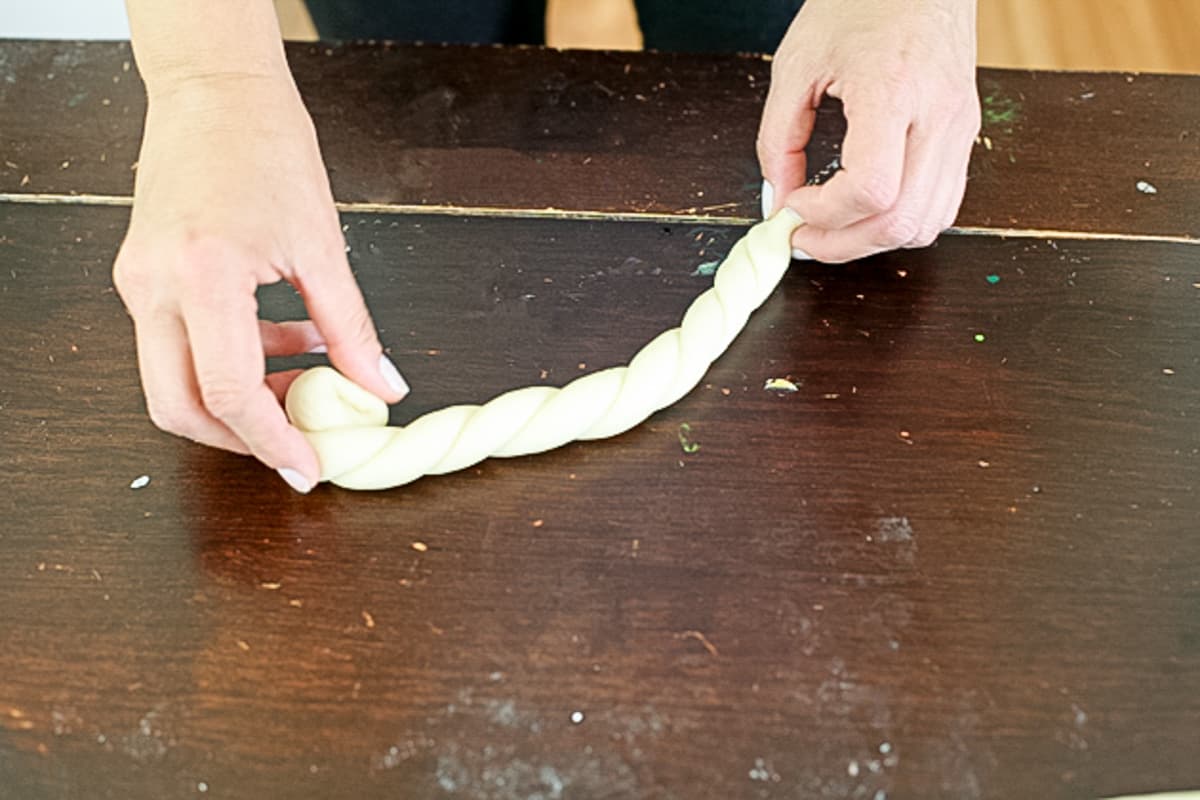
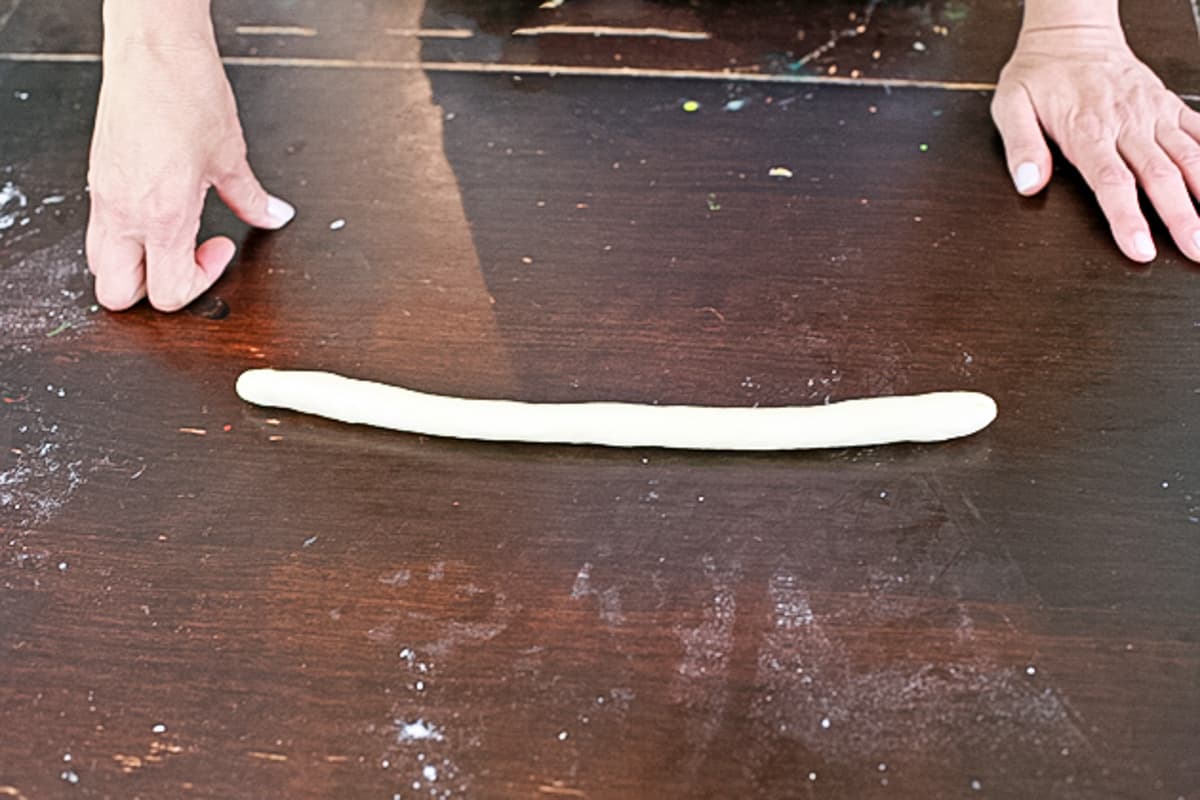
Take one ball and flatten it. Then work it into a dough strand. As you work it, don’t get frustrated. What will happen is that you’ll try to stretch and roll the dough into strands, but it will keep bouncing back. The dough will refuse to stretch. Always work with two pieces of dough, work one a little bit then let it rest and work on the other one. Let the second one rest and go back to work on the first one. Do that a couple of times, and you’ll get your strands. Making strands of dough is the beginning point of all the five different braiding techniques.
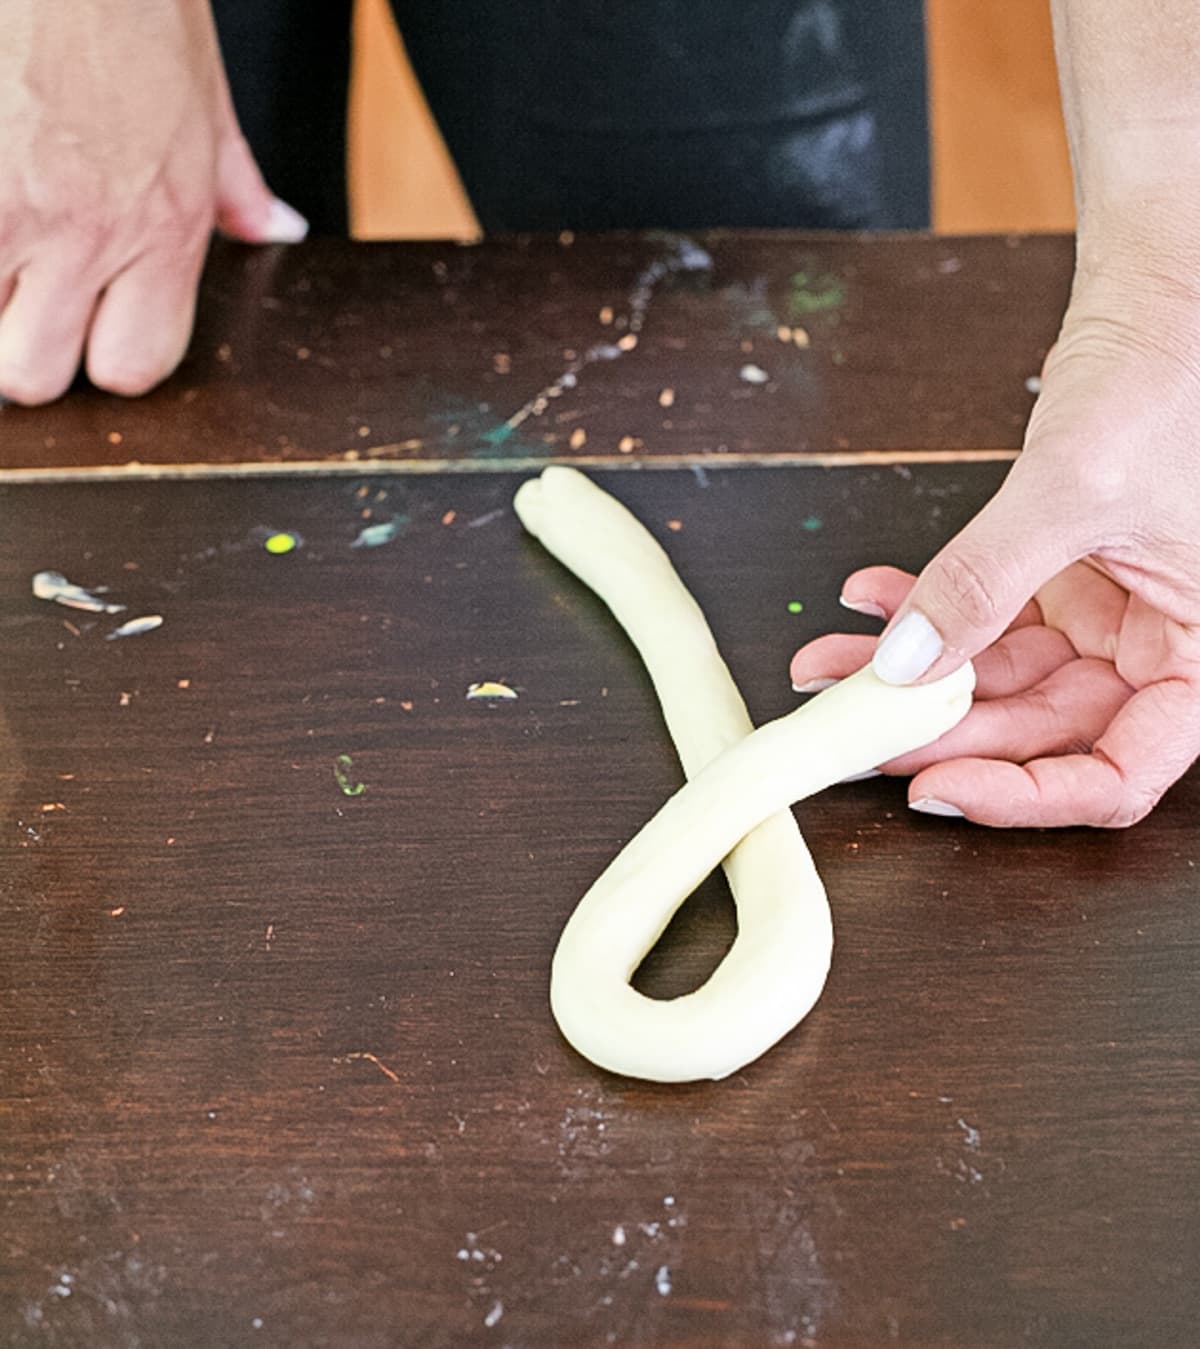
The Challah Ring Bun…

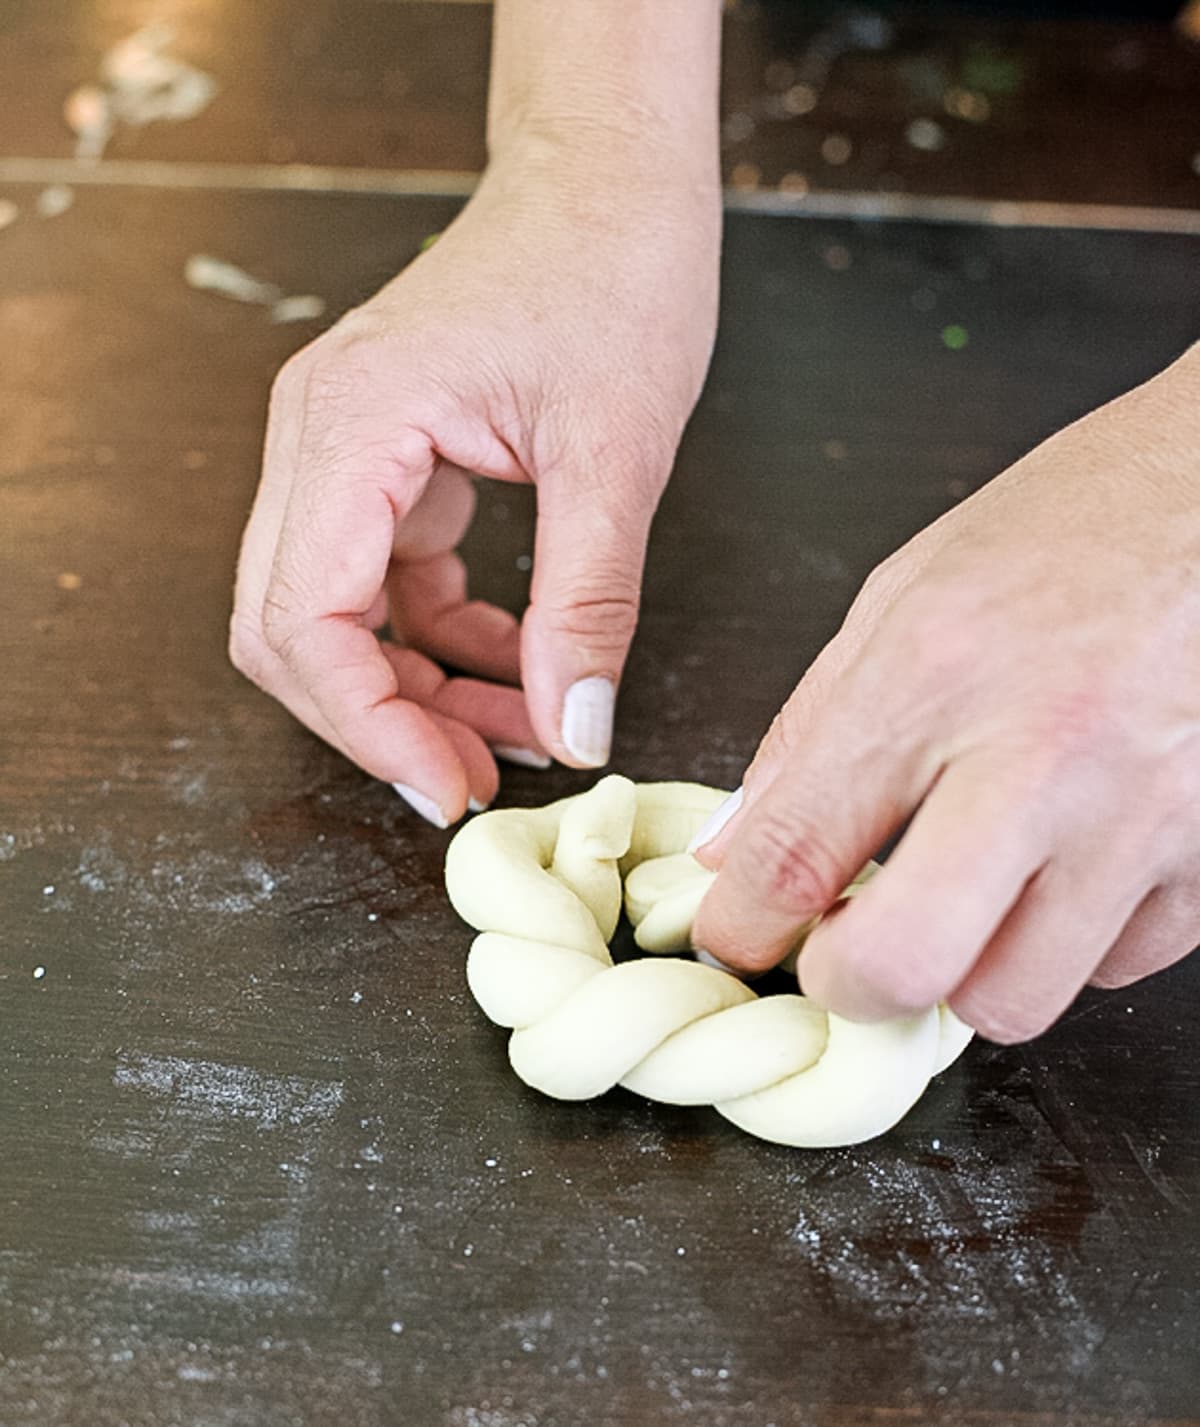
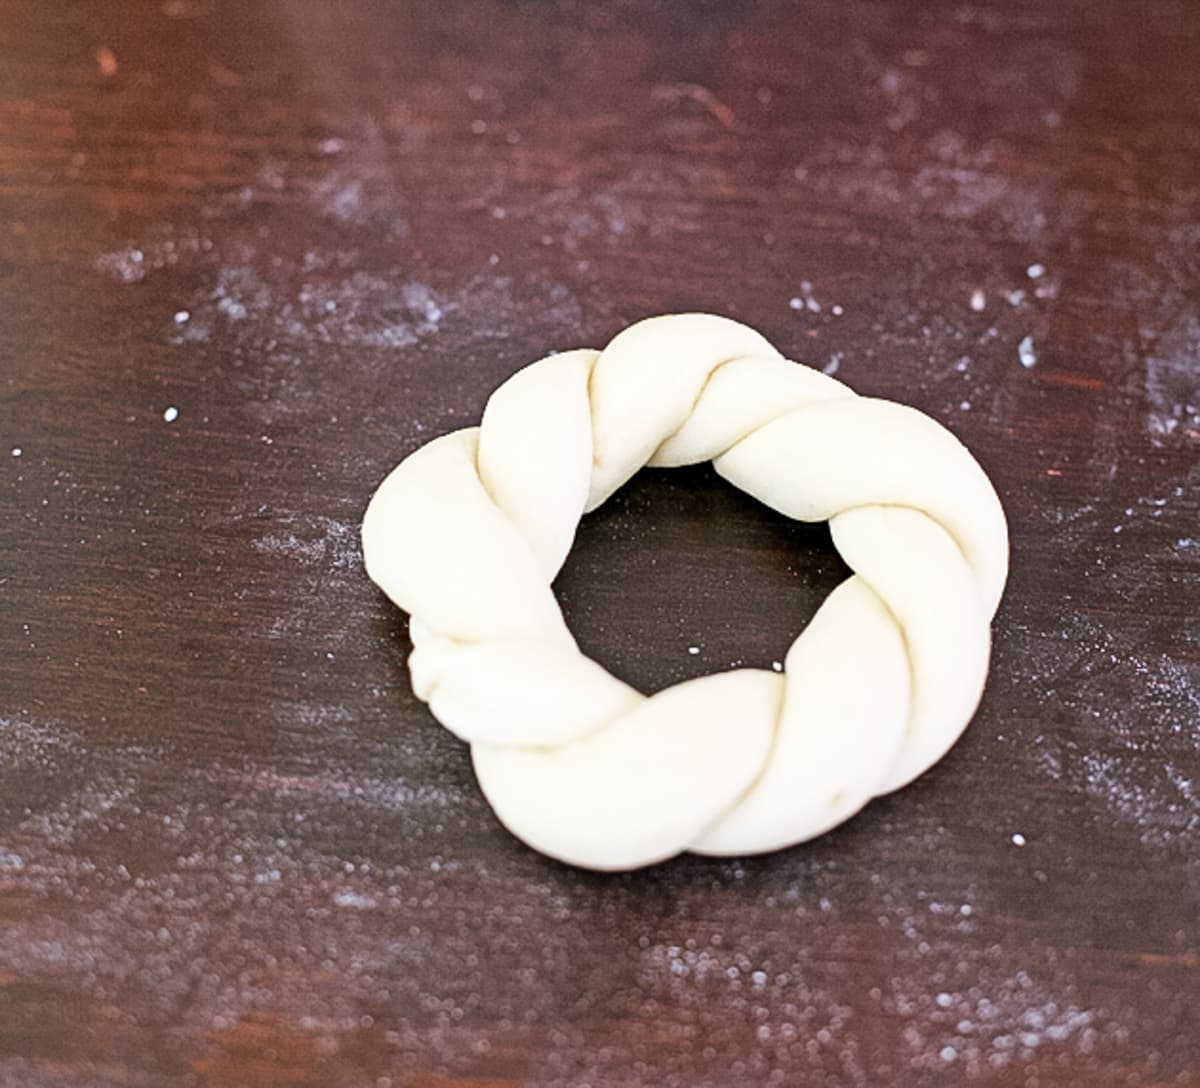
Shape the long piece of dough into a breast cancer awareness symbol, then take each one of the ends and wrap it around one side of the upper loop until they meet. Pinch the ends together… And voila! You have your first braided bun ready. That was easy, right? Set it aside on a baking sheet.
The Rose Challah Bun…
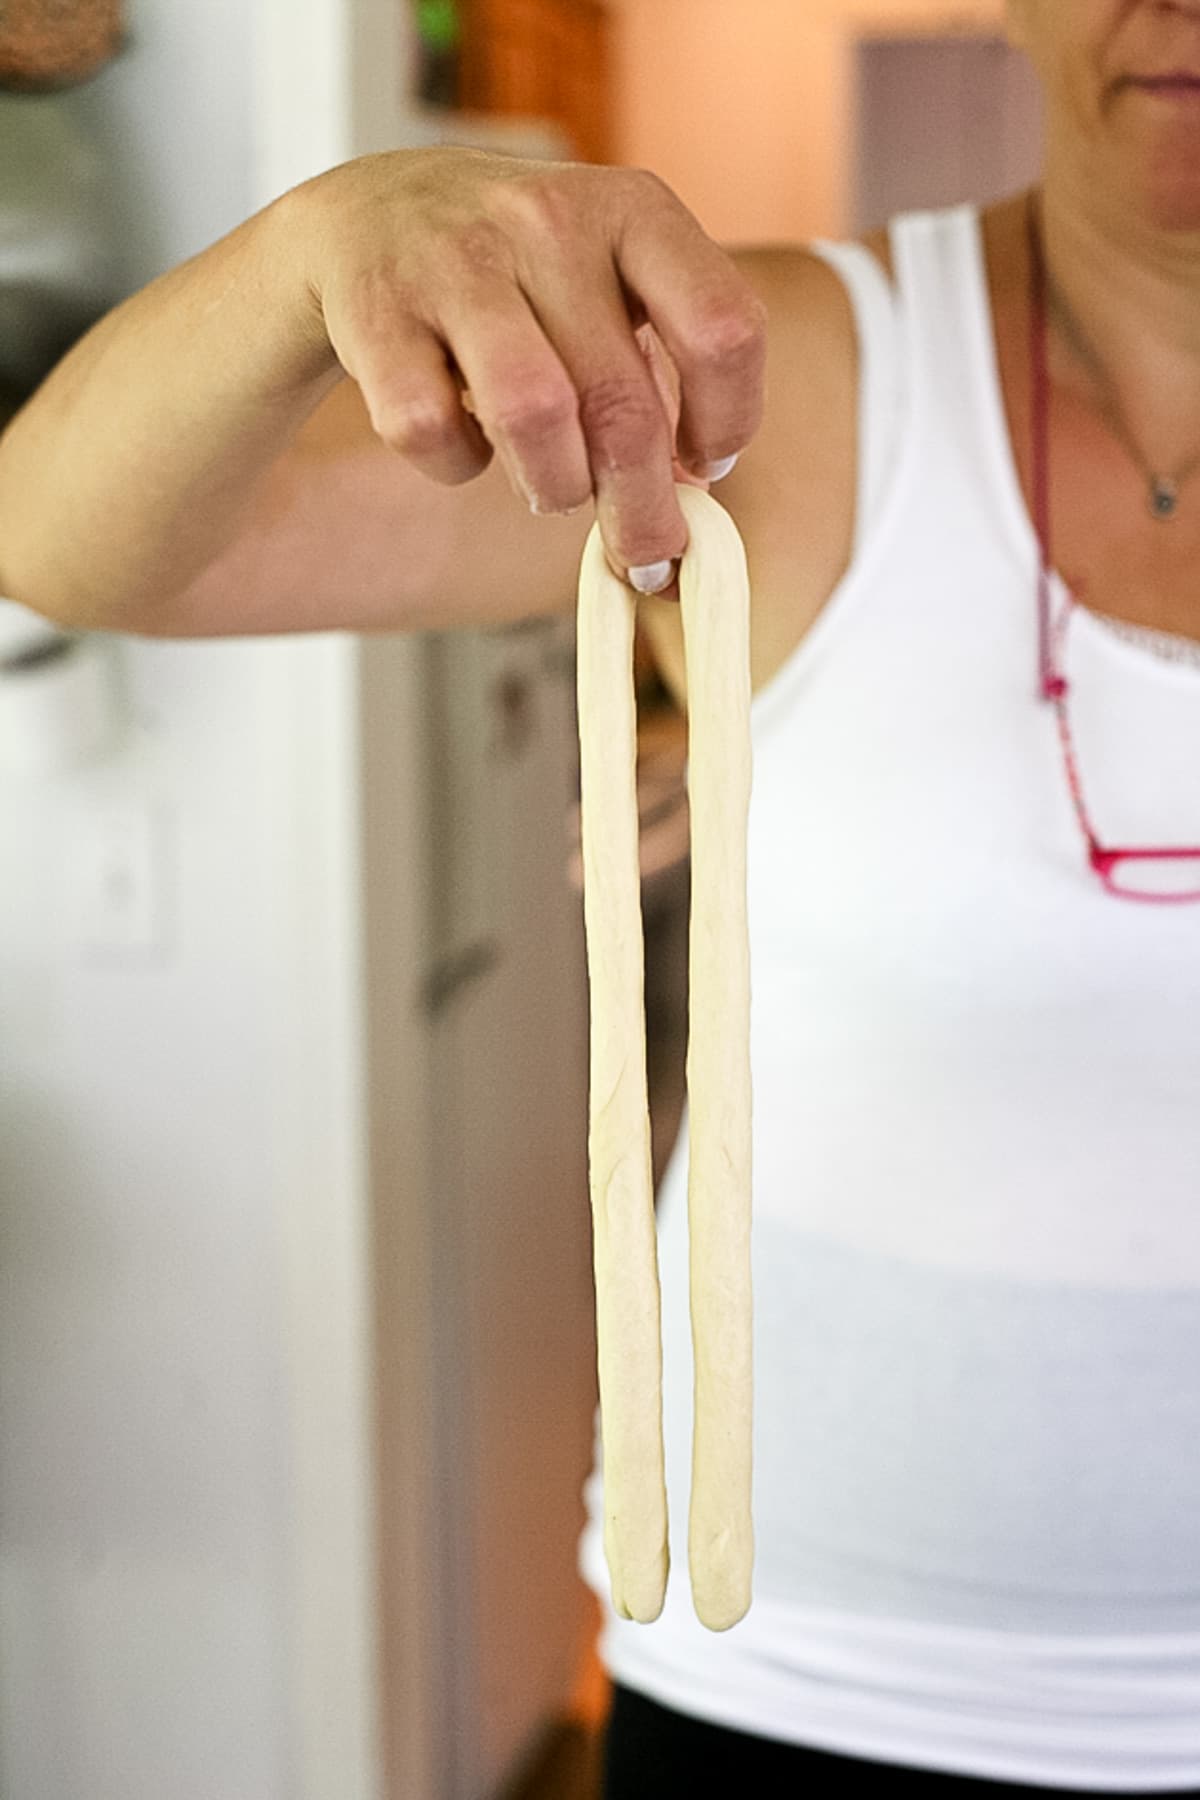
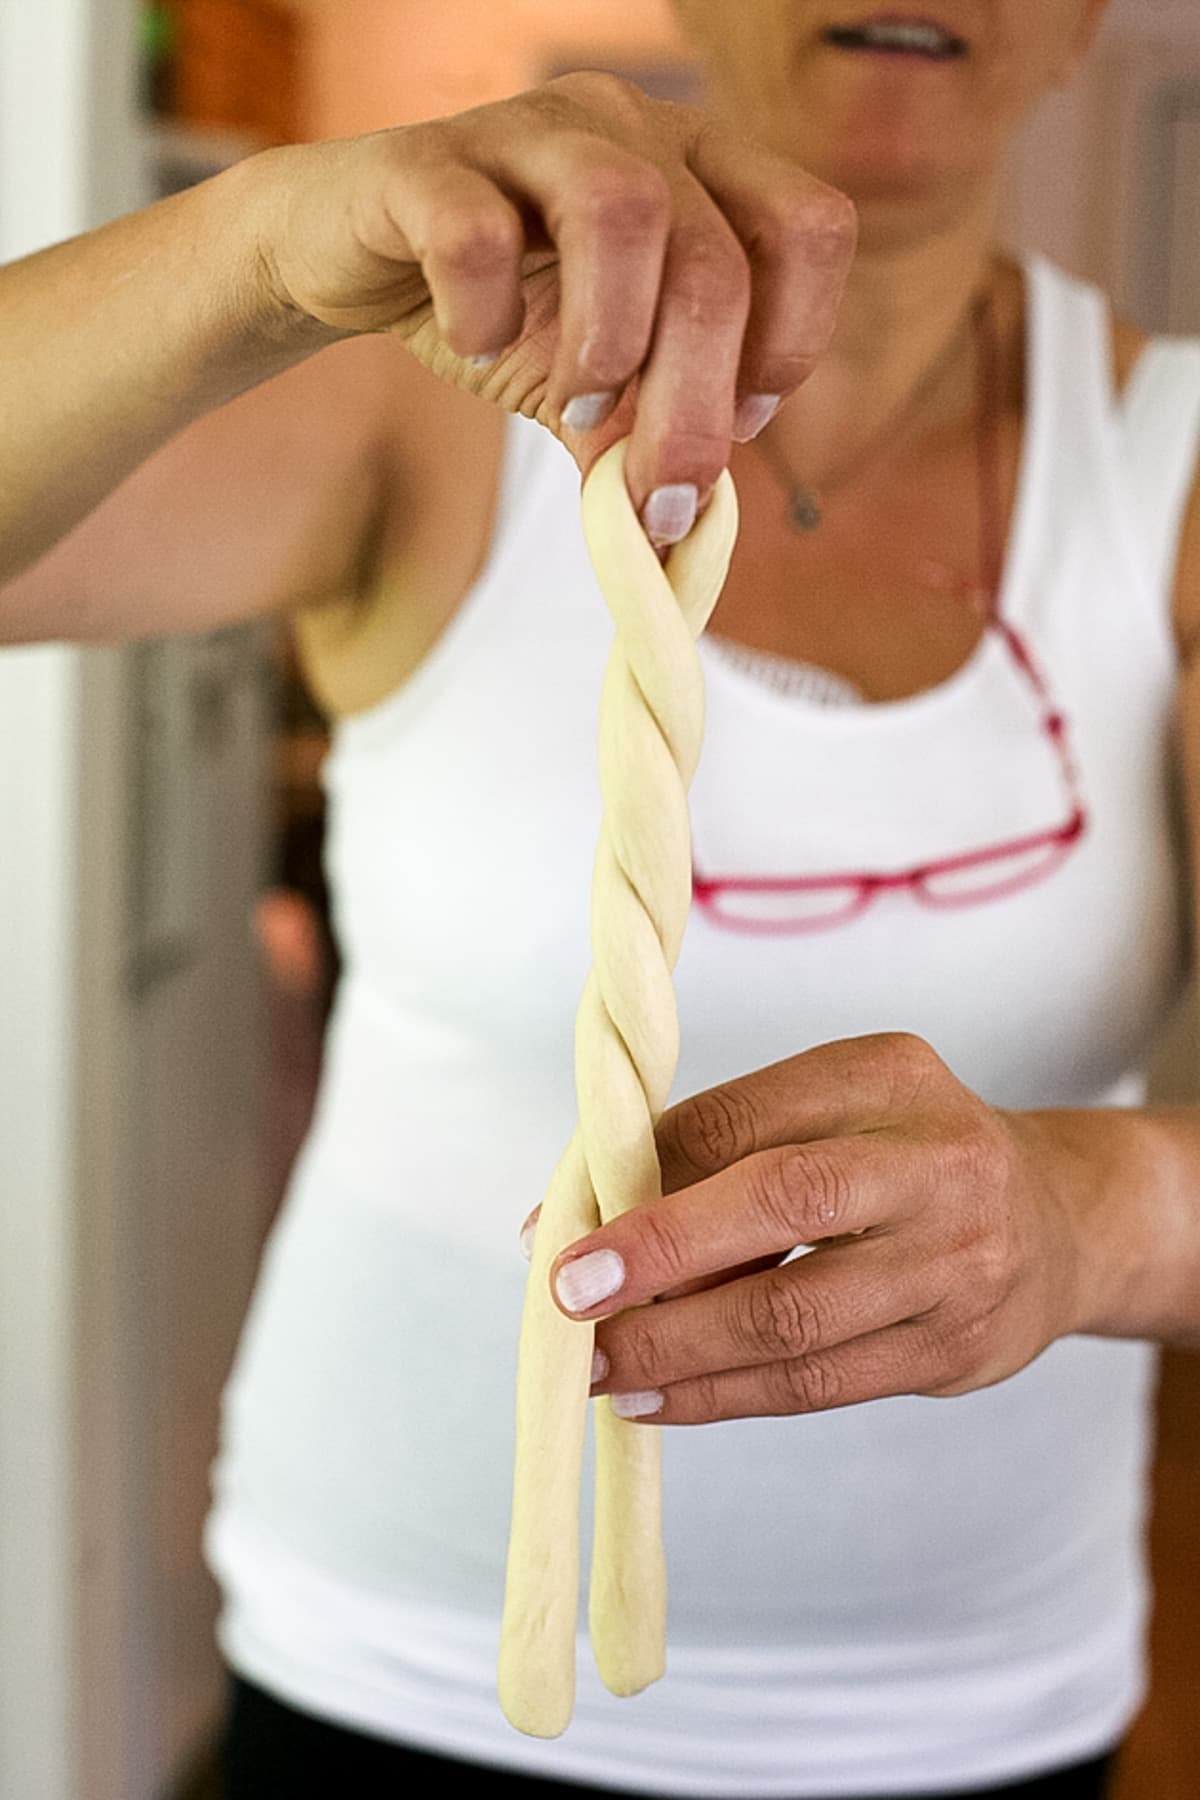
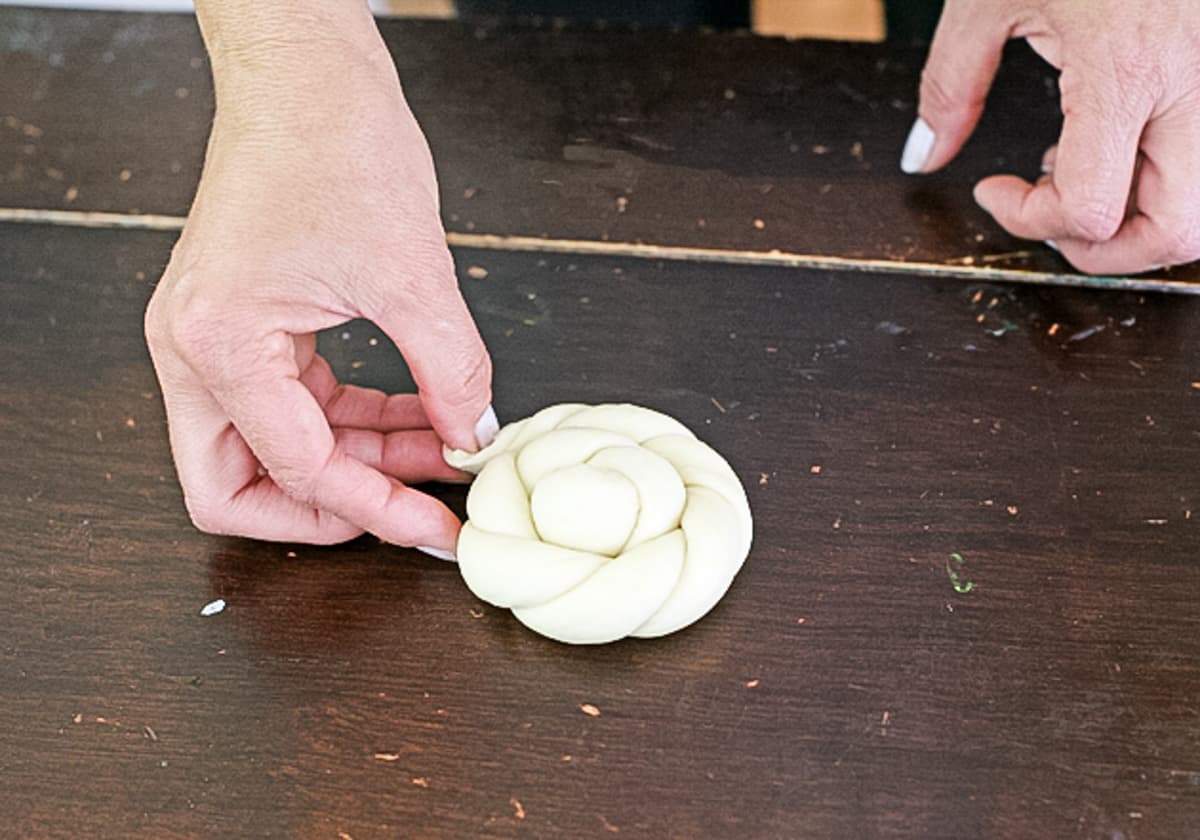
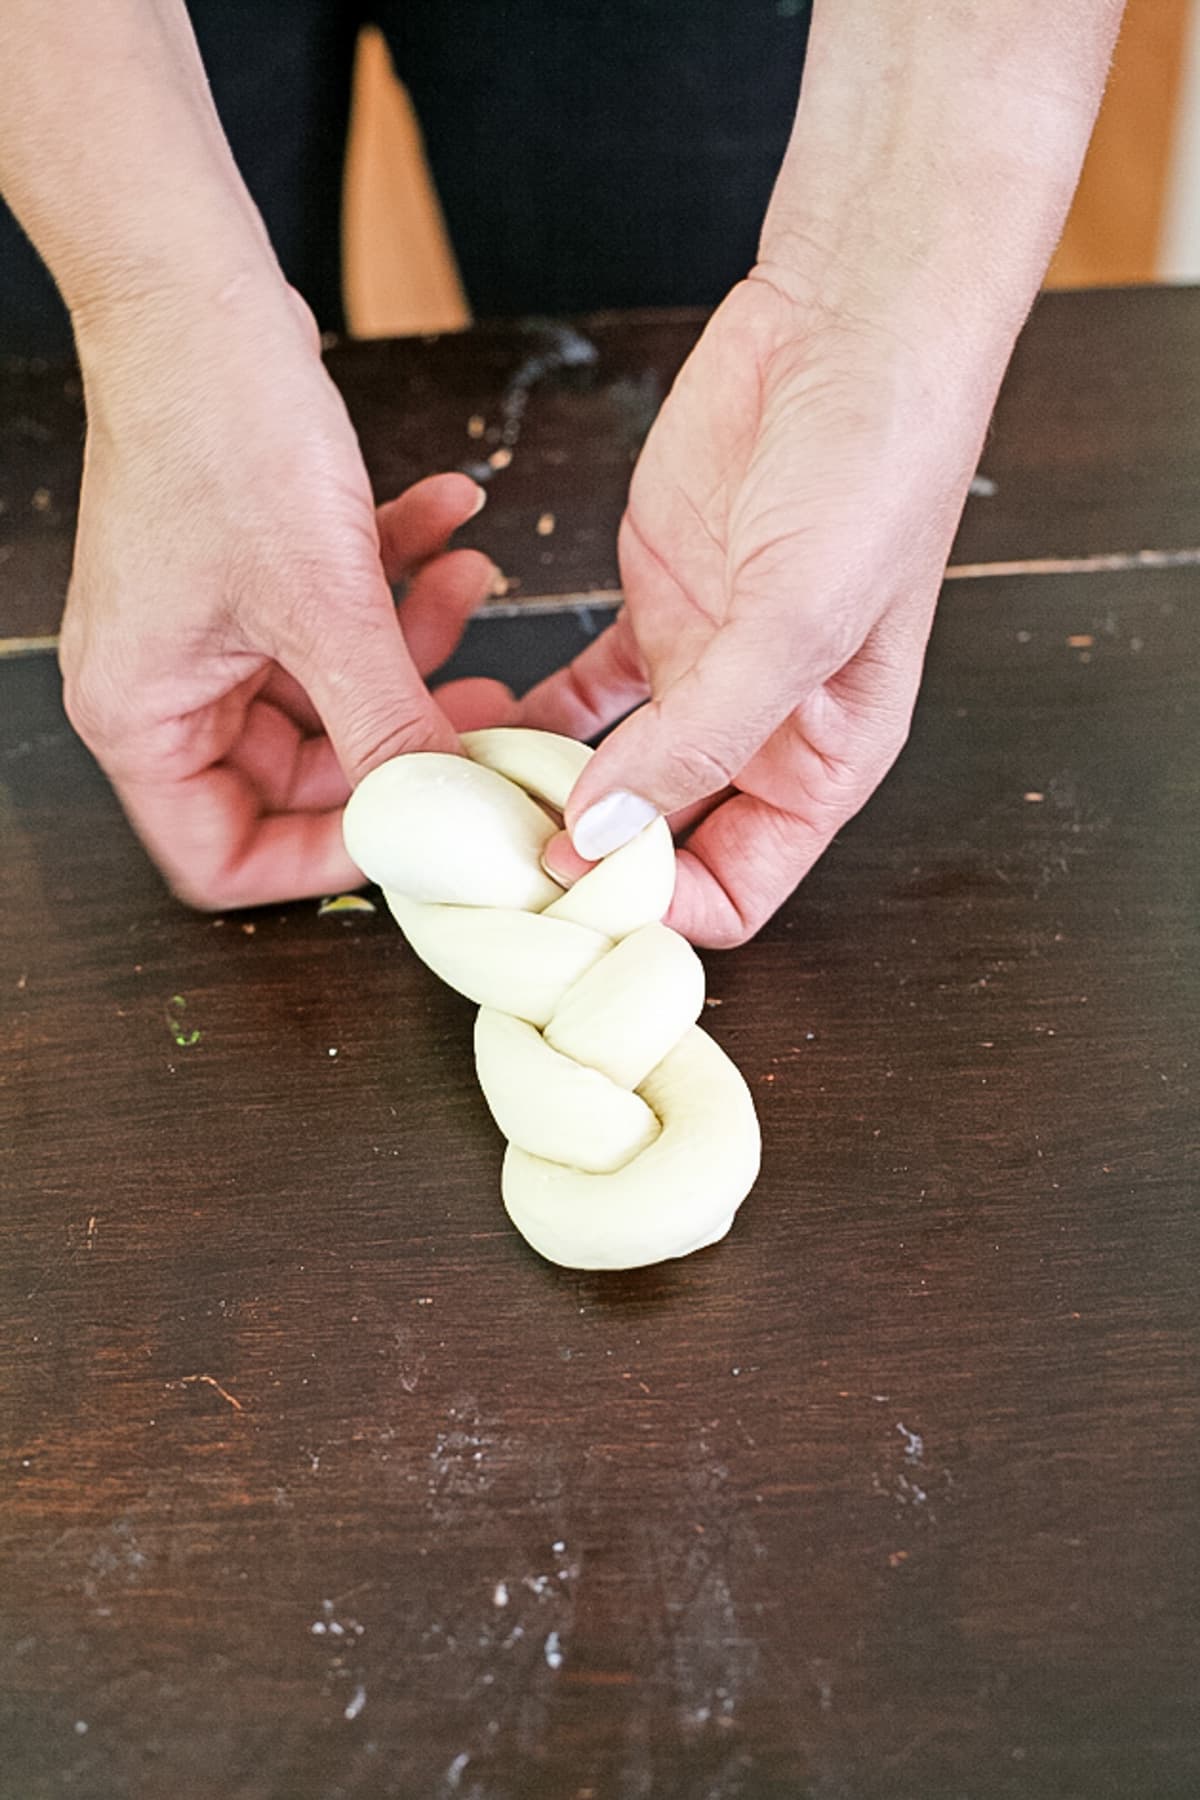
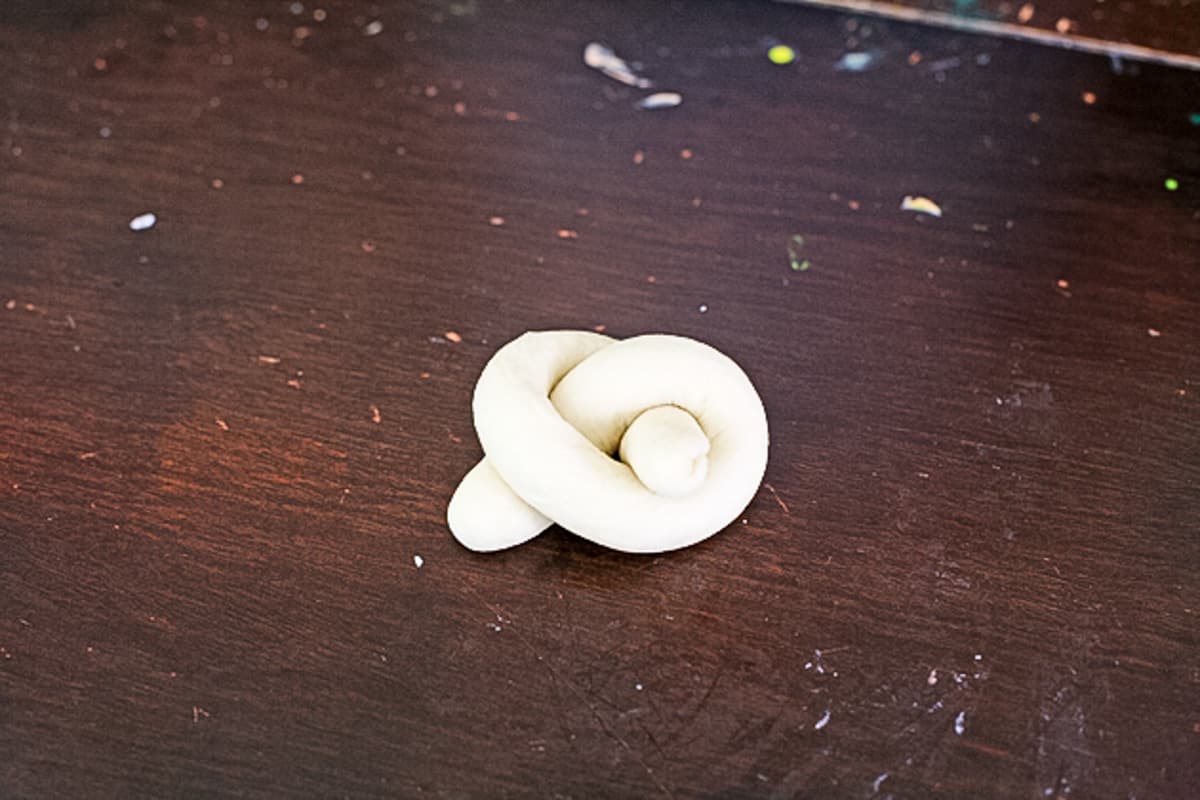
Again, you start with one long piece of dough. Lift this piece from its center so you have two equal lengths dangling in the air. Next, wrap them around each other. Set the strand on the table and, starting with the closed end, roll the dough around itself. Tuck the end underneath the ‘rose’ and set it on a baking sheet. This technique might be my favorite one. It’s beautiful to do a big loaf this way as well as small buns.
The Fake Eight Challah Bun…
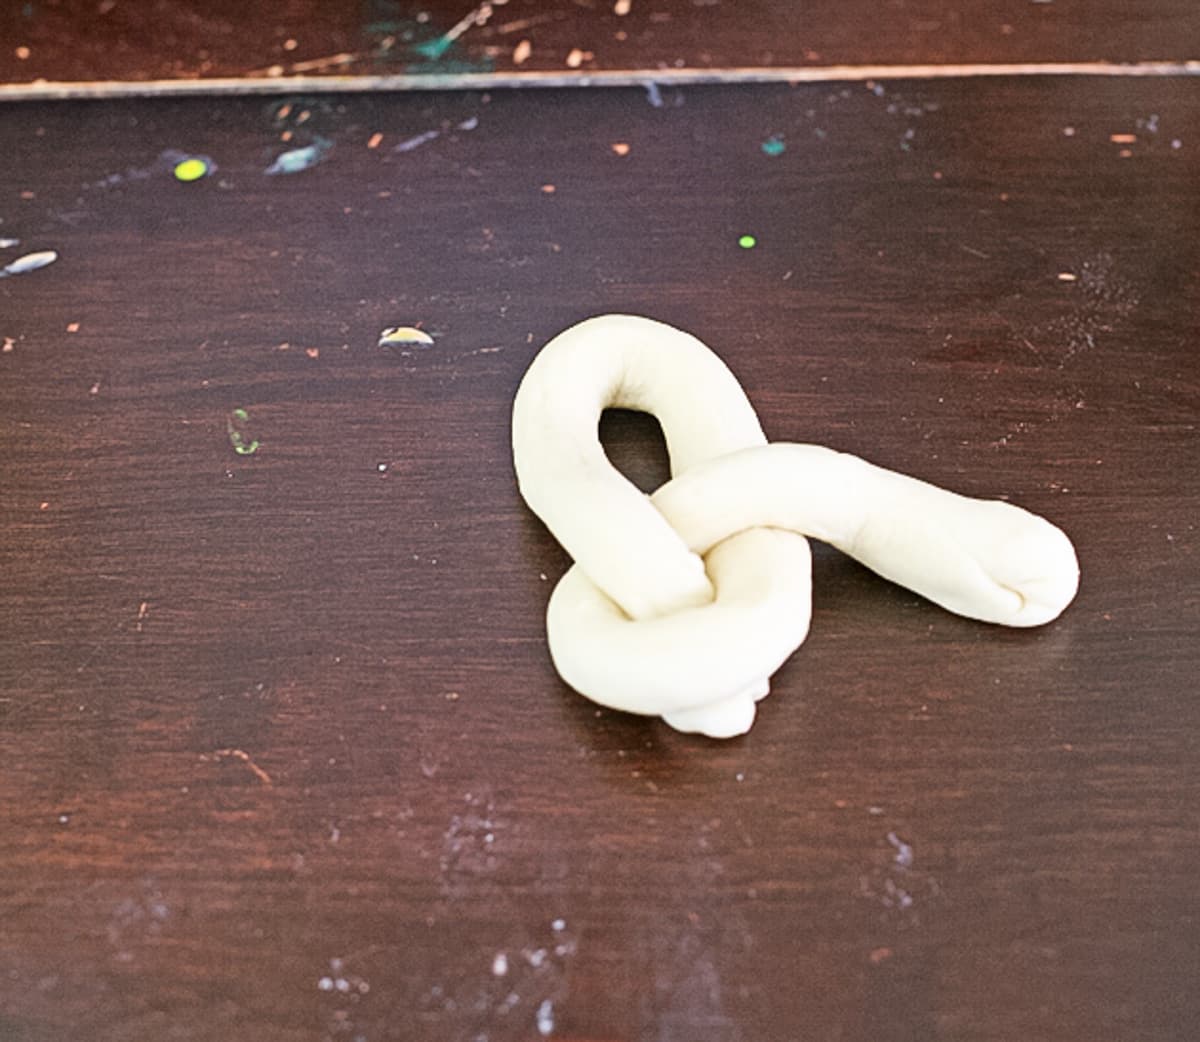
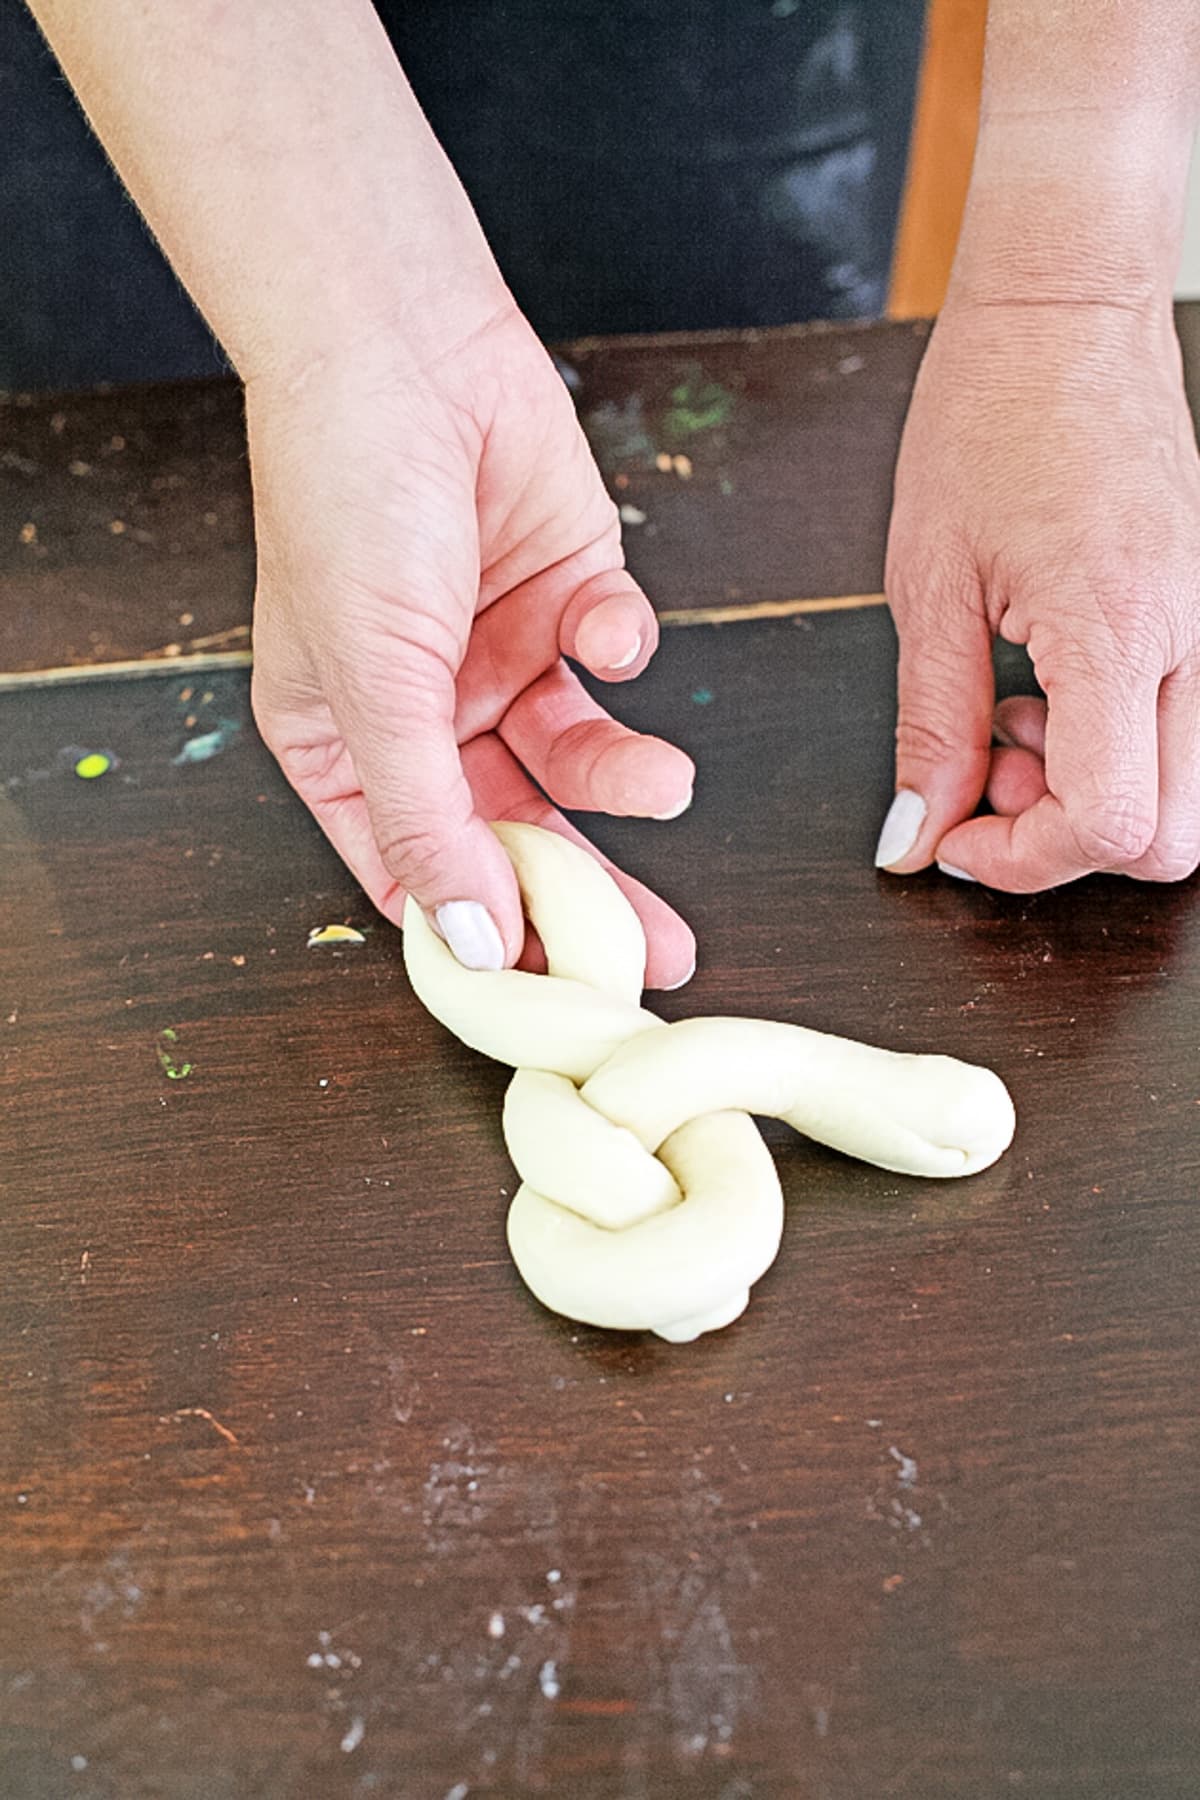
Again, start with one long piece and shape it into somewhat of a breast cancer awareness symbol but this time the loop should be smaller and one end shorter than the other one. Tuck the tip of the longer end into the loop. Twist the new loop that was created after the previous step, and lastly, tack the shorter end into the hole from underneath.
The 3D Braid Challah Bun…
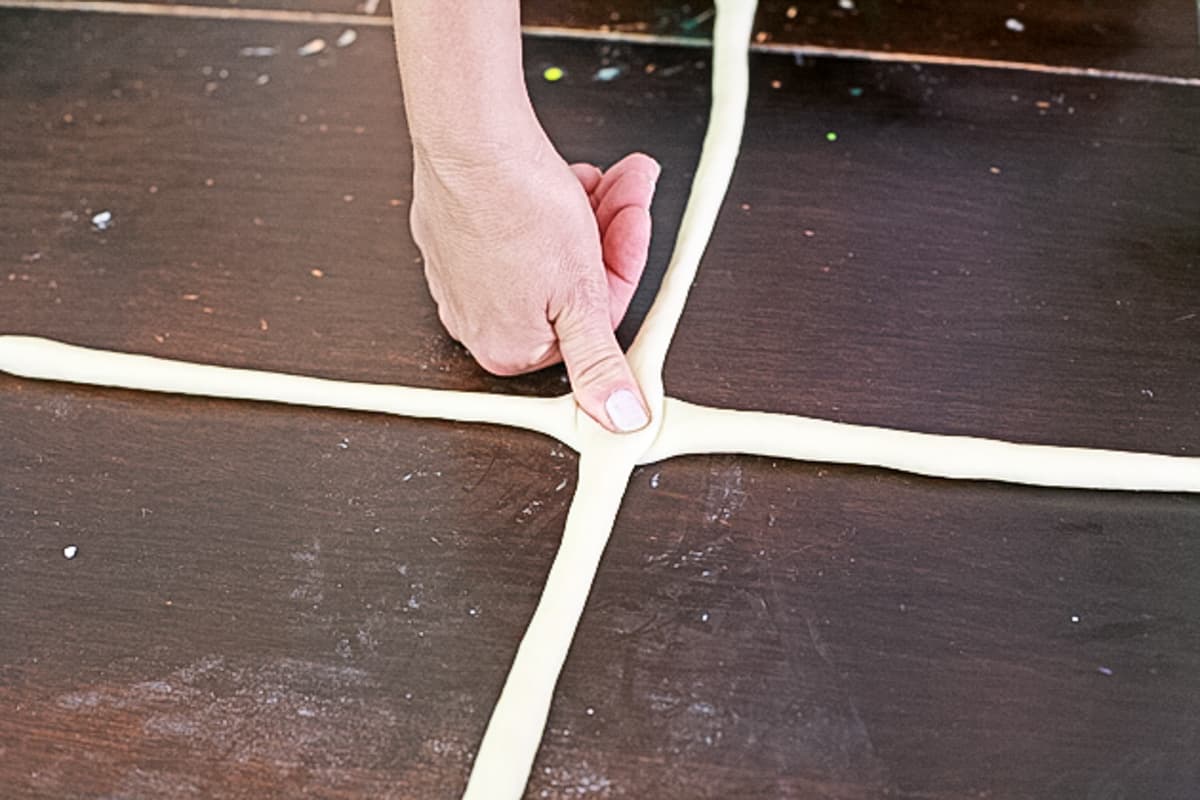
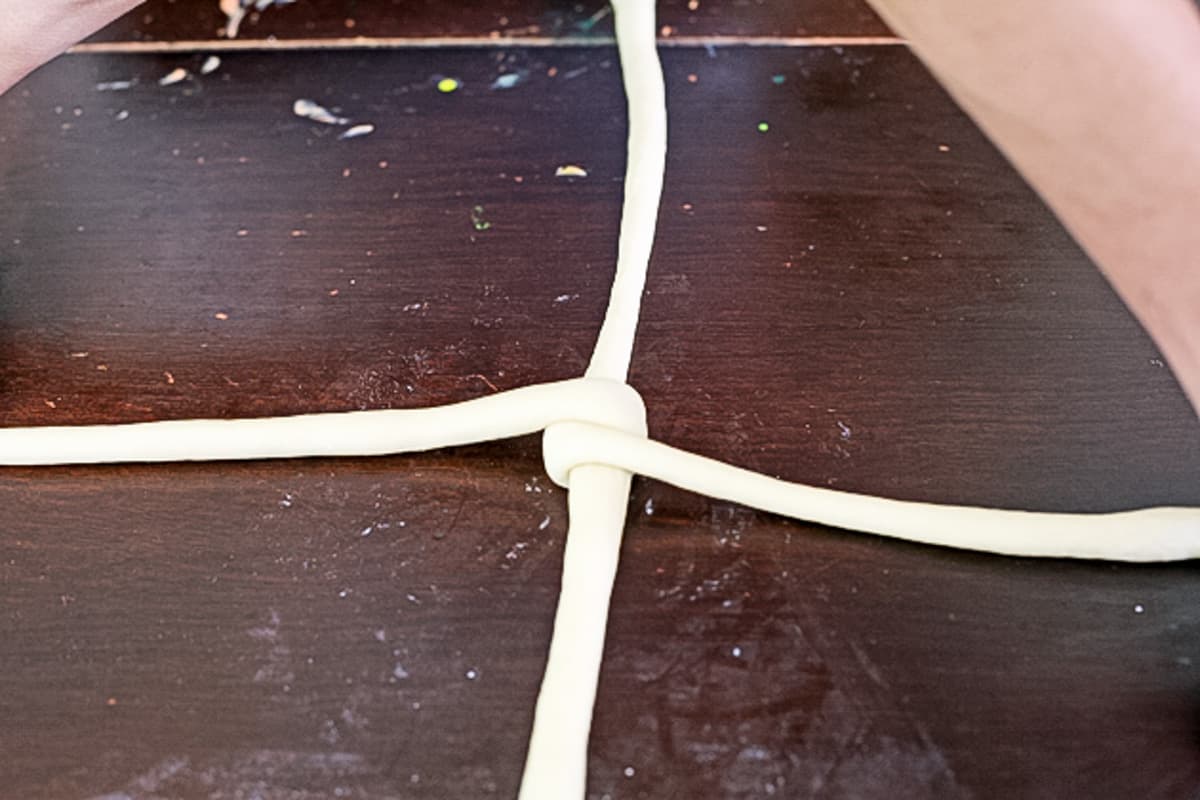
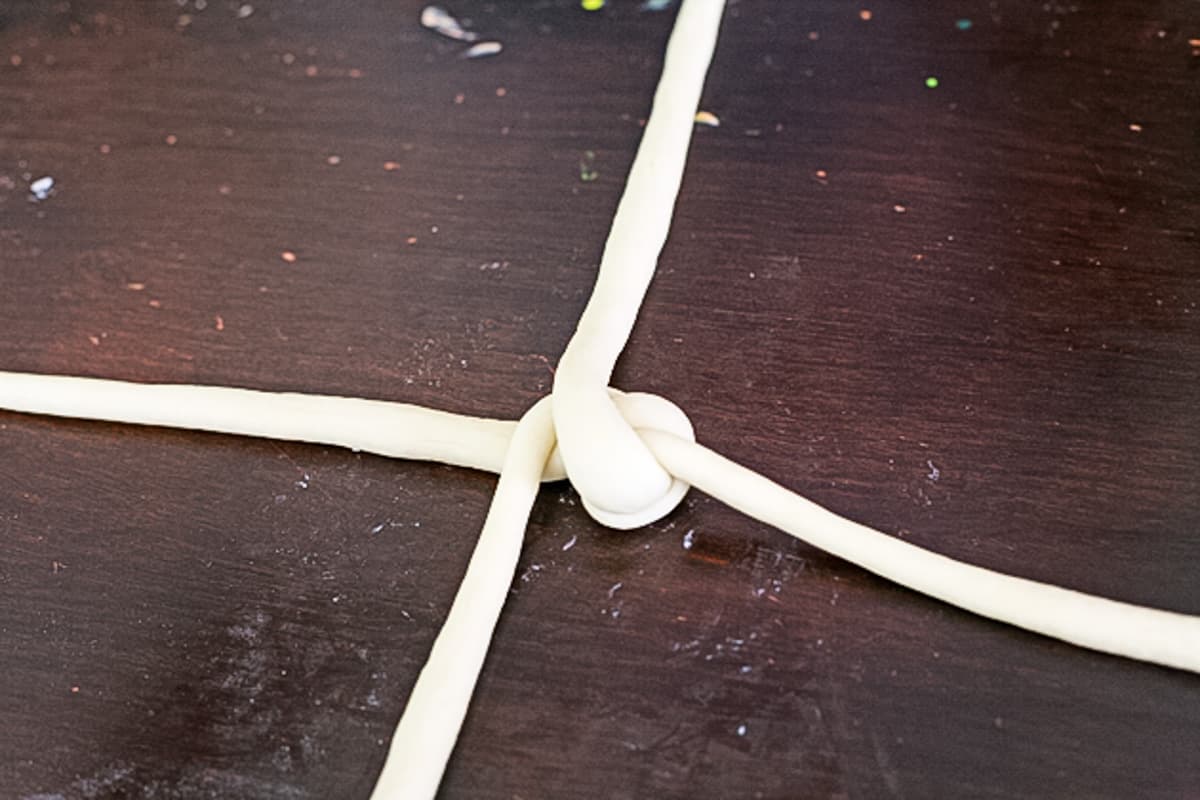

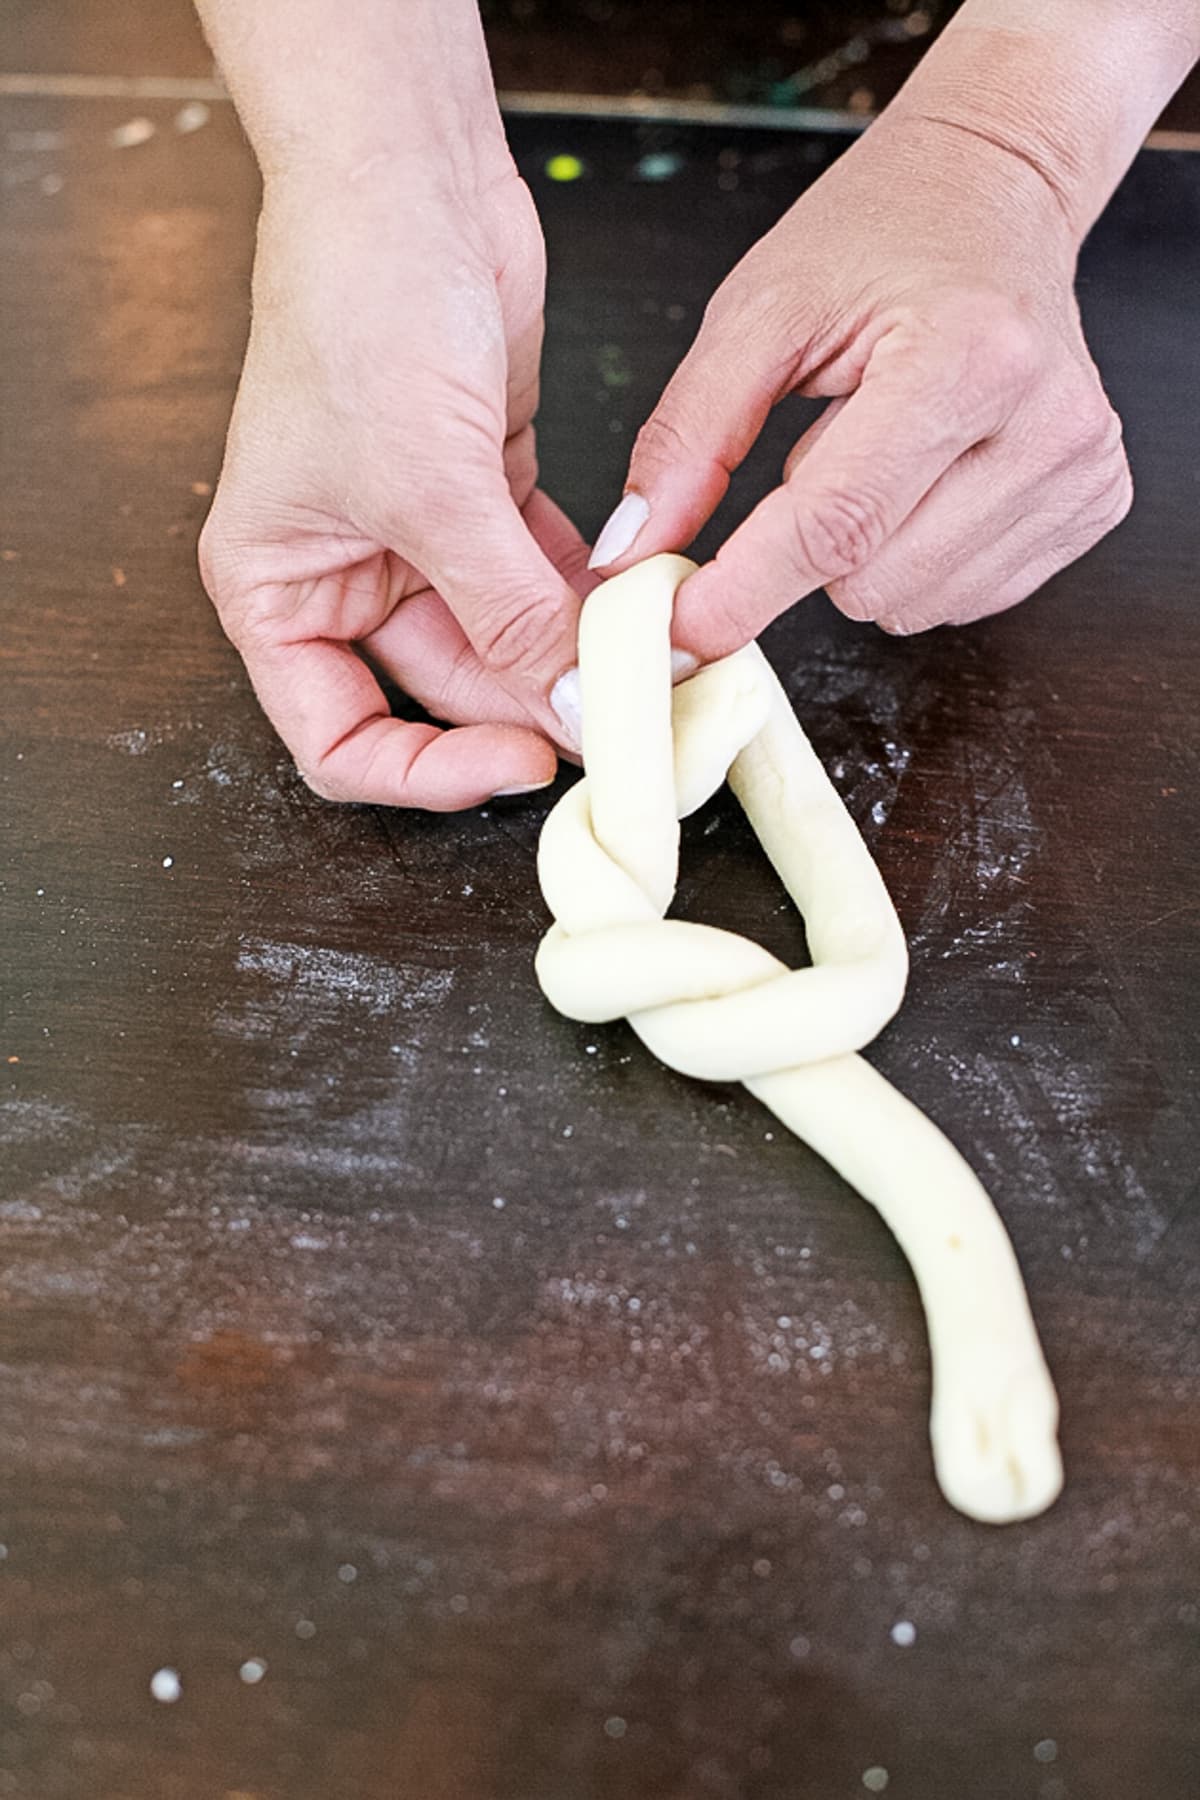
For this one, you will need two long dough strands. Set one horizontally in front of you, then set the second one vertically to cross the horizontal strand. This was just an unclear way to say make a + sign. After you make the + sign, press the center of the + to connect both strands.
Start with the bottom strand (in this case it is the horizontal one). Lift the two ends and change their direction. So now the end that was on the right is on the left, and the one that was on the left is on the right. Do the same thing with the second strand. Then, go back to the first. Keep changing the direction of the strands and moving between the first strand to the second one. Make sure to pinch the ends of the strands together when you get to the end.

Here is what you get. It’s pretty much a 3D braid. Very cool, right? I love this one too!
The Simple Pretzel Challah Bun…
This strand should be fatter and shorter than the other ones. Nothing much to explain here. You simply tie the strand into a pretzel. I know that it doesn’t look like much right now but it bakes really cute!

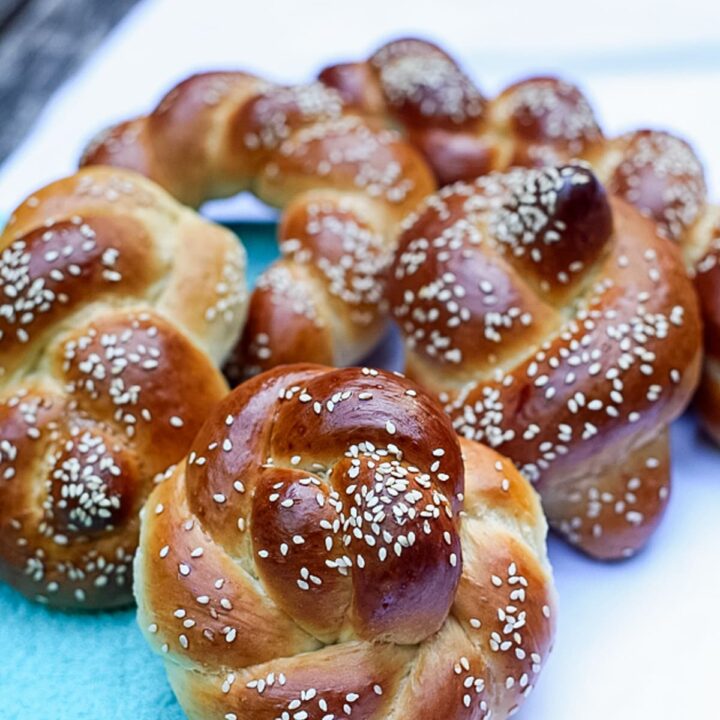
Now, look at that! 5 great ways to tie or braid challah dough into cute buns. Remember that you can make these into loaves as well. I bet your kids will love it, your partner will love it, and your dinner guests won’t stop talking about it!
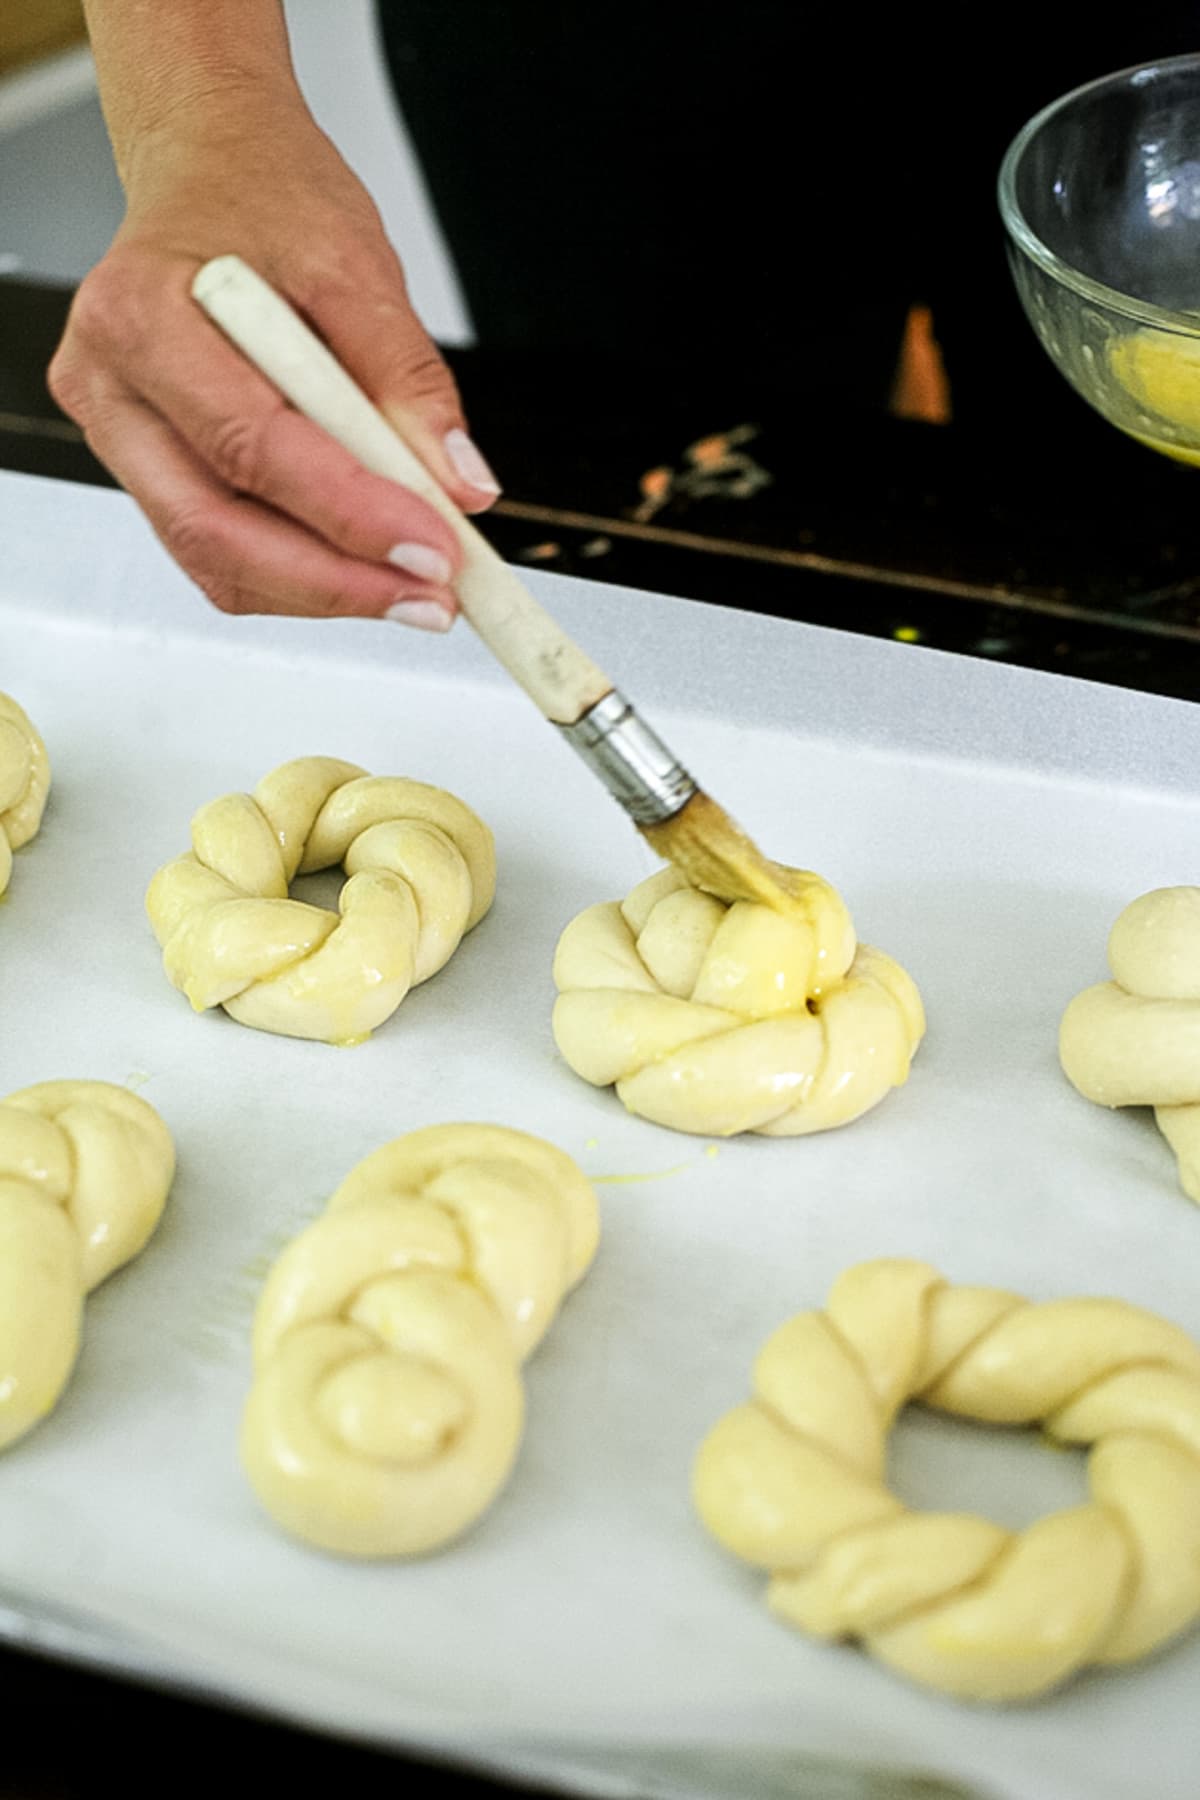
Step five – second rising. After you place all your buns on a baking sheet, beat one egg and brush them with it. Sprinkle some sesame seeds and set the challah buns in a warm place, uncovered, to rise for about 35 minutes.

Step six – bake the buns. While the buns are rising, heat your oven to 375 degrees F. Place the baking sheet with buns in the oven and immediately reduce the temperature to 350 degrees F. Bake until golden, 35 minutes or so for the smaller buns and 45 minutes or so for the larger loaves. Once your bread is done, take it out of the oven and transfer to a cooling rack. It’s so good warm so don’t let it cool too much before you dig in.
How to Serve Challah Buns…
- As hamburger buns – make this delicious homemade venison burger (or any other burger) and serve it in a challah bun. Or make this BBQ pulled meat and serve in a bun.
- As dipping bread – make shakshuka, a delicious Israeli breakfast, and use the bread to dip in the sauce. Or do the same with these Mediterranean stuffed peppers.
- With soup – try this Israeli bean soup or this Mediterranean pumpkin soup. They are both delicious and serve very well with a bun of Challah on the side.
- With jam – I have a lot of simple, low-sugar jam recipes here on the blog. Simply spread some jam on the bread and have it for breakfast or a snack.
- As French toast – Challah bread is the best bread for French toast! If you like French toast, slice the buns or make loaves instead of the buns and make yourself a delicious toast for breakfast, lunch, or dinner.
- With butter – all the above ideas are great, however, nothing ever beats fresh, warm bread with a whole lot of butter on top if you ask me!
Frequently Asked Questions…
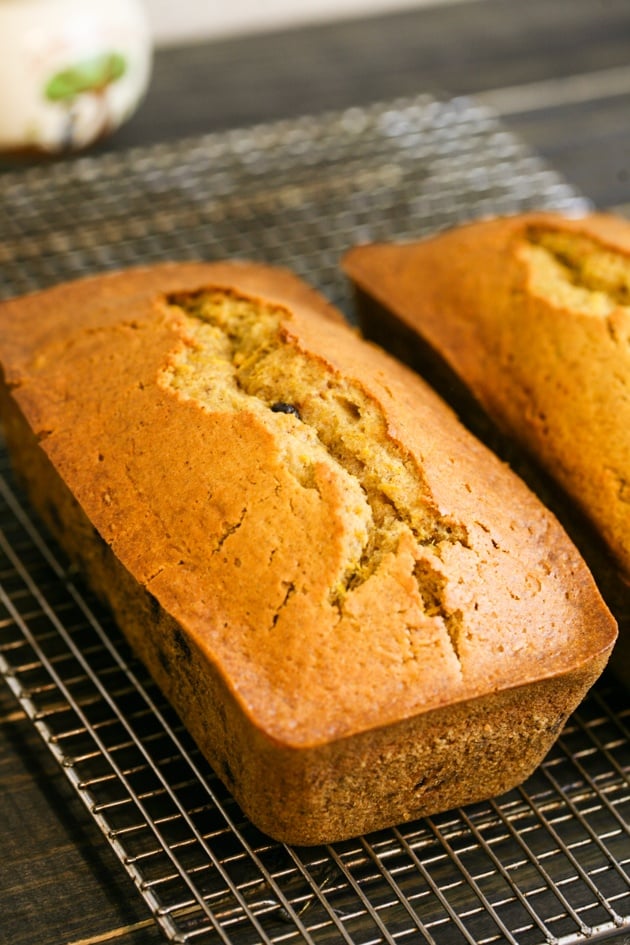
If you want to make larger loaves instead of buns that’s totally fine. You don’t need to change a thing in the recipe. When I make this bread for the farmer’s market I use disposable bread pans. I divide the dough into four equal parts. You can then simply work each part into a loaf, place it in the oiled pan, brush with egg and sprinkle with sesame seeds, let it rise, and bake. Or you can divide each part into three parts, braid the three parts and make a braided loaf. Add it to an oiled pan, brush with egg and sprinkle with sesame seeds, let it rise, and bake.
Yes! This bread freezes easily. Let it cool all the way, then wrap it in plastic food wrap and place it in the freezer. It should be good for months. When you want to serve it, let it thaw on the counter overnight, and before serving heat it in the oven or heat each slice in the toaster.
When we were kids, we used to make this bread with chocolate chips in it. You can also make it with Nutella, you can add nuts or seeds, or pretty much anything else. You can also sprinkle poppy seeds instead of sesame seeds or sunflower seeds or nothing at all. Or dust it with a mixture of cinnamon and sugar.
You should place cooled leftovers in a ziplock bag or another plastic bag or in an air-tight container. If your house is not too warm, it can stay on the counter for a few days. If it’s summer and the air is warm and humid, place it in the fridge.
This bread is a regular at my house. In Israel, it’s a tradition to make Challah bread every Friday for our Shabbat dinner (which is a fancy dinner on Friday night). It’s fun to teach the kids how to tie the dough and it’s fun to let them make their own loaves. Sometimes, even when you make a huge nice dinner, everyone ends up just eating the bread! I hope that you’ll like this recipe.
More Delicious Recipes…
- Chicken Gizzard Recipe
- South West Chicken Chili
- Middle Eastern Chicken and Rice
- Fried Chicken Meatballs
- Simple Livers and Onions
Challah Bun Recipe
Soft and sweet traditional Jewish challah bun recipe.
Ingredients
- 7 cups bread flour (1kg)
- 1 1/4 tablespoons dry yeast (20g)
- 2 large eggs at room temperature
- 1/2 cup canola oil (80g)
- 3 teaspoons salt (20g)
- 3/4 cup sugar (100g)
- Approximately 2 1/2 cups of warm water
Instructions
- Sift your flour into a large bowl (or the bowl of the stand mixer). Then, add the rest of the ingredients: yeast, eggs, canola oil, salt, and sugar.
- Start adding the water. Add a little bit at a time while working the dough with one hand (or while the mixer is working it) until all the ingredients are incorporated into a ball of dough.
If you are using a stand mixer, let the mixer work the dough for about 10 minutes. If you are kneading the dough by hand, transfer it to a floured surface. Hold the part of the dough that is closer to you with one hand and with the other stretch the dough forward, practically tearing it apart. No mercy here. Then, roll the dough back towards you and stretch it forward again. Roll it back in, and forward again. If the dough is too sticky, add a bit of flour, but not too much, so it doesn’t get too dry. After 8-10 minutes, the dough will become smooth and soft to the touch. - Add some flour to the bottom of a large mixing bowl and place the ball of dough in the bowl. Then, with a sharp knife cut an X on the top. This will allow the dough to rise easily. Dust the dough with a bit of flour, cover with a plastic bag and a kitchen towel and set in a warm place to rise for 40 minutes.
- Transfer the dough back onto a work surface dusted with flour and flatten the dough. Now, start dividing it. The easiest thing to do is divide the dough into three or four equal parts and make large loaves. However, you can divide the dough any way you want depending on the size of the loaves or buns you want to make.
If you are going to make simple, small challah buns, divide the dough into two equal parts (make sure to weight the parts of dough so you know that they are equal), then each half to two again, then each part to three. From each of those pieces (should be about 50-80 grams or so) you can make a challah bun.
Roll each piece into a ball, close the ball at its bottom, and place it on a baking sheet lined with parchment paper. Make sure to leave some space between the buns. Cover with a towel and let the buns rise for 30 minutes in a warm place.
**In the post for this recipe, I show you five different cool ways to braid the dough into fancy looking buns. You might want to give it a try! - After you place all your buns on a baking sheet, beat one egg and brush them with it. Sprinkle some sesame seeds and set the challah buns in a warm place, uncovered, to rise for about 35 minutes.
- While the buns are rising, heat your oven to 375 degrees F. Place the baking sheet with buns in the oven and immediately reduce the temperature to 350 degrees F. Bake until golden, 35 minutes or so for the smaller buns and 45 minutes or so for the larger loaves. Once your bread is done, take it out of the oven and transfer to a cooling rack. It’s so good warm so don’t let it cool too much before you dig in.
Notes
Frequently Asked Questions...
- How many loaves can I get from this recipe?
If you want to make larger loaves instead of buns that’s totally fine. You don’t need to change a thing in the recipe. When I make this bread for the farmer’s market I use disposable bread pans. I divide the dough into four equal parts. You can then simply work each part into a loaf, place it in the oiled pan, brush with egg and sprinkle with sesame seeds, let it rise, and bake. Or you can divide each part into three parts, braid the three parts and make a braided loaf. Add it to an oiled pan, brush with egg and sprinkle with sesame seeds, let it rise, and bake. - Can I freeze challah buns?
Yes! This bread freezes easily. Let it cool all the way, then wrap it in plastic food wrap and place it in the freezer. It should be good for months. When you want to serve it, let it thaw on the counter overnight, and before serving heat it in the oven or heat each slice in the toaster. - Can I add other ingredients to the dough?
When we were kids, we used to make this bread with chocolate chips in it. You can also make it with Nutella, you can add nuts or seeds, or pretty much anything else. You can also sprinkle poppy seeds instead of sesame seeds or sunflower seeds or nothing at all. Or dust it with a mixture of cinnamon and sugar. - Where should I store my Challa buns or bread?
You should place cooled leftovers in a ziplock bag or another plastic bag or in an air-tight container. If your house is not too warm, it can stay on the counter for a few days. If it’s summer and the air is warm and humid, place it in the fridge.
Nutrition Information:
Yield: 3 large loaves Serving Size: 1 loaf of breadAmount Per Serving: Calories: 1733Total Fat: 45gSaturated Fat: 5gTrans Fat: 0gUnsaturated Fat: 38gCholesterol: 124mgSodium: 2180mgCarbohydrates: 284gFiber: 9gSugar: 51gProtein: 45g
Can you substitute the canola oil with olive?
Not really. We use olive oil in Italian bread loaves, they don’t have eggs or sugar in them and the strong flavor of the olive oil works best there.
You can try coconut oil if you are looking for something a bit more healthy.
When making them rose for a full load, do you wrap multiple strands or just twist 1 very fat strand?
I guess that you can do it either way, it will jat look a bit different as you bake it. But both ways should work just fine.
Thank you so I had a lot of fun with this much recipe
You are welcome!
I love these resapies ???they also tased really good
Oh good! I’m happy you liked it.
My husband and I taught a challah baking class at our synagogue today. It was a lot of fun, and we taught 1 strand, three, and four. Wish we had known about that little rose, that’s so cute! Next time. You are so lucky to have that wonderful aunt. Nobody in my family makes challah, I picked it up on my own. My husband also picked it up on his own, before we got married.
A challah baking class!? That’s so great! I have to suggest it to our JCC. People would love that.
It’s our weekend bread, if I don’t make it my kids think something is wrong and they don’t realize it’s the weekend, LOL.
My aunt is a baker and works with clay. She is amazing! Every time we go to Israel I make her give me a lesson on something else.
Did you use a similar recipe to the one I posted here?
Thanks for stopping by!
Thank you for sharing your beautiful braiding techniques! Clear and concise instructions are wonderful. You are so fortunate to have your special aunt to share baking with. My grandmother and aunt were bakers, but I didn’t realize how special they were… and now they are gone. Happy Baking!
Thank you, Monica. My aunt is so great. She lives in Israel, though, so I make sure that every time I go to visit I learn at least one new thing from her. Thankfully, there are many great blogs these days to learn from.
Do you not have to bloom the yeast?
You can, but I usually don’t do it.
Okie dokie, Im gonna give this a shot. Thank you for sharing
Love this. I have been making Challah for years. I love your braiding techniques. I have one recipe I have used all these years but I want to give yours a try. Thanks for sharing.
And of course you can do this with your recipe too if you end up liking this one less.
How are you usually braiding your Challah?
My braiding technique is really nothing special. I just take three bread dough ropes and braid as it I am braiding hair, pinching at both ends to secure. I really like your alternative braiding methods.
This is what I did until now too. Never had time to learn the 4 or 6 strands braiding techniques.
Oh my stars Lee/Liron 🙂 I think I was drooling on my keyboard as I leaned to close to the screen. 🙂 Absolutely delicious! I can’t wait to get my things out of storage to get baking!
Thanks so much. I also love your story on your “About” page. Wouldn’t your lives make a wonderful movie!?!? I’d go to see it. I adore your blog and thank you for sharing your adventures.
Thank you Christina for your kind words!
OK, I hope i am not being rude… But you got me curious, why are your things in storage? I love moving stories. Is it to your dream, old farm house on a gravel country road? You totally don’t have to answer that 🙂
Thanks for visiting.
Lady LIron, Oooo I like the way you think! 🙂 I moved back to FL from OH and my things … nearly all my things… are in storage until I can get established. I like the dream of the old farm house on a gravel road. Schweet! 🙂 Oh and a horse to keep my cat company… and chickens… :))))
Yes, definitely a horse! Or four 😉 We used to live in Delray Breach. It was a very good two years. Pretty much like living on a vacation all the time.